
- Prep: 15 Minutes
- Cook: 12 Minutes
- Total: 27 Minutes
- Servings: 36 cookies
A Quick Note Before You Start
Let your eggs and peanut butter come to room temperature before mixing — cold peanut butter makes the dough stiff and hard to scoop. These cookies are naturally flour-free, so they’re also a great gluten-free treat.
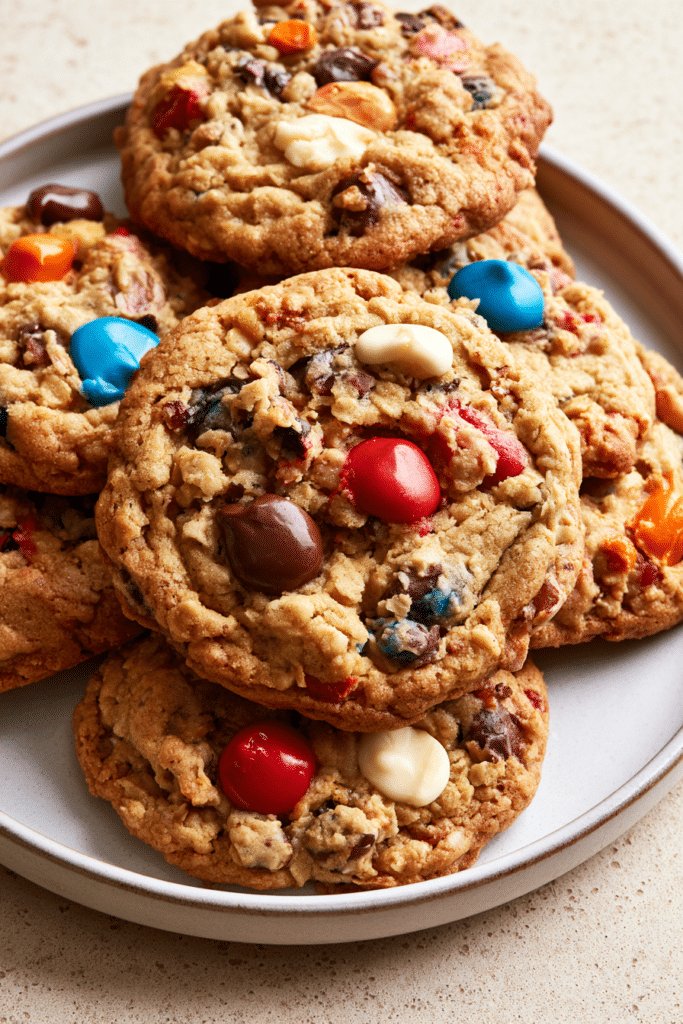
Monster cookies are the cookie that has everything — peanut butter, oats, chocolate chips, and M&Ms all crammed into one thick, chewy, outrageously satisfying bite. No flour, no fuss, just pure cookie chaos.
What makes this recipe special is the ratio: heavy on the peanut butter and oats, light on the sugar. You get cookies that hold their shape, stay chewy for days, and taste like your favorite childhood snack got a serious upgrade.
Ingredients for Monster Cookies
The Cookie Dough
- 3 large eggs — room temperature, binds the flour-free dough together
- 1 cup (2 sticks) unsalted butter, softened — gives richness and helps the cookies spread just enough
- 1 cup granulated sugar — for sweetness and crisp edges
- 1 cup packed light brown sugar — adds moisture and that deep caramel chew
- 1 teaspoon vanilla extract — rounds out all the flavors
- 1½ teaspoons baking soda — the only leavener you need; lifts without making them cakey
- ½ teaspoon salt — balances the sweetness and brings out the peanut butter
- 1½ cups creamy peanut butter — the backbone of these cookies; use a standard brand like Jif or Skippy, not natural (the oil separation causes spreading issues)
- 4½ cups old-fashioned rolled oats — NOT quick oats; rolled oats give the chewy, hearty texture that defines monster cookies
- 1 cup semi-sweet chocolate chips — use a good-quality brand for the best melty pockets
- 1 cup M&M candies — the colorful, crunchy signature of every monster cookie
Optional Add-Ins
- ½ cup chopped peanuts for extra crunch
- ½ cup Reese’s Pieces instead of M&Ms
- ¼ cup mini marshmallows pressed in after baking
- ½ cup white chocolate chips
- 1 teaspoon cinnamon for warmth
How to Make Monster Cookies Step by Step
Step 1: Preheat and Prep Your Pans
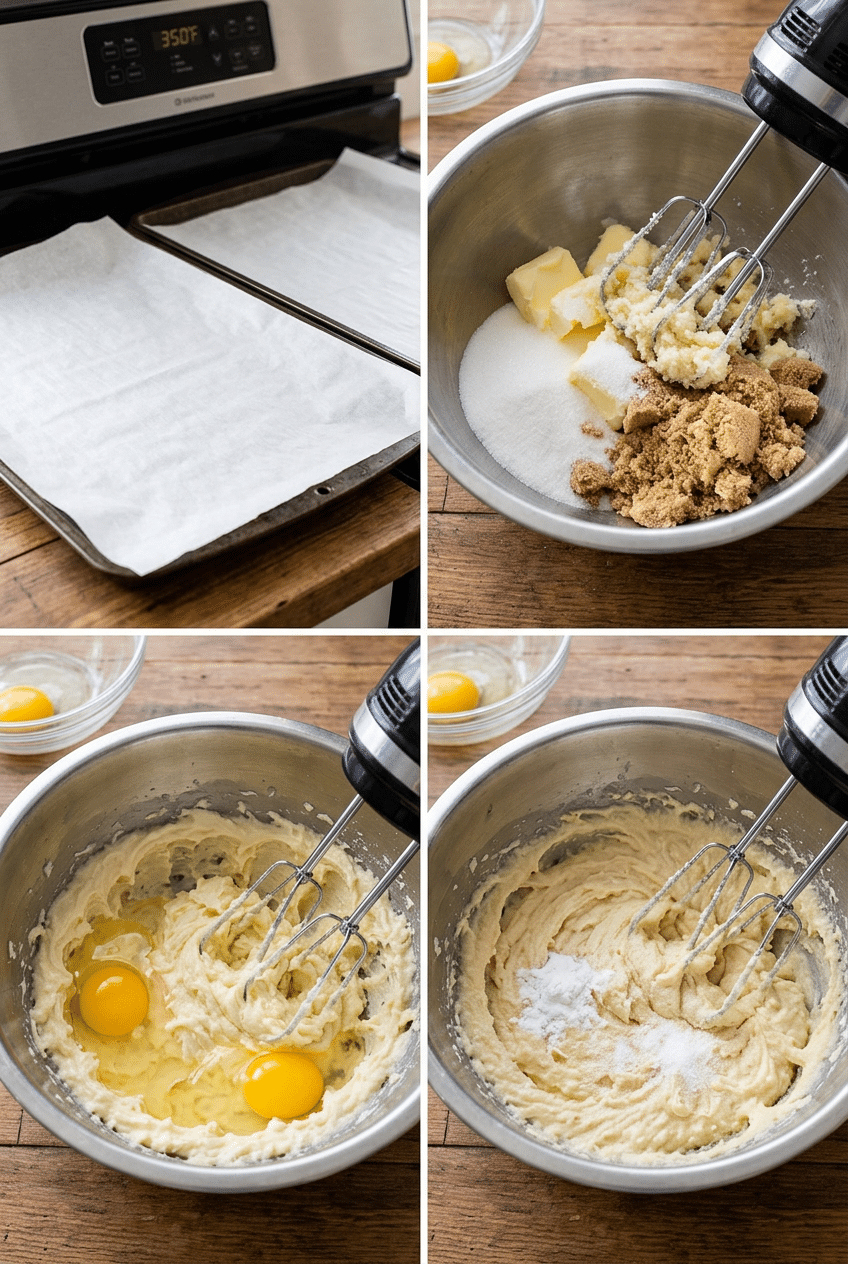
Set your oven to 350°F and line two large baking sheets with parchment paper. Parchment is non-negotiable here — these cookies have no flour and a high sugar content, which means they’ll stick like crazy to an unlined pan and make cleanup a nightmare.
You want two pans ready so you can rotate them through the oven while one batch bakes and the next gets scooped. This keeps the process moving and your cookies consistent.
👉 Reynolds Kitchens Parchment Paper Roll — Parchment paper is the only thing standing between your cookies and a sticky, ruined pan.
Step 2: Cream the Butter and Sugars
In a large bowl, beat the softened butter with the granulated sugar and brown sugar using a hand mixer or stand mixer on medium speed for about 3 full minutes. You want the mixture to turn pale, fluffy, and almost doubled in volume — this aerates the dough and is what gives you a cookie with lift instead of a dense hockey puck.
Don’t rush this step. Three minutes feels long, but the air you’re beating in right now is doing the work that flour normally does in a traditional cookie. Undermixed butter and sugar equals flat, greasy cookies.
Step 3: Add Eggs, Vanilla, and Peanut Butter
Add the eggs one at a time, mixing on medium after each addition until fully incorporated. Then add the vanilla extract and mix for another 30 seconds. Add the peanut butter and beat until completely smooth — the dough should look thick, glossy, and uniform with no streaks of peanut butter visible.
Adding eggs one at a time lets each egg fully emulsify into the fat before the next one goes in. Dumping them all in at once can cause the mixture to break and turn greasy, which affects the final texture of your cookies.
👉 Jif Creamy Peanut Butter (40 oz) — Jif’s consistent texture prevents the oily spread issues you get with natural peanut butter in this recipe.
Step 4: Mix in Baking Soda, Salt, and Oats
Sprinkle in the baking soda and salt, then mix briefly to combine. Switch to a wooden spoon or sturdy spatula and fold in the rolled oats in two additions, stirring until every oat is coated in the peanut butter mixture. The dough will be very thick — that’s exactly right.
Folding the oats in by hand (rather than using the mixer) prevents you from overworking the dough. Old-fashioned rolled oats also hold their shape better than quick oats, giving you that satisfying chewy bite rather than a mushy texture.
👉 Bob’s Red Mill Old Fashioned Rolled Oats — Bob’s Red Mill rolled oats have the perfect thickness for chewy monster cookies — not too thin, not too thick.
Step 5: Fold in Chocolate Chips and M&Ms
Gently fold in the chocolate chips and about three-quarters of the M&Ms, saving the rest to press on top of the scooped dough balls. Folding rather than stirring hard keeps the M&Ms from cracking and bleeding color into the dough, which would turn your cookies an unappetizing gray-brown.
Reserve those extra M&Ms for the top because the ones mixed into the dough tend to sink and hide. Pressing a few on top after scooping gives you those gorgeous colorful cookies that actually look like the photos.
👉 M&M’s Milk Chocolate Candy (42 oz Party Size) — A party-size bag means you have plenty for the dough AND plenty to press on top — plus some to snack on.
Step 6: Scoop, Press, and Bake
Use a large cookie scoop (about 3 tablespoons of dough) to portion the cookies onto your prepared baking sheets, spacing them 2 inches apart. Gently press the dough balls down slightly with your palm — these cookies don’t spread much on their own because there’s no flour to relax in the heat. Press the reserved M&Ms onto the top of each dough ball.
Bake at 350°F for 10 to 12 minutes, until the edges are set and lightly golden but the centers still look slightly underdone. This is the most important thing: pull them when they look underbaked. They firm up completely as they cool on the pan, and the residual heat finishes the job.
👉 OXO Good Grips Large Cookie Scoop (3 Tbsp) — A large cookie scoop gives you perfectly uniform 3-tablespoon dough balls every single time — no guessing.
Step 7: Cool on the Pan
Let the cookies cool on the baking sheet for at least 10 minutes before transferring them to a wire rack. If you try to move them right out of the oven, they’ll fall apart — the structure hasn’t set yet and they’re still fragile. After 10 minutes on the pan, they’ll be perfectly solid and ready to move.
The cooling time on the pan is also what creates those slightly crispy edges with a chewy center. Moving them to a rack too early stops that process. Patience here genuinely pays off in texture.
Nutrition Information
- Per serving (1 large cookie): 210 cal
- 10g fat
- 28g carbs
- 5g protein
Pro Tips
Use room temperature peanut butter: Cold peanut butter straight from the fridge makes the dough seize up and become almost impossible to fold oats into evenly. Pull your peanut butter out at least 30 minutes before baking — it should scoop like thick yogurt, not like clay.
Don’t overbake — ever: The number one monster cookie mistake is pulling them when they look done. At 12 minutes, they should look glossy and slightly wet in the center. They finish cooking on the hot pan during the 10-minute rest. Overbaked monster cookies turn crunchy instead of chewy within hours.
Press M&Ms on top AFTER scooping: Always reserve a handful to press into the tops of the dough balls right before baking. The ones folded into the dough disappear. The ones on top are what make the cookies look like the gorgeous photos that make everyone ask for the recipe.
Chill the dough if it’s too soft: If your kitchen is warm or your butter was a little too soft, the dough can be sticky and hard to scoop. Cover the bowl and refrigerate for 20 minutes. Cold dough scoops cleaner, holds its shape better in the oven, and usually bakes up slightly thicker.
Stick with standard peanut butter: Natural peanut butter (the kind that separates in the jar) has too much free oil, which causes monster cookies to spread thin and greasy. Jif, Skippy, or any no-stir creamy brand gives you the right fat-to-protein ratio for thick, structured cookies.
Delicious Variations
Double Chocolate Monster Cookies
Swap ¼ cup of the rolled oats for ¼ cup of Dutch-process cocoa powder and stir it in with the wet ingredients. This turns the base dough deep chocolate-brown and pairs insanely well with white chocolate chips instead of semi-sweet. Keep the M&Ms for color — the contrast against the dark dough looks stunning and tastes even better.
Peanut Butter Lover’s Version
Replace the M&Ms with Reese’s Pieces and use peanut butter chips instead of chocolate chips. Every element becomes a peanut butter hit. Add a light drizzle of melted peanut butter across the cooled cookies using a fork — it sets up beautifully and makes the peanut butter flavor front and center in every bite.
Holiday Monster Cookies
Swap the standard M&Ms for seasonal varieties — red and green for Christmas, pastels for Easter, orange and black for Halloween. The recipe stays exactly the same; you’re just swapping the candy. This is the easiest way to make a crowd-pleasing holiday cookie without learning a new recipe from scratch.
Monster Cookie Bars
Press the entire batch of dough into a greased 9×13-inch baking pan and bake at 350°F for 20 to 25 minutes until the edges are golden and the center is just set. Cool completely in the pan before cutting into bars. This is perfect for bake sales, potlucks, or any time you don’t want to scoop 36 individual cookies.
Storage Instructions
Refrigerator
Store baked monster cookies in an airtight container at room temperature for up to 5 days — they actually get chewier on day 2 and 3 as the brown sugar continues to hold moisture. If your kitchen runs warm, you can refrigerate them in an airtight container for up to a week. Let them come back to room temperature before eating so the peanut butter flavor fully blooms. Stacking them between layers of parchment paper prevents them from sticking together.
Freezer
Monster cookies freeze exceptionally well for up to 3 months. Freeze baked cookies in a single layer on a baking sheet for 1 hour, then transfer to a zip-top freezer bag or airtight container with parchment between layers. Thaw at room temperature for about 30 minutes. You can also freeze the raw dough balls the same way — freeze solid on a sheet, then bag them. Bake straight from frozen at 350°F, adding 2 to 3 extra minutes to the bake time.
Make-Ahead
The dough can be made up to 48 hours in advance and stored covered in the refrigerator. In fact, chilling the dough overnight improves the cookies — the oats hydrate fully, the flavors deepen, and the cookies bake up thicker and chewier than same-day dough. You can also scoop the dough balls, freeze them solid, and store them in a bag for up to 3 months so you can bake just a few cookies at a time whenever the craving hits.
For food safety guidelines, visit FDA Safe Food Handling Guidelines.
Frequently Asked Questions
Why are my monster cookies flat and spreading too much?
The most common culprit is natural peanut butter. The separated oil in natural peanut butter adds too much free fat to the dough, causing it to spread thin in the oven. Stick with Jif, Skippy, or another no-stir creamy brand. Butter that was too warm (melted rather than softened) can also cause spreading — your butter should be soft enough to leave a fingerprint but not shiny or greasy-looking.
Do monster cookies have flour in them?
Traditional monster cookies are completely flourless — the rolled oats provide structure in place of flour. This is actually what makes them naturally gluten-free (as long as you use certified GF oats like Bob’s Red Mill). The peanut butter and eggs bind everything together. It’s one of the things that makes monster cookies unique compared to standard drop cookies, and it’s why the texture is so hearty and chewy.
Can I use quick oats instead of old-fashioned rolled oats?
You can, but your cookies will be softer and have less texture. Quick oats are pre-cut smaller and absorb liquid faster, which makes the dough wetter and the baked cookie less chewy. Old-fashioned rolled oats hold their shape during baking and give monster cookies that signature hearty bite. If quick oats are all you have, reduce the quantity by about ¼ cup to compensate for the extra liquid absorption.
Can I make monster cookies smaller?
Absolutely. Use a medium cookie scoop (about 1.5 tablespoons) and reduce the bake time to 8 to 10 minutes. You’ll get around 48 to 52 smaller cookies. The same visual cue applies: pull them when the edges are set but the centers still look slightly underdone. Smaller cookies can dry out faster, so watch them closely after the 8-minute mark and start checking for that set-but-shiny-center look.
How do I keep monster cookies chewy after baking?
Store them in an airtight container with a slice of white sandwich bread tucked inside. The cookies draw moisture from the bread and stay soft and chewy for days. Replace the bread slice when it dries out. This trick works for almost any cookie. Also make sure you underbaked them slightly — cookies that come out fully dry from the oven have nowhere to go but harder as they cool.
Can I make monster cookies without eggs?
Yes. Replace each egg with one flax egg (1 tablespoon ground flaxseed mixed with 3 tablespoons water, rested for 5 minutes until gel-like). The cookies will be slightly denser and less chewy but still delicious. A mashed ripe banana also works as an egg substitute and adds a subtle sweetness that pairs nicely with the peanut butter and chocolate. Expect a slightly softer, more cakey texture with banana.
More Recipes You Will Love
👉 Perfect Sheet Pan Sausage & Veggies Recipe
👉 Perfect Chicken Caesar Wraps Recipe
👉 Perfect Teriyaki Chicken Bowls Recipe
Monster cookies are the kind of recipe you make once and then never stop making. They’re fast, they’re forgiving, they’re naturally flourless, and they taste exactly like a cookie that has absolutely zero chill about what it’s stuffed with. Make a batch, press those M&Ms on top, and tell me in the comments if you managed to wait for them to cool. (No judgment if you didn’t.)