
- Prep: 30 Minutes
- Cook: 20 Minutes
- Total: 50 Minutes
- Servings: 24 cupcakes
A Quick Note Before You Start
These spooky cupcakes use a one-bowl chocolate base that’s genuinely foolproof — no mixer required for the batter. The decorating is where the fun happens, so don’t stress about perfection. Slightly wonky monster faces are actually more charming than perfect ones.
Spooky cupcakes are the Halloween dessert everyone wants on the table — rich chocolate cake, swirls of colorful frosting, and monster faces that make kids (and adults) lose their minds. This recipe delivers every single time.
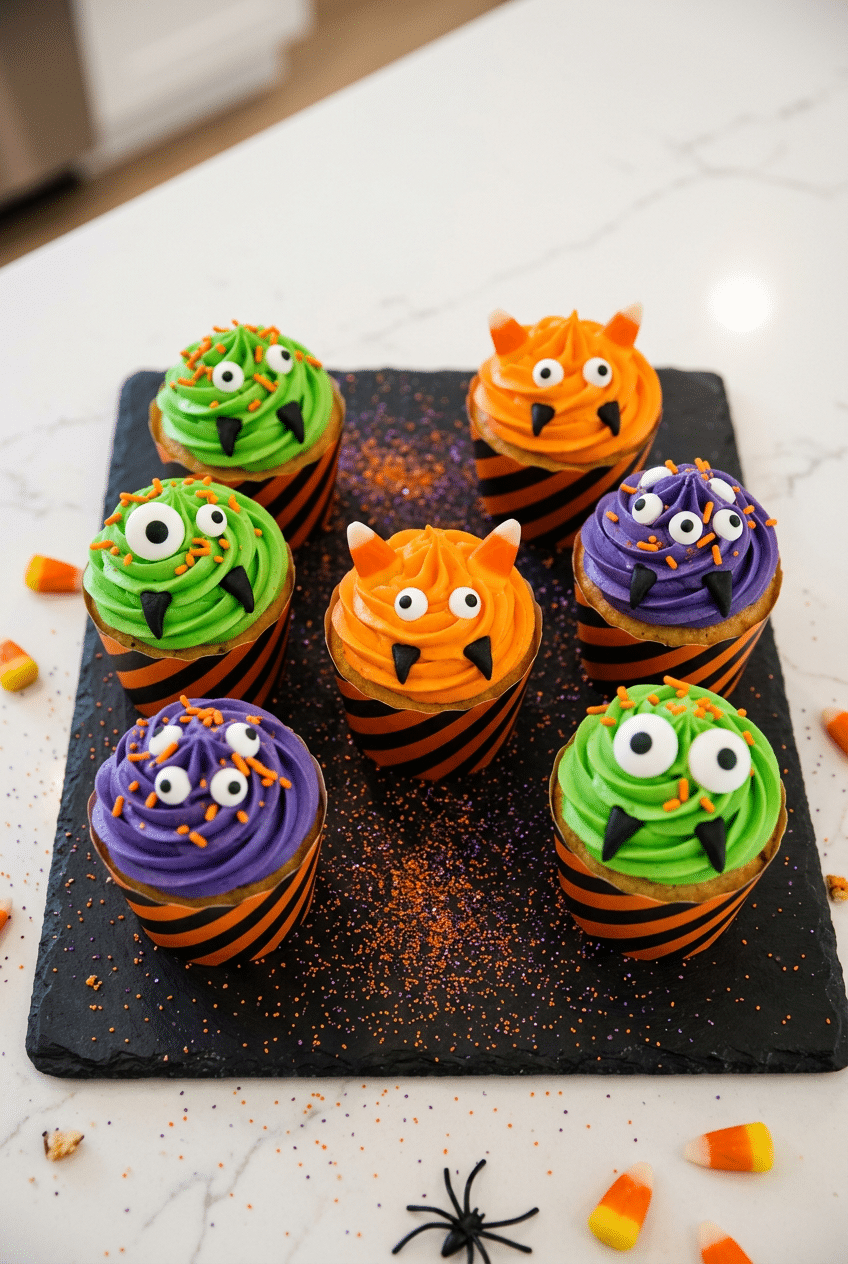
We’re combining a deeply chocolatey one-bowl batter with a sturdy American buttercream that holds its shape beautifully for decorating. Three monster designs included so your batch looks like a whole haunted crew.
Ingredients for Spooky Cupcakes
For the Chocolate Cupcake Batter
- 1¾ cups all-purpose flour — the backbone of the batter; spoon and level it, don’t scoop
- ¾ cup unsweetened cocoa powder — use Dutch-process for the darkest, richest color
- 2 cups granulated sugar — sweetens and keeps the crumb moist
- 2 tsp baking soda — gives the cupcakes their dome rise
- 1 tsp baking powder
- 1 tsp fine sea salt
- 2 large eggs, room temperature — room temp eggs emulsify better, giving you a fluffier crumb
- 1 cup buttermilk, room temperature — the acid reacts with baking soda for extra lift and tang
- 1 cup strong brewed black coffee, hot — deepens the chocolate flavor without tasting like coffee at all
- ½ cup neutral oil (vegetable or avocado) — oil-based batters stay moist for days, unlike butter-based
- 2 tsp pure vanilla extract
For the Halloween Buttercream
- 2 cups (4 sticks) unsalted butter, softened — must be truly soft or your frosting will be lumpy
- 6 cups powdered sugar, sifted — sifting prevents gritty frosting
- 4 tbsp heavy cream — adds silkiness and helps the frosting pipe smoothly
- 2 tsp pure vanilla extract
- ¼ tsp fine sea salt — balances the sweetness
- Gel food coloring in orange, green, and purple — Americolor Soft Gel Paste Food Color gives vivid Halloween colors without thinning your frosting the way liquid dye does
For the Spooky Decorations
- Candy eyeballs (assorted sizes) — the single item that makes cupcakes instantly spooky
- Black fondant or black candy melts — for cutting out fangs, bat wings, and witch hat shapes
- Candy corn — doubles as monster horns or witch hat accents
- Orange and black Halloween sprinkle mix — Wilton Halloween Sprinkle Mix has bats, skulls, and stars all in one jar
- Black gel food coloring pen — for drawing pupils, stitches, and tiny details directly on fondant
Optional Add-Ins
- ½ cup mini chocolate chips folded into batter
- 1 tsp espresso powder added to dry ingredients for extra depth
- Orange zest in the batter for a chocolate-orange Halloween vibe
- Green or purple velvet food coloring in the batter for a surprise inside
How to Make Spooky Cupcakes Step by Step
Step 1: Prep Your Pan and Oven
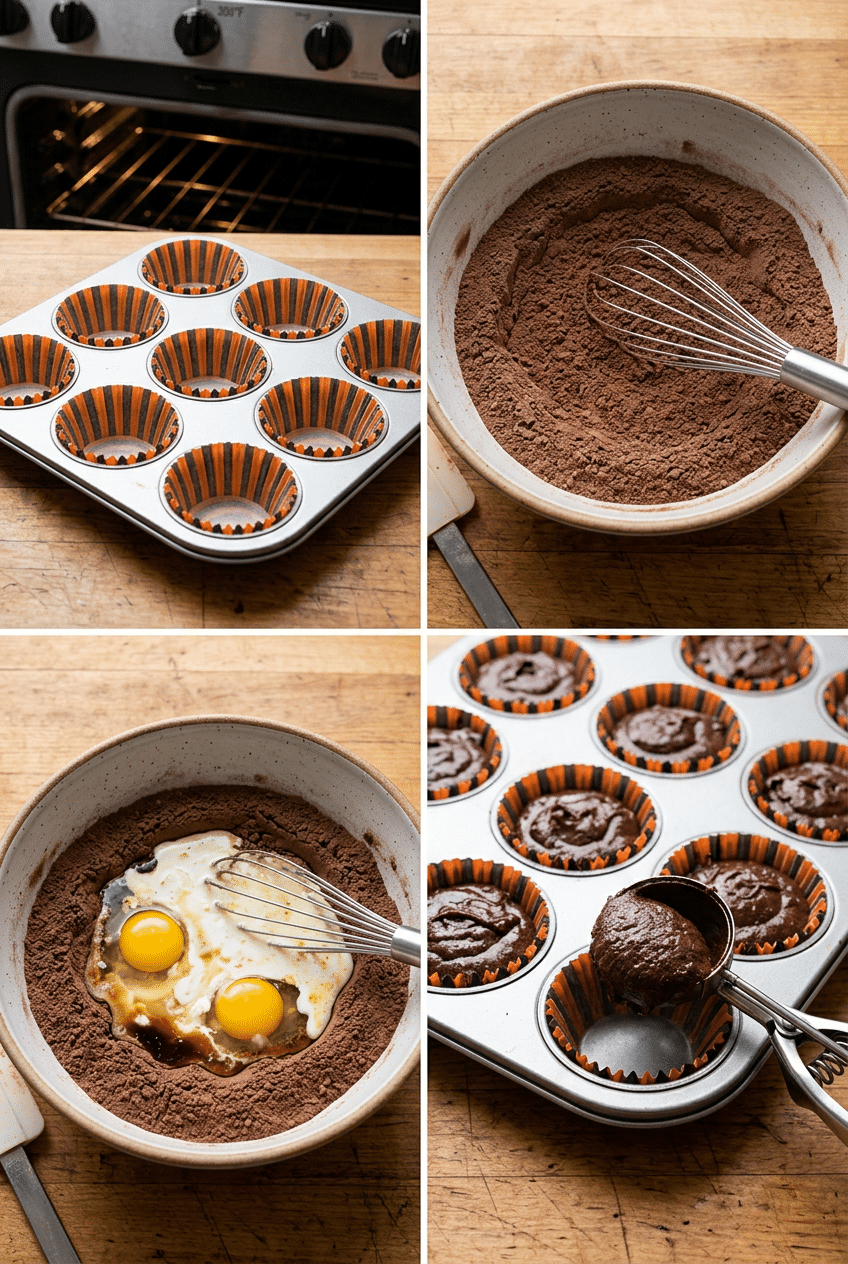
Preheat your oven to 350°F and line two standard 12-cup muffin tins with Halloween cupcake liners — black and orange striped ones are everywhere this time of year and they set the mood before anyone takes a single bite. Resist the urge to spray the liners; a well-mixed batter won’t stick, and the spray can make the paper peel away from the cake.
Getting your oven fully preheated before the batter goes in is non-negotiable. An underheated oven causes the batter to spread sideways instead of rising up, and you’ll lose that beautiful domed top that makes a good cupcake look great.
👉 Halloween Cupcake Liners — Black and Orange Striped — These set the Halloween vibe before you even frost a single cupcake.
Step 2: Mix the Dry Ingredients
In a large mixing bowl, whisk together the flour, cocoa powder, sugar, baking soda, baking powder, and salt until completely combined and uniform in color. You want no streaks of lighter flour hiding at the bottom — those dry pockets will create dense spots in your finished cupcakes.
Whisking the dry ingredients first means your leaveners are evenly distributed throughout, so every cupcake in the batch rises at the same rate. This is the lazy baker’s secret to a consistent, professional-looking batch.
Step 3: Add the Wet Ingredients
Make a well in the center of your dry ingredients and add the eggs, buttermilk, oil, and vanilla all at once. Stir with a wooden spoon or spatula just until combined — about 30 strokes — then carefully pour in the hot coffee and stir again until the batter is smooth and quite thin. Don’t panic; a thin batter is exactly right here.
The hot coffee does two things: it blooms the cocoa powder (releasing more chocolate flavor) and it thins the batter enough to fill the liners evenly. You’ll notice the batter smells intensely chocolatey right after you add it — that’s the bloom working.
Step 4: Fill and Bake the Cupcakes
Using a standard ice cream scoop or a ¼-cup measuring cup, fill each liner about two-thirds full. An ice cream scoop is genuinely the best tool for this — it keeps every cupcake the same size so they bake in the same amount of time. Uneven filling is the number one reason half a batch comes out overdone while the others are perfect.
Slide both pans into the oven and bake for 18 to 22 minutes, rotating the pans at the halfway point. A toothpick inserted in the center should come out with just a crumb or two — not wet batter, but not bone dry either. Pull them at the first sign of a clean toothpick.
Step 5: Cool Completely Before Frosting
Transfer the cupcakes to a wire cooling rack immediately after they come out of the oven — leaving them in the hot pan continues cooking them and can make the bottoms rubbery. Let them cool for at least 45 minutes to an hour before you even think about frosting. Frosting a warm cupcake is a recipe for a melted, sliding mess.
This is your free hour. While the cupcakes cool, you can prep all your decorations — cut out fondant shapes, sort your candy eyeballs by size, and organize your sprinkles. Coming to the decorating station ready to go makes the whole process faster and way more fun.
Step 6: Make the Halloween Buttercream
Beat the softened butter in a stand mixer or with a hand mixer on medium-high speed for a full 3 minutes until it’s pale and fluffy — this step is what separates light, airy buttercream from the dense, greasy kind. Add the sifted powdered sugar one cup at a time, mixing on low after each addition so you don’t create a sugar cloud. Then add the heavy cream, vanilla, and salt, and beat on high for another 2 minutes.
Divide the frosting into three bowls — one for each color. Add gel food coloring a tiny bit at a time, stirring between additions. You can always add more color, but you can’t take it back. Orange, lime green, and deep purple are the classic Halloween trio that look incredible together on a platter.
👉 Americolor Soft Gel Paste Food Color — Halloween Set — Gel paste gives you vivid orange, green, and purple without thinning your buttercream at all.
Step 7: Pipe and Decorate Your Monsters
Fit a piping bag with a large open star tip (Wilton 1M is the gold standard here) and fill it with one color of frosting. Pipe a generous swirl starting from the outside edge and working inward and up — hold the bag completely vertical and let the tip do the work. For a messier, more ‘monster hair’ effect, use a grass tip and pipe short upward pulls all over the top of the cupcake.
Now the fun part: press candy eyeballs into the frosting while it’s still soft — they’ll set in place as the buttercream crusts. Add fondant fangs by pinching small pieces of black fondant into triangle shapes and pressing them into the base of the frosting swirl. Use the black food coloring pen to draw pupils, stitches, or tiny lightning bolt scars on your monsters. No two need to look the same — that’s what makes the platter magical.
👉 Wilton Halloween Sprinkle Mix — One jar has bats, skulls, stars, and orange sanding sugar — everything you need for the whole batch.
Nutrition Information
- Per serving (1 decorated cupcake): 385 cal
- 19g fat
- 52g carbs
- 3g protein
Pro Tips
Use room temperature ingredients: Cold eggs and cold buttermilk don’t emulsify properly into the batter, creating a denser, less fluffy cupcake. Pull your eggs and buttermilk out of the fridge an hour before you start — this single habit makes a visible difference in how high and how tender your cupcakes turn out.
Don’t overfill the liners: Two-thirds full is the exact right amount. If you go above that, the batter spills over the top as it rises and you get a flat, mushroom-edged cupcake instead of a clean dome. A standard ice cream scoop is almost perfectly sized for this — two scoops per liner gets you right to the two-thirds mark every time.
Make the frosting stiff for decorating: If your buttercream is too soft to hold its piped shape, add powdered sugar a tablespoon at a time. If it’s too stiff and cracking as you pipe, add heavy cream a teaspoon at a time. The ideal decorating consistency holds a stiff peak but smooths slightly when you drag a spatula across it — similar to peanut butter.
Chill decorated cupcakes to set the decorations: After you press in candy eyeballs and fondant pieces, slide the decorated cupcakes into the fridge for 15 minutes. The buttercream will firm up and lock everything in place so nothing slides or falls off when you transport them to the party.
Batch your colors smartly: Frost all cupcakes of one color before cleaning the bag and switching — it’s faster and wastes less frosting. Do all orange monsters first, then green, then purple. You end up with a gorgeous varied platter without the chaos of switching colors mid-cupcake.
Delicious Variations
Vanilla Bean Spooky Cupcakes
Swap the chocolate batter for a classic vanilla base by replacing the cocoa with an extra ¼ cup flour and adding a full tablespoon of pure vanilla extract. The lighter cake makes neon Halloween frosting colors pop even more vibrantly, and you can tint the batter itself purple or orange for a colorful surprise when guests bite in.
Pumpkin Spice Halloween Cupcakes
Replace ½ cup of the oil with canned pumpkin puree and add 2 teaspoons of pumpkin pie spice to the dry ingredients. Frost with a cinnamon cream cheese buttercream instead of the standard American buttercream — it pipes beautifully and the tangy cream cheese flavor plays perfectly against the warm spiced cake. Decorate with candy corn jack-o-lantern faces.
Black Velvet Witch Cupcakes
Add 2 tablespoons of black gel food coloring to the chocolate batter for a dramatically dark, almost-black crumb that surprises everyone when they take a bite. Top with bright purple or neon green buttercream and a tiny fondant witch hat on each one. The contrast between the black cake and bright frosting is visually stunning on a Halloween table.
Graveyard Cupcakes
Frost cupcakes with plain chocolate buttercream, then crush Oreo cookies into crumbs and sprinkle them over the top to look like dirt. Press a Milano cookie (or a white chocolate-dipped rectangular cookie) into the frosting at a slight angle as a tombstone, and write ‘RIP’ on it with the black edible food pen. Add a candy worm peeking out of the ‘dirt’ for extra spook factor.
Storage Instructions
Refrigerator
Store decorated spooky cupcakes in an airtight container in the refrigerator for up to 4 days. The buttercream will firm up considerably when cold, so pull them out about 30 minutes before serving so the frosting softens back to its ideal creamy texture. Keep them in a single layer if possible — stacking decorated cupcakes risks smashing the candy eyeballs and fondant decorations.
Freezer
Unfrosted cupcakes freeze beautifully for up to 3 months. Wrap each cooled cupcake individually in plastic wrap, then place them in a zip-top freezer bag. Thaw overnight in the refrigerator or at room temperature for about 2 hours before frosting and decorating. Do not freeze already-decorated cupcakes — the fondant and candy decorations absorb moisture during thawing and can become sticky or bleed color into the frosting.
Make-Ahead
This recipe is a dream for make-ahead Halloween prep. Bake the cupcakes up to 2 days ahead and store unfrosted in an airtight container at room temperature. Make the buttercream up to 3 days ahead — store it covered in the fridge and re-whip with a hand mixer for 1 minute before using. You can also cut out fondant shapes (fangs, bats, hats) days in advance and store them in a dry container — they firm up as they dry and are actually easier to work with after 24 hours.
For food safety guidelines, visit FDA Food Safety Guidelines.
Frequently Asked Questions
Can I make spooky cupcakes without a piping bag?
Absolutely. A zip-top bag with the corner snipped off works just as well as a disposable piping bag — the hole gives you control over the size of your swirl. For a totally no-fuss approach, spread frosting with the back of a spoon and use the spoon to pull up little peaks all over the surface, which looks wonderfully jagged and monster-like. Then press your candy eyeballs and decorations right into the textured frosting.
Why did my cupcakes sink in the middle?
Sunken centers almost always come from one of three things: opening the oven door too early (before 15 minutes), underbaking slightly, or overfilling the liners so the center can’t support its own weight. For this recipe, wait until at least the 18-minute mark before checking. The cupcakes are done when the top springs back lightly when you press it with a fingertip and the toothpick comes out with just a crumb or two.
What gel food coloring brand works best for Halloween cupcakes?
Americolor Soft Gel Paste is widely considered the best by professional bakers for vivid, true-to-color results. Their Electric Orange, Lime Green, and Violet are the exact shades you want for Halloween. Avoid liquid food coloring from the grocery store — it takes so much volume to get a bright color that it thins your buttercream and changes the texture. A tiny amount of gel paste gives you deeply saturated color without affecting the frosting at all.
How far in advance can I decorate spooky cupcakes?
You can fully decorate them up to 24 hours in advance and store them in the fridge. After that, the candy eyeballs can start to absorb moisture from the buttercream and become soft or bleed slightly. For the freshest look, bake and frost up to 2 days ahead, then add candy decorations the day of your party — it takes just a few minutes and ensures everything looks crisp and fresh on the platter.
Can I use store-bought frosting for these spooky cupcakes?
You can, but there’s a catch: store-bought frosting is generally too soft to hold a piped swirl at room temperature, and it doesn’t take gel coloring as well as homemade buttercream. If you’re short on time, buy two cans of Betty Crocker or Duncan Hines white frosting, add gel food coloring, and mix in 2 to 3 tablespoons of powdered sugar per can to stiffen it up enough to pipe. It won’t be as vivid or as sturdy, but it works in a pinch.
Can kids help make these Halloween cupcakes?
Decorating spooky cupcakes is one of the best kid-friendly kitchen activities there is. Kids as young as 3 can press candy eyeballs into frosted cupcakes — they love it. Older kids (6 and up) can handle piping with a gentle squeeze on the bag, and kids 8 and up can tackle simple fondant shaping with your guidance. Save the oven parts for adults and let the kids own the decorating table entirely — you’ll end up with the most charming, character-filled batch of cupcakes imaginable.
More Recipes You Will Love
👉 Perfect Greek Chicken & Rice Recipe
👉 Perfect Sheet Pan Sausage & Veggies Recipe
👉 Perfect Chicken Burrito Bowls Recipe
These spooky cupcakes are genuinely one of the most fun things you can make in October — rich chocolate cake, vivid Halloween frosting, and monster faces that make everyone at the party smile. Make them for a school party, a Halloween potluck, or just a Tuesday night with the kids. Try them this week and drop a comment below — I want to see your monsters! Tag us on Instagram with your spookiest creation.