
- Prep: 10 Minutes
- Cook: 10 Minutes
- Total: 20 Minutes
- Servings: 8 servings
A Quick Note Before You Start
This candy corn popcorn comes together in under 20 minutes but tastes like you spent all day on it. The key is using room-temperature candy corn — cold candy doesn’t melt evenly into the white chocolate coating and will crack instead of blend.
Candy corn popcorn is the Halloween snack that disappears faster than any bowl of trick-or-treat candy. Sweet, salty, crunchy, and loaded with that classic orange-yellow-white color, it’s impossible to stop eating.
This recipe layers white chocolate-coated popcorn with real candy corn and a drizzle of colored melting wafers for that showstopping Halloween look. We’ll show you exactly how to get every kernel coated without a sticky mess.
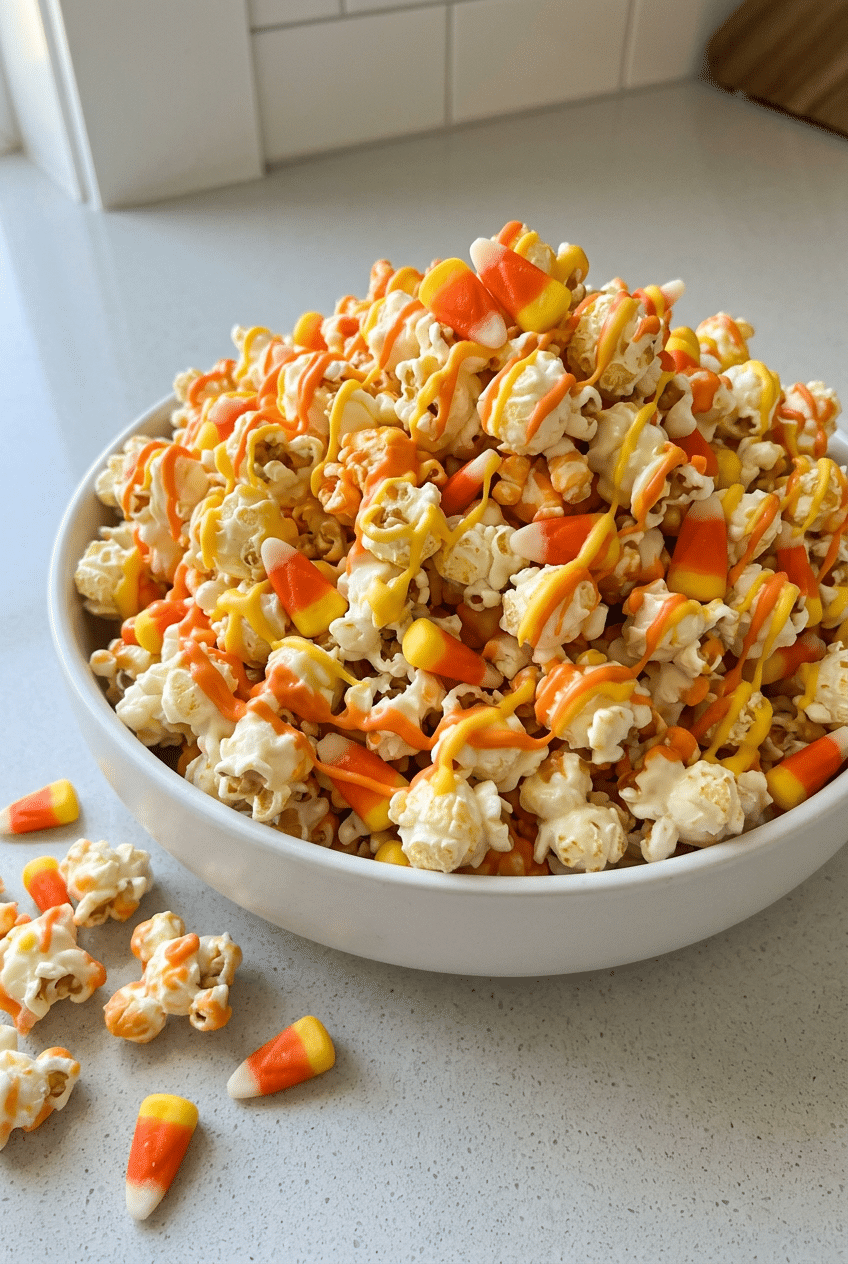
Ingredients for Candy Corn Popcorn
For the Popcorn Base
- 10 cups popped popcorn — about 1/2 cup unpopped kernels or 2 standard microwave bags (plain or lightly salted)
- 1/2 teaspoon fine sea salt — balances the sweetness and makes every bite pop
For the White Chocolate Coating
- 12 oz white chocolate melting wafers — Ghirardelli White Melting Wafers melt the smoothest and coat without seizing; avoid regular white chocolate chips here
- 2 tablespoons coconut oil — thins the chocolate just enough to coat every kernel evenly without clumping
For the Halloween Mix-In
- 1 1/2 cups candy corn — Brach’s Candy Corn is the classic pick; add after the chocolate coats the popcorn so they don’t melt
- 4 oz orange candy melting wafers — Wilton Orange Candy Melts give you that bright Halloween drizzle color
- 4 oz yellow candy melting wafers — Wilton Yellow Candy Melts for the full candy corn color trio
Optional Add-Ins
- 1/2 cup white chocolate chips (extra crunch clusters)
- 1/4 cup Halloween sprinkles or nonpareils
- 1/2 cup salted peanuts (sweet-salty balance)
- 1/4 teaspoon pumpkin pie spice (warm fall flavor)
- 1/2 cup pretzel pieces (extra crunch and salt)
How to Make Candy Corn Popcorn Step by Step
Step 1: Pop and Prep Your Popcorn
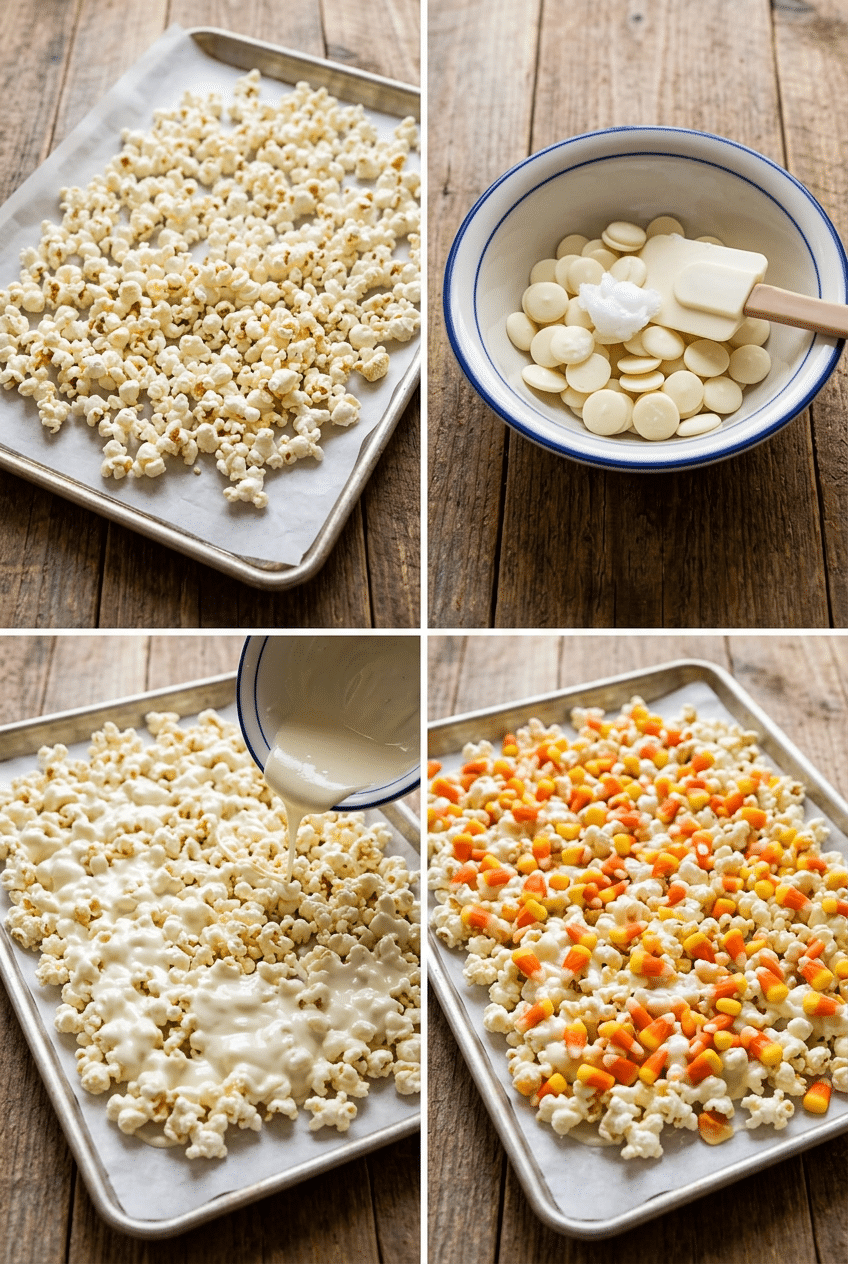
Pop your popcorn and spread it across a large rimmed baking sheet lined with parchment paper. Pick out any unpopped kernels — nobody wants to crack a tooth in the middle of a Halloween snack. Let the popcorn cool completely for at least 5 minutes before adding any chocolate, because warm popcorn creates steam that makes chocolate seize up.
If you’re using microwave popcorn, go for plain or lightly salted — the butter-flavored varieties leave an oily residue that prevents chocolate from sticking properly. Stovetop-popped or air-popped kernels actually give you the crispest base and the best chocolate adhesion, so use those if you have the option.
👉 Parchment Paper Baking Sheets (Pre-Cut, 100 Pack) — Pre-cut sheets fit standard baking pans perfectly — chocolate slides right off with zero scrubbing.
Step 2: Melt the White Chocolate Coating
Combine the white chocolate melting wafers and coconut oil in a microwave-safe bowl. Microwave in 30-second intervals, stirring between each one, until the mixture is completely smooth — usually 3 rounds total. Stir vigorously after each interval even if it looks like nothing melted yet, because the residual heat does most of the work and you risk burning the chocolate if you keep nuking it.
The coconut oil is doing real work here. It drops the viscosity of the chocolate so it flows off a spoon in a thin ribbon instead of clumping in thick globs. That thin consistency means every kernel gets a light, even coat rather than heavy sticky chunks that glue all your popcorn into one immovable brick.
👉 Ghirardelli White Melting Wafers (10 oz) — Melts smoother than white chips and won’t seize — the difference shows in every kernel.
Step 3: Coat the Popcorn
Pour the melted white chocolate evenly over the popcorn on your baking sheet. Use a silicone spatula to fold and toss the popcorn gently, working from the outside edges toward the center, until every piece is coated. Work quickly because the chocolate starts setting within 3-4 minutes at room temperature — you don’t have time to answer a text mid-toss.
Don’t pour all the chocolate in one spot and then try to mix it from there — you’ll end up with a chocolate swamp in the middle and dry popcorn around the edges. Drizzle it in a Z-pattern across the whole sheet first, then fold. Spread the coated popcorn back into an even single layer so it sets flat instead of in clumps.
Step 4: Add the Candy Corn and Let It Set
While the white chocolate is still wet and tacky, scatter the candy corn evenly across the popcorn. Press each piece down lightly with your fingertip so it sticks into the coating — this is what keeps your candy corn from rolling off and collecting at the bottom of the bowl. Then let the whole sheet sit undisturbed at room temperature for 10 minutes, or slide it into the fridge for 5 minutes if you’re impatient.
Do NOT add the candy corn before coating the popcorn — the hot chocolate will melt the candy corn into streaky puddles of orange and yellow dye that stains everything and loses the textural contrast. The candy corn should stay whole and distinct so you get that classic Halloween mix look.
👉 Brach’s Classic Candy Corn (40 oz Bag) — The original candy corn — better color and softer texture than store-brand versions.
Step 5: Drizzle with Orange and Yellow Candy Melts
Melt the orange Wilton Candy Melts and yellow Wilton Candy Melts separately in small microwave-safe bowls using the same 30-second interval method. Transfer each color into a separate zip-lock bag, snip a tiny corner off each bag, and drizzle both colors in thin lines across the set popcorn. Use a zigzag motion across the whole sheet so the color distributes evenly instead of pooling in one corner.
This drizzle step is purely for looks, but it’s the step that takes this from ‘bag of popcorn’ to ‘how did you make this.’ The orange and yellow mimic the classic candy corn color palette across the whole batch. Let the drizzle set completely — another 5 to 8 minutes at room temperature or 3 minutes in the fridge — before breaking it apart.
👉 Wilton Candy Melts Variety Pack (Orange, Yellow, White) — Gives you all three candy corn colors in one pack for the perfect Halloween drizzle.
Step 6: Break Apart and Serve
Once the chocolate is fully set and no longer tacky to the touch, use your hands to break the popcorn into clusters or individual pieces. Transfer to a large serving bowl or divide into treat bags. The popcorn will hold together in light clusters which is actually the ideal texture — part snack mix, part candy bark.
Taste one piece and adjust the salt level now if needed. A light extra pinch of flaky sea salt over the finished bowl right before serving cuts through all that sweetness and makes everything taste more complex. It’s a five-second step that makes a genuinely noticeable difference.
👉 Halloween Treat Bags with Twist Ties (100 Pack) — Package this as party favors or trick-or-treat gifts — these seal flat so the popcorn stays fresh.
Nutrition Information
- Per serving (approx. 1.25 cups): 285 cal
- 11g fat
- 46g carbs
- 2g protein
- 1g fiber
- 32g sugar
Pro Tips
Use Stovetop or Air-Popped Kernels: Microwave popcorn has a thin film of oil and salt that can prevent chocolate from bonding cleanly to the kernel. Stovetop or air-popped kernels give you a completely dry surface that white chocolate grips immediately — you’ll notice fewer bare spots and better overall coverage across your whole batch.
Room Temperature Candy Corn Only: Cold candy corn straight from a cool pantry is more brittle and more likely to fracture or leave sharp edges when pressed into the chocolate. Let your candy corn sit on the counter for 20-30 minutes before using so the coating is slightly pliable and the candy adheres without cracking.
Work in Batches for Large Parties: White chocolate sets quickly — if you’re making a double or triple batch, coat and candy-corn one tray at a time. By the time you finish tray two, tray one is set and ready for the drizzle. Trying to work all the trays at once means your chocolate sets before the candy corn goes on.
The Zip-Lock Bag Drizzle Trick: Piping bags are great, but a zip-lock bag with a 1-2mm corner snipped off gives you just as much control and costs nothing. The key is making the snip tiny — you can always cut a little more if you need a thicker drizzle, but you can’t un-snip a hole that’s too big.
Add Flaky Salt Last: Flaky sea salt like Maldon goes on right before serving, not during assembly. If you add it while the chocolate is wet, it dissolves into the coating and loses that visible sparkle and burst of salinity that makes sweet-salty popcorn so addictive.
Delicious Variations
Peanut Butter Candy Corn Popcorn
Replace the white chocolate melting wafers with peanut butter melting wafers or mix 3 tablespoons of creamy peanut butter into your white chocolate before coating. The nutty, slightly salty base plays perfectly against the sweet candy corn. Add 1/2 cup of salted peanuts to the mix for extra crunch and protein. This variation is especially good for people who find the straight-sweet version a little too one-note.
Dark Chocolate Halloween Popcorn
Swap the white chocolate for dark chocolate melting wafers and use only orange candy melts for the drizzle. The bittersweet chocolate base creates a much more sophisticated flavor — closer to a Halloween bark than a kids’ snack. Use black and orange sprinkles on top for a dramatic monochrome Halloween aesthetic. This version is perfect for adult Halloween parties where you want something that feels a little more grown-up.
Caramel Candy Corn Popcorn
Skip the white chocolate entirely and coat the popcorn with a simple caramel sauce made from 1/2 cup butter, 1 cup brown sugar, 1/4 cup corn syrup, and a pinch of baking soda cooked to 250°F. Toss the candy corn in after the caramel cools for 2 minutes so it doesn’t melt. Bake the coated popcorn at 250°F for 45 minutes, stirring every 15 minutes, for a classic caramel corn base with candy corn mixed throughout.
Candy Corn Popcorn Bark
Instead of tossing the coated popcorn into clusters, press it firmly into the parchment-lined baking sheet into a flat, even 1/2-inch thick layer. Let it set completely until hard, then break it into large irregular shards like bark. The result is somewhere between popcorn and candy bark — easier to serve at parties, cleaner to eat, and absolutely stunning as a gift wrapped in cellophane with a ribbon.
Storage Instructions
Refrigerator
Store candy corn popcorn in an airtight container at room temperature for up to 5 days — the fridge actually works against you here because the temperature change causes condensation on the chocolate, which makes it turn white and streaky (called blooming). If your kitchen runs warm (above 75°F), you can refrigerate it in a sealed container, but let it come back to room temperature for 10 minutes before serving so the texture is right.
Freezer
Candy corn popcorn does not freeze well. The candy corn becomes extremely hard and chewy when frozen and can crack or shatter, and the chocolate coating tends to bloom and lose its glossy finish when thawed. Moisture from freezing also makes the popcorn go soft rather than crispy. Make this recipe no more than 2 days before you need it for the best texture and appearance.
Make-Ahead
This recipe is actually ideal for making ahead — the chocolate sets completely and the flavors meld overnight, which some people prefer. Make it up to 2 days before your Halloween party, store in an airtight container or individual treat bags at room temperature, and it’ll be just as good as fresh. If you’re gifting it, assemble in cellophane bags immediately after the chocolate sets so air exposure is minimal and the popcorn stays at peak crunch.
For food safety guidelines, visit FDA Food Safety Guidelines for Candy and Confections.
Frequently Asked Questions
Can I use candy corn in popcorn without white chocolate?
Yes, you can toss plain popped popcorn with candy corn for a no-cook snack mix — and it’s actually delicious in a salty-sweet way. But without a chocolate coating to act as a binder, the candy corn just rolls to the bottom of the bowl and you end up eating popcorn and candy corn separately rather than together. The chocolate coating is what makes this feel like a unified treat instead of two snacks thrown in the same container.
Why is my white chocolate not sticking to the popcorn?
The most common reasons are warm popcorn creating steam, butter-flavored microwave popcorn leaving an oily film, or chocolate that’s been overheated and become too thick. Make sure your popcorn is completely cooled and as plain as possible. If your chocolate thickened during melting, stir in an extra half teaspoon of coconut oil to bring it back to a pourable consistency. Work fast once it’s melted because it starts setting within minutes at room temperature.
How far in advance can I make candy corn popcorn?
Up to 2 days ahead is the sweet spot. The popcorn stays crispy and the chocolate stays glossy in an airtight container at room temperature. Beyond 2 days, the popcorn starts to lose its crunch as it slowly absorbs moisture from the air, and the candy corn can start to weep a little sugar onto the chocolate. For parties and gifting, make it the day before for the absolute best texture and appearance.
Can I make candy corn popcorn without a microwave?
Absolutely. Use a double boiler — a heatproof bowl set over a pot of barely simmering water — to melt your white chocolate wafers and coconut oil together. Stir constantly and keep the heat very low because white chocolate scorches quickly. The double boiler method actually gives you slightly more control over temperature than the microwave and is less likely to overheat the chocolate. Just make sure no water or steam gets into the chocolate or it will seize.
What kind of candy corn works best in this recipe?
Brach’s Classic Candy Corn is the standard recommendation for a reason — it has a consistent size, good color saturation, and a texture that holds up when pressed into warm chocolate without immediately melting. Generic store-brand candy corn tends to be either too hard or too waxy. If you want to get creative, Brach’s also makes autumn mix candy corn with chocolate and caramel varieties that work beautifully in this recipe for a different twist.
Can I make this candy corn popcorn recipe nut-free and allergy-friendly?
Yes — the base recipe is naturally nut-free as written. Always check your specific brand of candy melts and white chocolate wafers for shared-facility allergen warnings, since manufacturing cross-contamination varies by brand. Ghirardelli and Wilton both publish allergen information on their websites. If you’re making this for school parties, replace any peanut add-ins with sunflower seeds or extra pretzels, and verify that your candy corn brand is peanut-free, as some manufacturers share equipment.
More Recipes You Will Love
👉 Perfect Sheet Pan Sausage & Veggies Recipe
👉 Perfect Taco Meat Recipe (Better Than Takeout)
👉 Perfect Chicken Caesar Wraps Recipe
Candy corn popcorn is the kind of recipe that looks like you went to a specialty candy shop but takes less than 20 minutes in your own kitchen. Make a batch for your Halloween party, bag some up as classroom treats, or just keep a bowl on the counter and watch it vanish. Tag us on Instagram when you make it — we love seeing your Halloween creations. And drop a comment below if you tried any of the variations!