
- Prep: 20 Minutes
- Cook: 0 Minutes
- Total: 20 Minutes
- Servings: 12 servings
A Quick Note Before You Start
Make this cheese ball the night before your party — it slices and holds its shape way better after chilling overnight. The longer it sits, the more the flavors meld together into something seriously addictive.
A pumpkin shaped cheese ball is the Halloween appetizer that stops people dead in their tracks. It looks like something from a bakery, but you can throw it together in 20 minutes with pantry staples.
The trick is in the shaping technique and the right coating — this recipe nails both. You get a perfectly spiced, creamy center with a cheddar-coated exterior that actually looks like a real pumpkin.
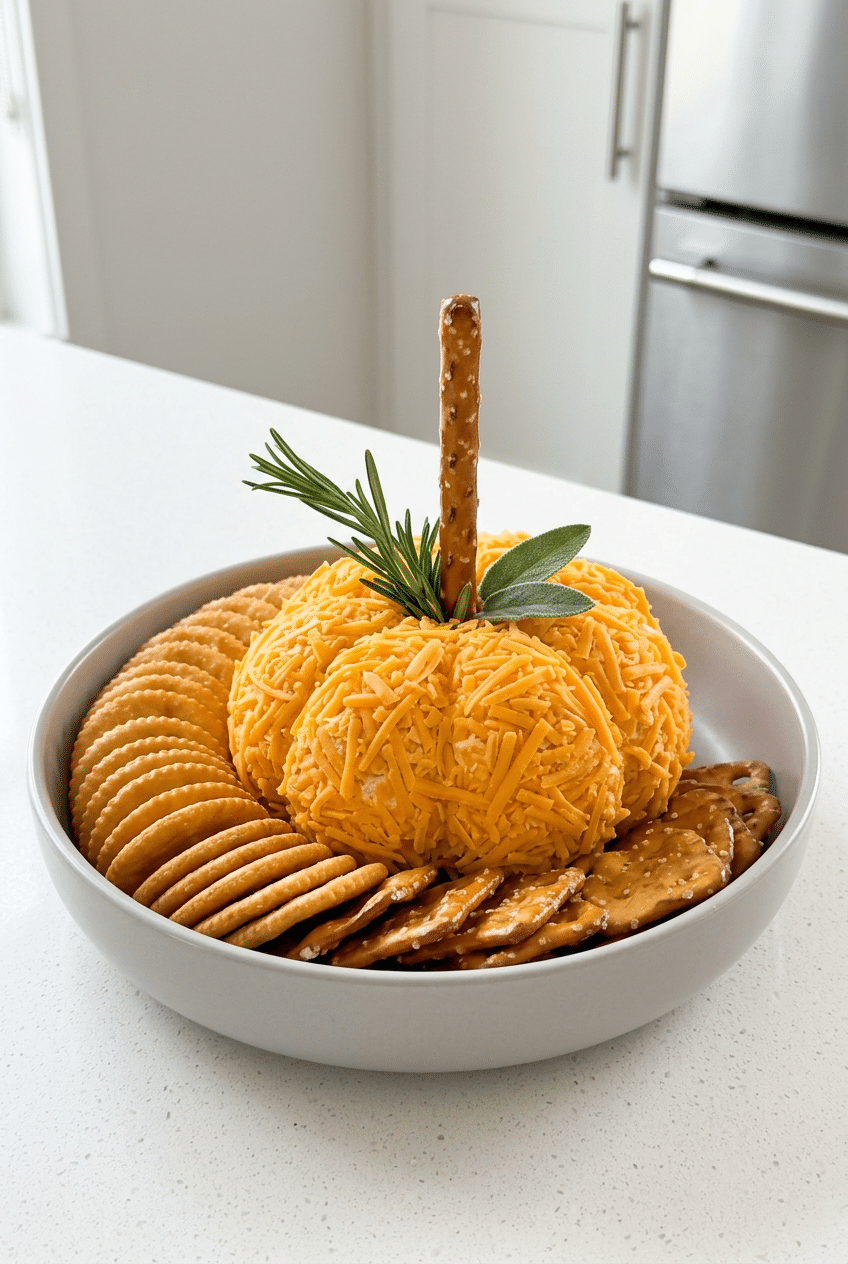
Ingredients for Pumpkin Shaped Cheese Ball
For the Cheese Ball Base
- 2 blocks (8 oz each) cream cheese, softened — the full-fat block version, not the spread in a tub
- 2 cups shredded sharp cheddar cheese — sharp gives you that tangy backbone
- 1 packet (1 oz) ranch seasoning mix — Hidden Valley Ranch Seasoning Mix is the classic here; it does the heavy lifting on flavor
- 1 tsp garlic powder
- 1/2 tsp onion powder
- 1/2 tsp smoked paprika — adds a subtle warmth and depth
- 1/4 tsp cayenne pepper — optional but gives a nice background heat
- 4 oz crumbled bacon — about 6 strips cooked crispy and crumbled, or use store-bought bacon bits in a pinch
- 2 green onions, finely sliced
For the Pumpkin Coating
- 2 cups finely shredded sharp orange cheddar cheese — this is your pumpkin skin; fine shred clings better than thick
- 1/2 tsp smoked paprika — dust over the outside for deeper orange color
For the Stem and Garnish
- 1 large pretzel rod — the stem; thick rods work better than thin ones so it doesn’t snap
- 2-3 sprigs fresh rosemary or sage leaves — tuck around the pretzel rod as leaves for a realistic pumpkin look
For Serving
- Ritz crackers, pretzel chips, sliced bell peppers, and celery sticks — arrange around the cheese ball for dipping
Optional Add-Ins
- 2 tbsp finely diced jalapeño for heat lovers
- 1/4 cup chopped pecans mixed into the base for texture
- 1 tsp Worcestershire sauce for extra umami depth
- 2 oz softened goat cheese swapped for one of the cream cheese blocks for a tangier base
How to Make a Pumpkin Shaped Cheese Ball Step by Step
Step 1: Soften and Mix the Base
Start by making sure your cream cheese is fully softened — set it out on the counter for at least an hour before you start. Cold cream cheese will leave lumps in your mixture no matter how long you beat it, and you want a silky-smooth base that holds its shape after chilling. If you forgot to pull it out early, microwave each block for 15-20 seconds, flip it, and go another 10 seconds.
In a large bowl, combine the two blocks of softened cream cheese, shredded sharp cheddar, ranch seasoning packet, garlic powder, onion powder, smoked paprika, and cayenne if you’re using it. Mix everything together with a hand mixer on medium speed or a sturdy wooden spoon until fully combined. Fold in the crumbled bacon and sliced green onions by hand so they stay distributed in pieces rather than getting pulverized.
👉 Hidden Valley Ranch Seasoning Mix (4-pack) — The ranch packet is the shortcut that makes this cheese ball taste like a restaurant appetizer — don’t skip it.
Step 2: Shape Into a Ball
Lay out a large sheet of plastic wrap on your counter and scoop the cheese mixture into the center. Gather up the sides of the plastic wrap and twist it tightly, pressing and molding the mixture into a rough ball shape with your hands through the plastic. Don’t stress about making it perfect at this stage — you’re just getting the general round shape before it chills.
Refrigerate the wrapped cheese ball for at least 1 hour, or ideally overnight. Chilling firms it up so it holds its shape when you press the pumpkin segments in later. Skipping this step means your cheese ball will spread and sag when you try to carve in the lines — patience here pays off big.
Step 3: Create the Pumpkin Segments
Once the cheese ball is firm, unwrap it and set it on your serving board. Take a long piece of kitchen twine or unflavored dental floss and loop it around the ball. Pull each loop of twine gently but firmly from the top to the bottom of the ball, spacing each segment evenly — aim for 6 to 8 sections, just like a real pumpkin. The twine presses a groove into the cheese that creates those iconic ridges.
This is the step that makes the whole thing look bakery-level impressive, and it takes about 30 seconds. Pull the twine snug enough to leave a visible indentation but not so hard that you slice through the ball. After all your segments are pressed in, gently re-smooth any rough patches with your fingertips.
👉 Unflavored Dental Floss or Kitchen Twine — A roll of kitchen twine is the secret to those perfect pumpkin ridges — $5 and it lasts forever.
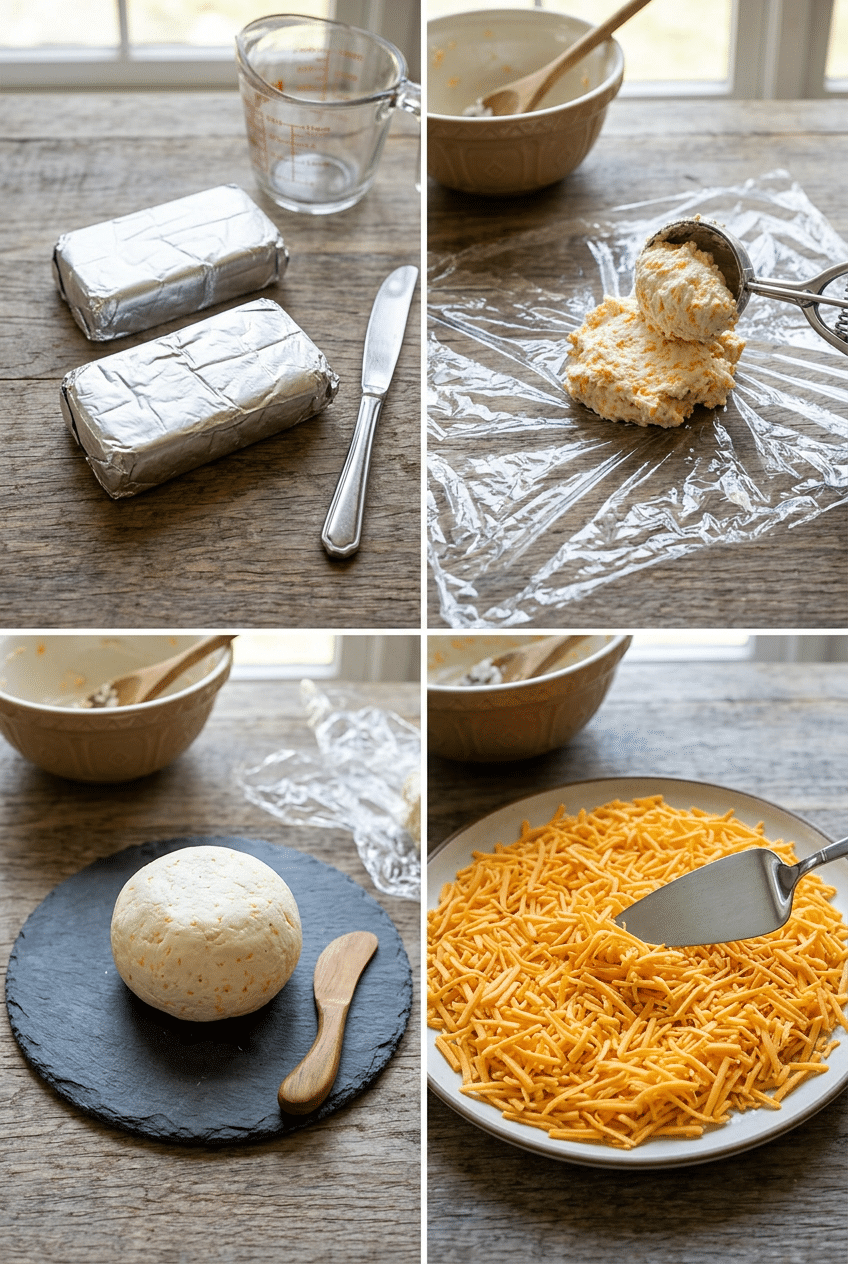
Step 4: Coat in Orange Cheddar
Spread your finely shredded orange cheddar out on a large plate or sheet pan. Press the segmented cheese ball firmly into the shredded cheddar, rotating and pressing it on all sides until every surface is coated. Use your hands to press extra cheese into any bare spots or into the grooves — the goal is full coverage with no cream cheese peeking through.
Once coated, dust a light layer of smoked paprika over the outside using a small fine-mesh sieve or your fingertips. This deepens the orange color and makes it look like an actual pumpkin sitting on your table rather than a cheese ball that someone tried to shape into one. The paprika also adds a tiny bit of smoky flavor to every bite.
Step 5: Add the Stem and Leaves
Press a thick pretzel rod firmly down into the top center of the cheese ball to create the pumpkin stem. Push it in about an inch so it stands upright and doesn’t tip over when guests start pulling crackers from the board. Tuck two or three sprigs of fresh rosemary or a few sage leaves right at the base of the pretzel rod to mimic the curling vine and leaves of a real pumpkin.
Set the finished cheese ball back in the fridge for another 15-20 minutes to firm up after all that handling. When you pull it out to serve, arrange your crackers, pretzel chips, and sliced vegetables in a fan around the base. The whole display looks like something that took hours — nobody has to know it was 20 minutes of actual hands-on work.
👉 Large Round Wooden Charcuterie Board — A round wooden board frames this pumpkin cheese ball perfectly and makes the whole spread look editorial.
Nutrition Information
- Per serving (approx. 2 tbsp): 210 cal
- 18g fat
- 3g carbs
- 9g protein
Pro Tips
Use finely shredded cheese, not thick-cut: Finely shredded cheddar clings to the outside of the cheese ball in a smooth, even layer that looks like pumpkin skin. Thick-cut shreds fall off and leave patchy bare spots — you’ll spend five frustrating minutes trying to make them stick. Grab the bag labeled ‘finely shredded’ and your coating will go on in one smooth press.
Chill it twice: Once before shaping the segments, and once again after coating. That second 15-minute chill after the cheddar coating firms everything back up so the ridges hold their shape and the coating doesn’t slide. Guests will think you’re a professional.
Color boost trick: If your cheddar coating looks more yellow than orange, dust a light even layer of smoked paprika through a small fine-mesh sieve while rotating the ball. It deepens the orange color dramatically without adding a strong paprika flavor — a little goes a long way.
Pretzel rod insurance: Push the pretzel rod in while the cheese ball is still slightly cold and firm. If the ball is too warm and soft, the rod will lean and eventually fall over mid-party. Nobody wants a fallen pumpkin stem. Firm cheese ball equals a proud, upright stem.
Make the scoring lines deeper than you think: When you press the kitchen twine around the ball to create segments, pull a little harder than feels natural. The cheddar coating you press on afterward fills in some of the groove depth, so what looks like a deep ridge before coating becomes a shallower, more realistic-looking pumpkin line after coating.
Delicious Variations
Spicy Jalapeño Pumpkin Cheese Ball
Mix two finely minced jalapeños (seeds removed for medium heat, left in for hot) directly into the cream cheese base before chilling. Add an extra quarter teaspoon of cayenne to the mix. The heat plays off the cool creaminess in a way that keeps people coming back for more bites. Coat the outside in a mix of cheddar and finely crushed pepper jack for a spicy exterior that matches the heat inside.
Everything Bagel Pumpkin Cheese Ball
Skip the ranch packet and instead season your base with two tablespoons of everything bagel seasoning, one teaspoon of onion powder, and a tablespoon of chives. For the outside coating, use a mix of cream cheese-rolled everything bagel seasoning instead of cheddar — press the ball into a plate covered in the seasoning blend. It’s a savory, sesame-forward version that pairs especially well with sliced cucumbers and mini toasts.
Sweet Pumpkin Dessert Cheese Ball
Turn this into a dessert version by beating together two blocks of cream cheese with half a cup of powdered sugar, one teaspoon of vanilla extract, one teaspoon of pumpkin pie spice, and a quarter cup of canned pumpkin puree. Roll the outside in crushed graham crackers mixed with cinnamon sugar instead of cheddar, and serve with apple slices, gingersnap cookies, and cinnamon pita chips. It’s fall in every bite.
Smoky Bacon and Gouda Cheese Ball
Swap one block of cream cheese for four ounces of softened goat cheese and replace the cheddar in the base with shredded smoked gouda. Double the bacon to a full cup of crumbled crispy bacon and fold in a teaspoon of Worcestershire sauce. For the outside, coat in a combination of finely shredded smoked gouda and crushed smoked almonds for a deeply savory, smoky version that feels more grown-up and pairs beautifully with a glass of red wine.
Storage Instructions
Refrigerator
Wrap any leftover pumpkin cheese ball tightly in plastic wrap and store it in the refrigerator for up to 5 days. The flavors actually get better after the first day as everything melds together. After the party, the ball shape won’t be perfect anymore — just rewrap it tightly into a log or ball shape for snacking. Keep it away from strong-smelling foods like cut onions since cream cheese can absorb odors.
Freezer
You can freeze a pumpkin cheese ball, but there’s a catch: freeze it BEFORE you add the cheddar coating and the pumpkin shaping. Wrap the plain cheese ball mixture tightly in two layers of plastic wrap and one layer of aluminum foil, then freeze for up to one month. Thaw overnight in the refrigerator, then roll it in fresh cheddar and shape it on the day you serve it. Freezing after coating changes the texture of the shredded cheese exterior and it won’t look as clean.
Make-Ahead
This is one of the best make-ahead party appetizers you’ll ever find. Mix and shape the cheese ball up to 3 days before your party and keep it wrapped tightly in the fridge. On the day of the party, pull it out, roll it in fresh shredded cheddar, press the twine segments, dust with paprika, and add the pretzel stem — the whole finishing process takes under 10 minutes. This make-ahead strategy actually improves the flavor since the cream cheese has days to absorb the ranch seasoning and spices.
For food safety guidelines, visit FDA Safe Food Handling Guidelines.
Frequently Asked Questions
How do you make a pumpkin shaped cheese ball look like a real pumpkin?
The two tricks are the twine segmenting and the finely shredded orange cheddar coating. After chilling your cheese ball until firm, wrap kitchen twine around it from top to bottom in 6-8 evenly spaced grooves — this creates the pumpkin ridges. Then press the entire ball into a plate of finely shredded sharp cheddar for the orange skin. Finish with smoked paprika dusted over the top to deepen the color, and a pretzel rod stem with rosemary leaves for the final touch.
Can I make the pumpkin cheese ball ahead of time?
Absolutely — in fact, you should. The cheese ball base can be mixed and shaped up to 3 days in advance and stored tightly wrapped in the fridge. The flavors develop and deepen overnight, and the firm texture makes it much easier to shape into a pumpkin. Add the cheddar coating, twine segments, and pretzel stem on the day you’re serving it. This is genuinely one of the best make-ahead Halloween appetizers you can bring to a party.
What crackers go best with a cheese ball?
You want crackers that are sturdy enough to scoop a generous chunk without snapping. Ritz crackers are the crowd classic — their buttery flavor works with almost every cheese base. Pretzel crisps are another top pick because the salt complements the cheddar and ranch. For something more elegant, try sliced baguette or thin wheat crackers. For a no-carb option, thick slices of bell pepper, cucumber rounds, and celery sticks all work beautifully and add color to the board.
Why is my cheese ball not holding its shape?
Almost always, it’s because the cream cheese wasn’t chilled long enough after mixing. The mixture needs at least 1 hour in the fridge — overnight is even better — to firm up enough to hold the pumpkin segments and coating. Make sure you’re using block cream cheese, not the spreadable kind in a tub. Spreadable cream cheese has extra water and air whipped in, which makes it too soft to shape. Full-fat block cream cheese is non-negotiable for a cheese ball that actually holds together.
Can I make a pumpkin cheese ball without ranch seasoning?
Yes. If you want to skip the ranch packet, season your base with one teaspoon each of garlic powder and onion powder, half a teaspoon of dried dill, half a teaspoon of dried parsley, a quarter teaspoon of celery salt, and salt and pepper to taste. Everything bagel seasoning is another excellent substitute — use about two tablespoons and it gives you that garlicky, oniony, sesame-forward flavor that’s addictive on cream cheese. The ranch packet is a convenient shortcut, but the cheese ball works great without it.
What can I use instead of a pretzel rod for the stem?
A thick pretzel rod is ideal because it’s rigid and food-safe, but you have options. A sturdy breadstick works well if it’s thick enough not to snap. A cinnamon stick pressed into the top is a great non-edible option that looks incredibly realistic and gives the whole display a warm fall scent. You can also carve a small piece of bell pepper into a stem shape and press it in. Whatever you use, insert it while the cheese ball is cold and firm so it stands upright without leaning.
More Recipes You Will Love
👉 Perfect Sheet Pan Sausage & Veggies Recipe
👉 Perfect Chicken Caesar Wraps Recipe
👉 Perfect Taco Meat Recipe (Better Than Takeout)
This pumpkin shaped cheese ball is the appetizer that gets photographed before anyone takes a bite — and then demolished in about 15 minutes flat. Make it the night before, pull it out five minutes before guests arrive, and watch the room light up. Did you bring this to a Halloween party? Drop a comment below and tell me how it went — I read every single one.