
- Prep: 30 Minutes
- Cook: 0 Minutes
- Total: 30 Minutes
- Servings: 10-12 servings
A Quick Note Before You Start
No cooking required — this is pure assembly magic. The secret is starting with the skull and ribcage outline FIRST so everything else falls into place naturally. Give yourself a clean, large surface and don’t rush the arrangement.
A skeleton charcuterie board is the Halloween party centerpiece everyone stops dead in their tracks to photograph before eating. It’s dramatic, completely customizable, and surprisingly simple to pull off in under 30 minutes.
We’re building a full human skeleton shape from meats, cheeses, crackers, fruits, and dips — right on your serving board. No special skills needed, just a good eye for arrangement and the right ingredient choices.
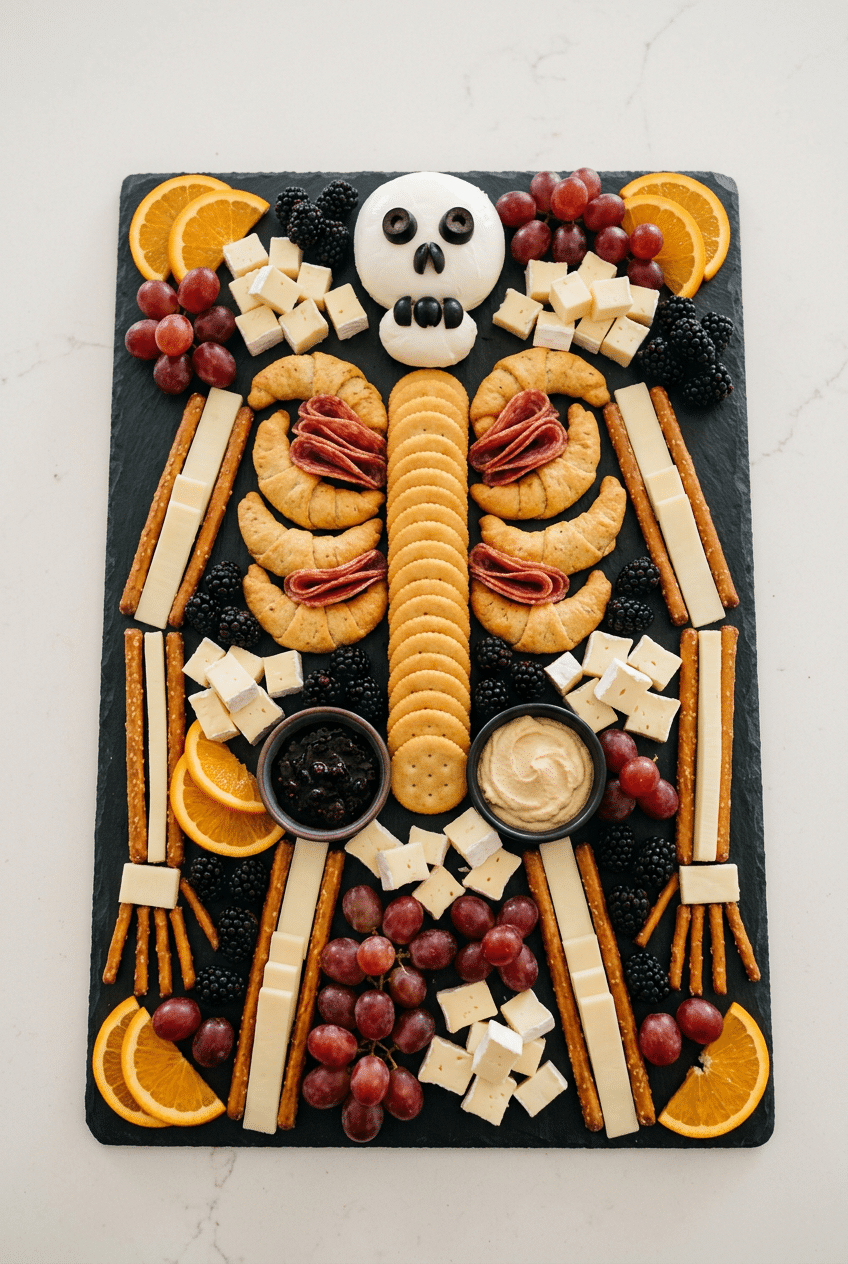
Ingredients for Skeleton Charcuterie Board
For the Skull
- 1 round (8 oz) cream cheese ball or Brie wheel — the smooth white surface is perfect for the skull shape
- 2 black olives, halved — for the eye sockets
- 1 black olive, sliced into a triangle — for the nose cavity
- 8-10 white cheddar or Parmesan crisps — arranged below the skull as the jaw and teeth
For the Ribcage & Spine
- 1 package (6 oz) thin-sliced pepperoni — folded into half-moons for the ribs
- 4 oz thinly sliced salami — rolled into tubes and placed alongside ribs for bone texture
- 1 sleeve (about 30) round butter crackers like Ritz — stacked down the center to form the spine
- 1 package (5 oz) Whisps Parmesan Cheese Crisps — used as floating rib ends and fill pieces; their bone-white color is unbeatable for skeleton boards
For the Arm & Leg Bones
- 16-20 pretzel rods — the hero ingredient for limb bones; they snap cleanly to the right length
- 4 oz white cheddar, sliced into rectangles — layered at joints to mimic cartilage and connective tissue
- 1 package (4 oz) white chocolate pretzel nuggets or yogurt-covered pretzels — used as the rounded bone joints at elbows, knees, and ankles
For the Fillers & Dips
- 1 cup red or black grapes — clusters fill negative space beautifully and add color contrast
- 1/2 cup blackberries — dark and dramatic, perfect for a Halloween palette
- 1/2 cup mandarin orange segments — Halloween orange pops against the dark board
- 3 oz dried cranberries or dark cherries — scatter around the skeleton to fill tiny gaps
- 1 jar (10 oz) Bonne Maman Strawberry Preserves or dark berry jam — spooned into a small black bowl at the hip area; the deep red color looks dramatically spooky
- 1/2 cup hummus — in a second small black bowl on the opposite hip for dipping
- 2 oz honey in a small dark dish — drizzle-ready for the cheese and crackers
Optional Add-Ins
- Candy eyeballs scattered across the board for extra spooky effect
- Black sesame crackers for dark color contrast
- Prosciutto ribbons draped between bones
- White chocolate bark broken into bone shapes
- Mozzarella pearls piled near the joints
- Skull-shaped gummy candies tucked between sections
- Rosemary sprigs for a dark herbaceous filler
How to Make a Skeleton Charcuterie Board Step by Step
Step 1: Choose and Prep Your Board
Grab the largest board or tray you own — you need at least 18×24 inches to fit a full skeleton shape without everything looking cramped. A dark slate board or black serving tray makes the white and pale ingredients pop like actual bones, which is exactly the visual you’re going for.
Before you place a single ingredient, sketch the skeleton outline lightly on the board with your finger or a toothpick so you understand the spacing. This sounds unnecessary but saves you from rearranging everything twice. The skull sits at the top, spine runs down the center, ribs branch out to both sides, and the legs extend downward from the hip area.
👉 Large Dark Slate Serving Board (18×12 inch) — A dark slate surface makes white and pale bone-colored ingredients pop — it’s the single biggest visual upgrade.
Step 2: Build the Skull First
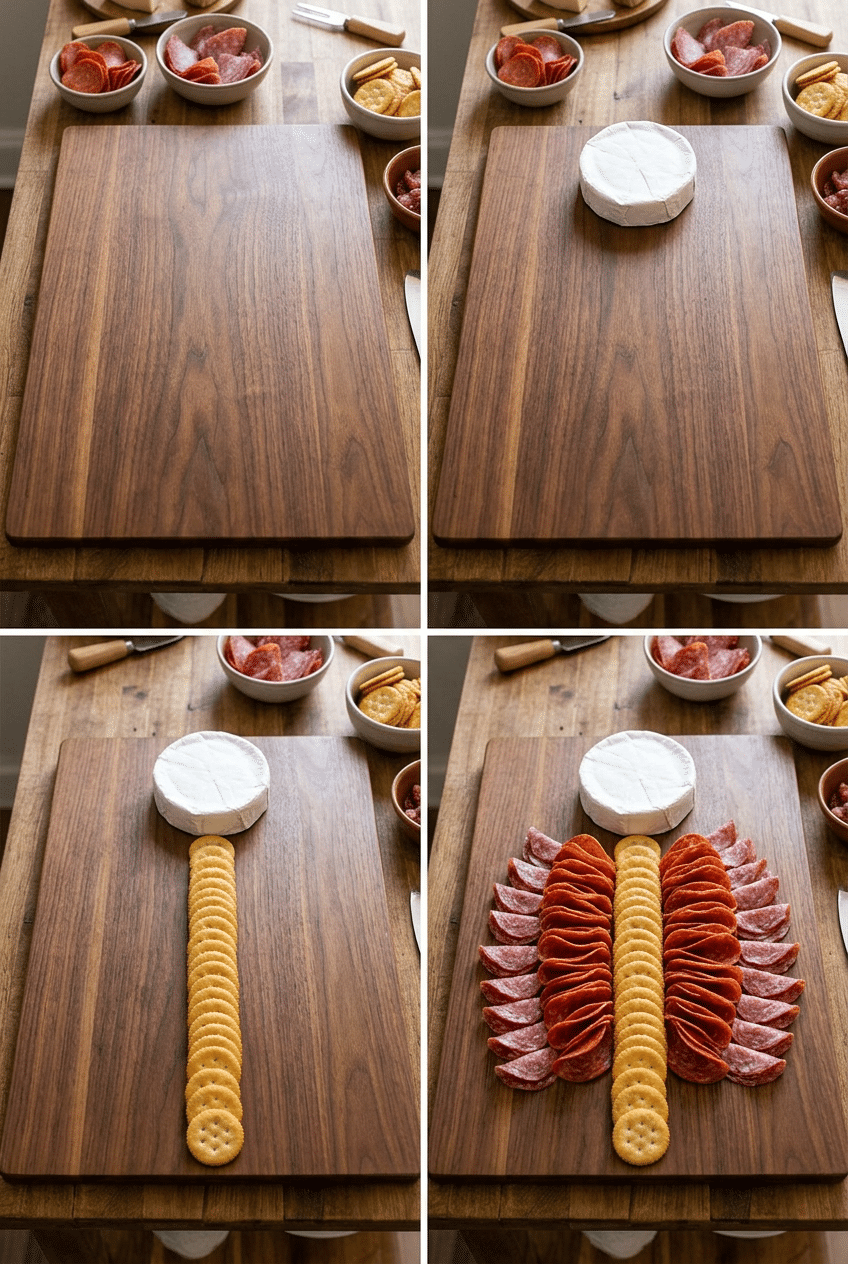
Place your Brie wheel or cream cheese ball near the top center of the board — this is your skull and everything else orients around it. Press two halved black olives gently into the cheese for eye sockets, then press a small triangle of olive below and between them for the nasal cavity. The olives stick naturally into soft cheese without any additional help.
Arrange your white cheddar crisps or Parmesan wafers in a curved row just below the cheese round to form the jawbone and teeth. Alternate upright and angled pieces so they look irregular, like actual teeth. Don’t make them too neat — a slightly chaotic jaw actually reads as more realistic and spooky.
Step 3: Lay the Spine Down the Center
Stack round butter crackers in a vertical line down the center of the board from just below the skull all the way to where you want the pelvis to begin — roughly two-thirds of the way down the board. Overlap them slightly so they look like vertebrae, not a tidy cracker column. You want about 12-15 crackers for a proportional spine.
The crackers serve double duty here: they’re the visual anchor that gives every other element something to reference for placement, and they’re one of the most popular dipping vessels on the whole board. Ritz-style butter crackers are ideal because their golden color contrasts the white cheese and pale pretzel bones while still reading as part of the overall skeletal structure.
Step 4: Create the Ribcage
Working from the spine outward on both sides, start placing your folded pepperoni and salami into curved rib shapes. Fold each pepperoni slice in half so it curves naturally, then press the flat edge against the spine crackers and let the curved edge arc outward. Alternate with rolled salami tubes for textural variation — about 5-6 ribs per side gives you a full-looking ribcage.
Fill the spaces between the ribs with Whisps Parmesan Cheese Crisps — their irregular, bone-white shape makes them look like rib cartilage and floating ribs without any extra effort. Tuck them into the gaps so the ribcage looks dense and detailed rather than sparse. This is the section that photographs best, so take your time and layer generously.
👉 Whisps Parmesan Cheese Crisps — Their bone-white color and irregular shape make them the best ready-made ‘rib cartilage’ on the market.
Step 5: Build the Arms and Legs
Snap pretzel rods to your desired arm length — usually about 5-6 inches — and arrange two rods side by side for each arm bone (upper and lower arm) angling outward from the ribcage. Place a yogurt-covered pretzel nugget or white chocolate pretzel at each joint to represent the elbow knuckle. Repeat the same structure for the legs below the spine, making the leg bones noticeably longer than the arms for correct proportions.
At the shoulder joints where the arms meet the ribcage, place a small rectangle of white cheddar to mimic the shoulder blade. At the hip joints where the legs begin, place another small white cheddar piece on each side. These little details transform the board from ‘pile of food’ to genuinely skeleton-shaped — it’s worth the extra two minutes of placement.
Step 6: Fill in the Gaps with Color
Now comes the fun part: filling the negative space with your colorful ingredients. Cluster red and black grapes near the shoulder areas, scatter blackberries along the outer edges of the board, and tuck mandarin orange segments near the lower legs for that classic Halloween orange-and-black color story. The goal is that no dark board surface shows through anywhere except deliberately.
Nestle your small black bowls of Bonne Maman dark berry jam and hummus right at the hip bones — they look like organs and they’re positioned perfectly for dipping the rib meats and crackers. Scatter dried cranberries into any remaining tiny gaps. Step back, assess the whole board, and push a few things around until the skeleton shape is clearly readable from across the room.
👉 Bonne Maman Dark Cherry or Strawberry Preserves — The deep red color looks dramatically spooky in a black bowl — and it tastes incredible with Brie.
Step 7: Final Details and Serve
Add any finishing touches now — candy eyeballs, a drizzle of honey over the Brie skull, a few rosemary sprigs tucked near the edges for color and fragrance. If you want extra drama, place the board in a slightly dimmed room before guests arrive and let the shadows do the atmospheric work.
Serve immediately at room temperature for the best cheese texture and flavor. If you need to prep more than 30 minutes ahead, cover the board loosely with plastic wrap and refrigerate — just pull it out 20 minutes before serving so the cheeses soften back up. Cold cheese on a Halloween board is a tragedy nobody needs.
👉 Candy Eyeballs Decorating Sprinkles — Scatter these across the board for instant Halloween creepiness — they’re edible and people love finding them.
Nutrition Information
- Per serving (of 12): ~280 cal
- 17g fat
- 21g carbs
- 10g protein
Pro Tips
Start with the skull and spine FIRST: Every experienced board builder knows that anchor pieces go down before fillers. Place your cheese skull and cracker spine before anything else — they dictate proportions and spacing for every other element. If you start with grapes and meats, you’ll back yourself into a corner and the skeleton won’t read clearly from a distance.
Use the dark board surface as your friend: A dark slate or black tray is not optional if you want maximum visual impact. Light wood or white boards make the skeleton look muddy and indistinct. The contrast between dark background and bone-white ingredients is what makes people gasp when they see it.
Build the bones thicker than you think: Skeleton boards look best when the bones are generously thick — two pretzel rods side by side, not one. One lonely pretzel rod per limb looks sparse and sad. Double up every bone element and the whole thing reads as substantial and impressive.
Keep cheeses at room temperature before serving: Pull all cheese from the fridge 20-30 minutes before assembly. Room-temperature cheese is softer, more spreadable, and actually stays in place better when you press olive eyes into the skull. Cold, firm cheese fights you every step of the way.
Photograph it BEFORE guests arrive: Once people start picking at the board, the skeleton collapses fast. Set it up in good light, take your photos, THEN bring it out. This is not the board you want to photograph at minute 10 of a party.
Delicious Variations
Vegan Skeleton Board
Swap all meat and dairy for plant-based alternatives. Use a round cashew cheese or Violife cream cheese for the skull, replace pepperoni with thinly sliced roasted red peppers folded into rib shapes, use vegan crackers for the spine, and load up on fruits, nuts, and veggies like cauliflower florets as bone fillers. The visual impact is identical — nobody will know it’s fully plant-based until they taste it.
Sweet Dessert Skeleton Board
Flip the whole concept to a dessert version. Build the skull from a round vanilla cheesecake or white chocolate bark. Use white chocolate-dipped pretzel rods for the bones, yogurt-covered raisins for joints, marshmallows for the spine, and fill the gaps with Halloween candy, gummy worms, and dark chocolate bark. This version is especially popular with kids and works beautifully as a Halloween dessert table centerpiece.
Mini Individual Skeleton Boards
Instead of one large board, make individual mini skeleton boards on small 6-inch slate tiles or wooden rounds — one per guest. Scale everything down: use a small Babybel cheese for the skull, two or three crackers for the spine, and just four pretzel sticks per person for arms and legs. These make incredible party favors and place settings that guests can eat at their own pace without fighting over the last rib.
Keto-Friendly Skeleton Board
Keep it low-carb by eliminating the cracker spine and replacing it with stacked cucumber rounds or rolled deli turkey for the vertebrae. Use pork rinds instead of pretzel rods for the bones, load up on full-fat cheeses, salami, and pepperoni for the ribs, and fill with olives, pickles, and low-sugar berries. The skeleton shape holds just as well and the whole board is guilt-free for any keto guest.
Storage Instructions
Refrigerator
Once assembled, cover the skeleton charcuterie board loosely with plastic wrap and refrigerate for up to 4 hours before serving. The soft cheeses hold their shape well when cold, but the crackers can absorb moisture from nearby fruits and begin to soften after a few hours. If you’re prepping far in advance, keep the crackers separate in a zip-lock bag and place them on the board just before guests arrive for maximum crunch.
Freezer
This board is not suitable for freezing — the cheeses, fruits, and crackers don’t survive the freeze-thaw cycle with any dignity. What you CAN freeze ahead: portion and freeze any unused meats like pepperoni and salami in airtight bags for up to 2 months. Thaw them overnight in the fridge and they’re ready to go for your next board build. Everything else should be bought fresh for each occasion.
Make-Ahead
You can prep every element of this board up to 24 hours in advance without assembling. Slice the cheeses, portion the fruits into containers, count out the crackers and pretzel rods, and prep your dips — all stored separately in the fridge. The day of your party, assembly takes 15 minutes instead of 30 since all the thinking is already done. The Brie skull can even be decorated with olives the night before and wrapped in plastic — just check that the olives haven’t bled color into the cheese.
For food safety guidelines, visit FDA Safe Food Handling Guidelines.
Frequently Asked Questions
How big does my board need to be for a skeleton charcuterie board?
You need at minimum an 18×24 inch surface to build a recognizable full skeleton shape. Anything smaller and the proportions get cramped — the skull crowds the ribs, and the legs have nowhere to go. A large rectangular cutting board, a sheet pan lined with parchment paper, or a dedicated charcuterie board all work perfectly. If you only have a smaller board, consider doing just the upper body: skull, ribcage, and arms with no legs, which fits comfortably on a 16×12 surface.
What can I use for the skull if I don’t want Brie?
Any round, pale-colored cheese works well for the skull. A round cream cheese ball, a wheel of Camembert, a large round fresh mozzarella, or even a round Babybel with the red wax removed all work beautifully. The key qualities are: roughly round shape, pale white or cream color, and enough softness that you can press olive eyes into the surface without the cheese crumbling. Hard cheeses like aged cheddar are too firm and too yellow to read convincingly as a skull.
Can I make a skeleton charcuterie board the night before?
You can prep all the individual components the night before — slice cheeses, portion meats, wash fruits, make dips — and store everything separately in the fridge. Full assembly the night before isn’t ideal because crackers absorb moisture from fruits and soften, and the overall arrangement looks less fresh after hours in the fridge. Assemble the board 30-60 minutes before your party for the best visual presentation, adding crackers and pretzel rods last since they’re the most moisture-sensitive elements.
How many people does a skeleton charcuterie board feed?
This recipe as written feeds 10-12 people as an appetizer or party snack. If it’s the only food at your Halloween party, scale it up and plan for 6-8 servings. Charcuterie boards are notoriously hard to portion precisely because guests graze throughout the night rather than taking a defined serving. A good rule of thumb: 2-3 ounces of meat and 2-3 ounces of cheese per person as a starter, with crackers and fruits being essentially unlimited fillers you can add more of at any point.
What cheeses work best for a skeleton charcuterie board?
Stick to a white or pale color palette for maximum bone-like effect. Brie, Camembert, fresh mozzarella, cream cheese, white cheddar, Parmesan, and ricotta all work beautifully. Avoid orange or yellow cheeses — aged cheddar, gouda, and colby look out of place against the spooky aesthetic. If you want to sneak in a sharper flavor, a white aged cheddar or a pale Manchego gives you that bite while keeping the bone-white visual theme completely intact.
What’s the best board surface for a skeleton charcuterie board?
Dark surfaces dramatically outperform light ones for this specific board. A black slate serving board, dark walnut wood, or even a black sheet pan lined with parchment paper all create the high-contrast background that makes white and pale ingredients look genuinely skeletal. On a light maple or white marble surface, the bones just don’t pop the same way — the whole thing looks washed out. The dark background is one of the most impactful and least-talked-about elements of a successful skeleton board.
More Recipes You Will Love
👉 Best Pumpkin Shaped Cheese Ball Recipe
👉 Mummy Wrapped Brie Recipe (Halloween Party)
👉 Best Halloween Punch Recipe (Scary Good)
👉 Perfect Pizza Skulls Recipe (TikTok Famous)
This skeleton charcuterie board is genuinely one of the easiest Halloween showstoppers you’ll ever make — thirty minutes, no cooking, and guests go absolutely wild for it every single time. Build it once and you’ll do it every year. If you make it, drop a photo in the comments below — I love seeing your skeleton boards come to life. And tag us on Instagram so we can share the spooky goodness!