
- Prep: 10 Minutes
- Cook: 15 Minutes
- Total: 25 Minutes
- Servings: 8 servings
A Quick Note Before You Start
Use a full wheel of brie — not a wedge. The round shape is what gives you that perfect mummy silhouette. Don’t score the top before wrapping; you want the dough to seal the cheese in and let it melt slowly from the inside out.
Mummy wrapped brie is the Halloween appetizer that stops guests in their tracks — a golden, flaky crescent roll exterior hiding a pool of melted, gooey brie cheese underneath, served with honey or jam for dipping.
This recipe takes 25 minutes start to finish, uses just a handful of ingredients, and looks like you spent hours on it. It photographs beautifully, which is exactly why it never stops circulating on Pinterest every October.
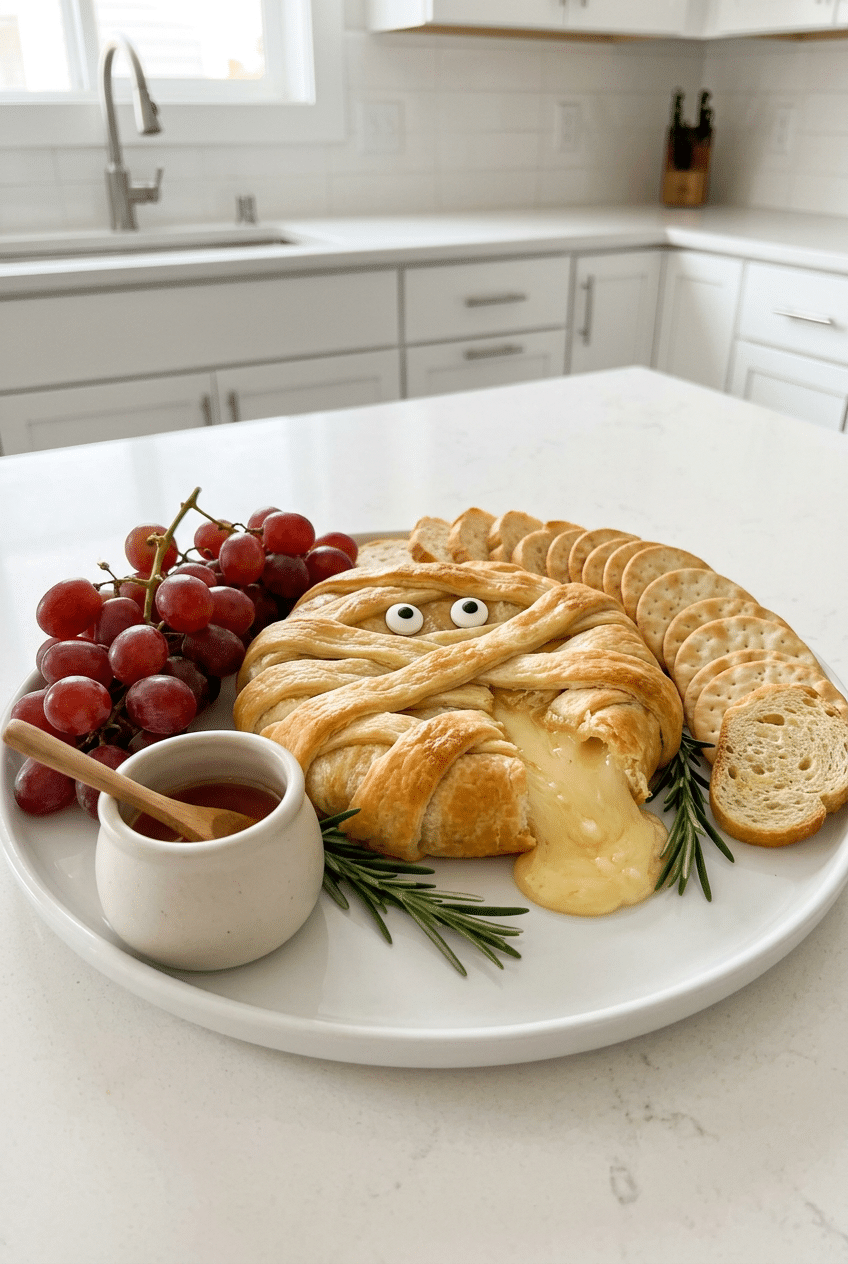
Ingredients for Mummy Wrapped Brie
For the Mummy Brie
- 1 wheel (8 oz) brie cheese — the full round wheel is non-negotiable for the mummy shape; don’t substitute a wedge
- 1 can (8 oz) Pillsbury Crescent Roll Dough — the classic seamless sheet version works best so you can cut your own strips; regular crescent rolls work too
- 1 egg — beaten, for egg wash so the dough turns a deep golden brown instead of pale
- 1 tablespoon water — mixed with the egg for the egg wash
- 2 candy googly eyes — the secret weapon that transforms this from “baked brie” into a full mummy character
- Pinch of flaky sea salt — sprinkled over the top after baking for a subtle crunch and flavor pop
For Serving
- 2 tablespoons honey — drizzled over the top right before serving; the sweet-savory combo with brie is unbeatable
- 2 tablespoons fig jam or raspberry jam — for dipping; the slight tartness cuts through the richness of the brie perfectly
- Sliced baguette, crackers, or apple slices — for scooping up that melted cheese
Optional Add-Ins
- 1 teaspoon fresh thyme leaves pressed onto the brie before wrapping
- 1 tablespoon chopped walnuts or pecans tucked under the dough
- 1 teaspoon Everything Bagel seasoning pressed onto dough strips before baking
- Drizzle of hot honey instead of regular honey for a spicy-sweet finish
How to Make Mummy Wrapped Brie Step by Step
Step 1: Preheat and Prep Your Pan
Preheat your oven to 375°F and line a small baking sheet with parchment paper. Pull the brie out of the fridge and let it sit at room temperature for about 5 minutes while your oven heats — this helps the center melt more evenly once it goes in.
Cold brie going straight from fridge to oven tends to stay firm in the center while the outside overbakes. That brief rest makes a real difference in getting that fully molten, scoopable interior everyone is there for.
Step 2: Cut Your Crescent Dough Strips
Open the crescent roll dough and unroll it flat onto a lightly floured surface or directly on the parchment. If you have the seamless sheet version, press the perforations together firmly. Cut the dough lengthwise into strips about half an inch wide — you’ll need roughly 10 to 12 strips to cover the wheel.
Thinner strips give you that authentic mummy bandage look with lots of visible wrapping lines. Thicker strips cover more but look less dramatic. Go thinner — it reads better in photos and gives guests more of that flaky, layered crust in every bite.
👉 Pillsbury Crescent Roll Dough Seamless Sheet — The seamless sheet version lets you cut perfect mummy strips without fighting perforations.
Step 3: Wrap the Brie Like a Mummy
Place the brie wheel in the center of your lined baking sheet. Start draping dough strips over the top in a loose, overlapping, crisscross pattern — think messy bandages, not tight neat rows. Let the strips hang slightly over the edges and tuck them gently underneath the wheel. Leave a small open gap near the top-front where the eyes will go.
The casual, imperfect wrapping is actually the goal here. If you overthink it and try to be too neat, it loses the mummy character. Uneven, overlapping strips with little gaps between them look far more realistic — and forgiving — than anything perfectly symmetrical.
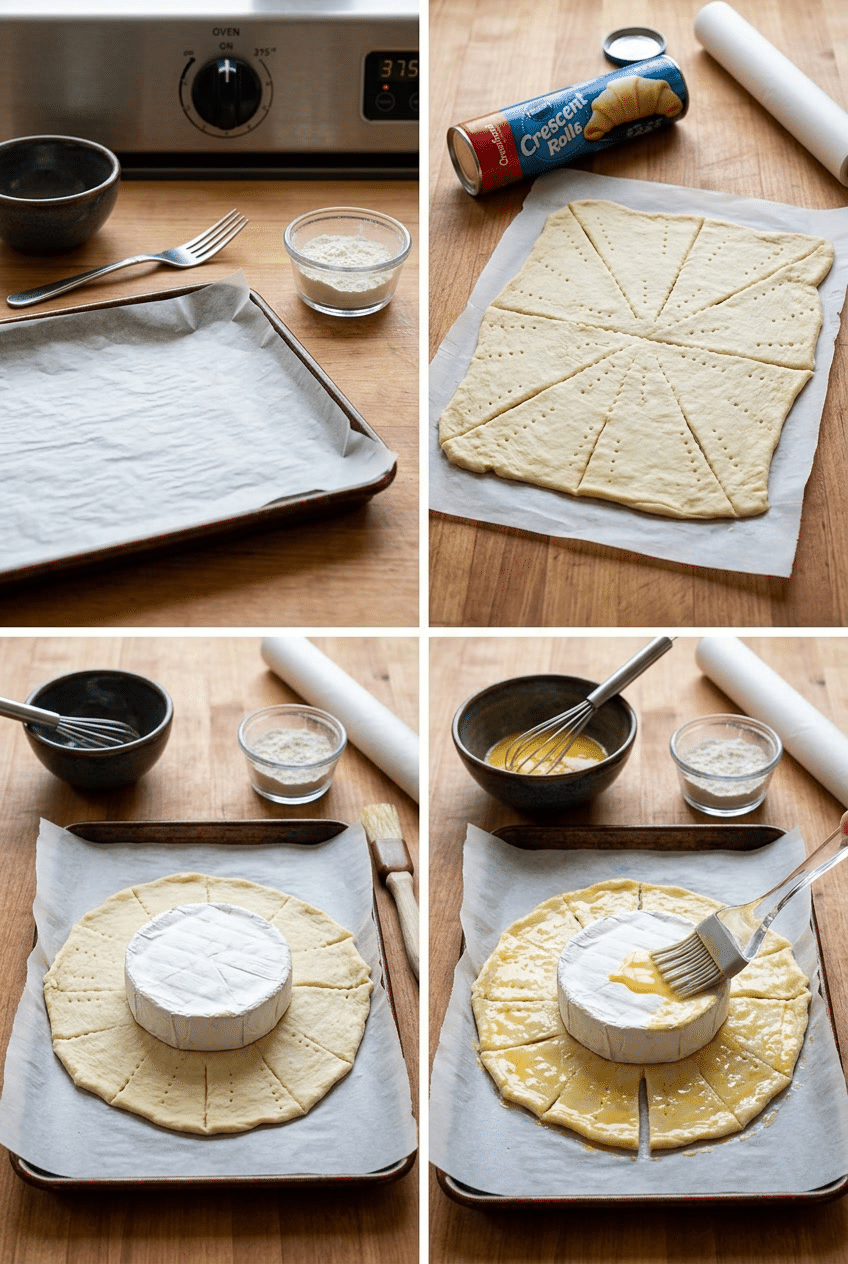
Step 4: Egg Wash and Into the Oven
Whisk the egg with one tablespoon of water in a small bowl, then brush it generously over all the exposed dough strips. Make sure you get into the crevices between the strips too — any unbrushed dough will stay pale and look undercooked next to the golden parts.
Slide the baking sheet into the oven and bake at 375°F for 13 to 16 minutes, until the dough is deep golden brown and you can see the cheese starting to bubble up at the edges. Watch it after the 12-minute mark — oven temperatures vary and you don’t want the dough to overbrown before the cheese fully melts.
Step 5: Add the Eyes and Serve Immediately
Pull the brie from the oven and immediately press two candy googly eyes into the gap you left in the dough. They’ll stick to the warm surface easily. Sprinkle a pinch of flaky sea salt over the top, drizzle honey over the entire thing, and transfer it — parchment and all — directly onto your serving board.
This is a serve-immediately appetizer. Brie is at its absolute best within 10 minutes of coming out of the oven, when the inside is fully molten and the dough is still crisp. It does firm back up as it cools, so have your crackers, baguette slices, and jam ready to go before it ever hits the table.
👉 Wilton Candy Eyeballs Decorations — These candy eyes are what turn a baked brie into an actual mummy — don’t skip them.
Nutrition Information
- Per serving: 210 cal
- 15g fat
- 11g carbs
- 9g protein
Pro Tips
Don’t Remove the Brie Rind: The rind is your best friend here — it acts as a natural casing that holds the melted cheese inside while the dough cooks. If you peel the rind off, the brie will collapse and leak out the bottom before the dough has a chance to set. Leave every bit of it on.
Score a Tiny X on Top Before Wrapping: Use a sharp knife to cut a small, shallow X into the top of the brie before layering the dough strips. You won’t see it through the dough, but it creates a release point that lets the cheese melt upward through the crust instead of pooling and leaking out the sides.
Use Cold Dough for Cleaner Strips: Keep the crescent roll dough refrigerated until the moment you open it. Warm dough gets sticky and tears when you try to cut strips. Cold dough holds its shape cleanly and gives you those distinct, defined bandage lines that make the mummy look sharp.
Let It Rest on the Parchment: Don’t attempt to transfer the brie to a board using a spatula fresh from the oven — the melted cheese inside makes the whole thing fragile. Slide the parchment paper directly onto your serving board. It looks intentional, and you won’t destroy your mummy in the process.
Double Up on Eyes for a Funnier Character: Two standard googly eyes look great, but if you want something more playful and expressive, press in three or four eyes in a cluster. It reads better from across a party table and gets more laughs — plus more photos, which means more people asking for the recipe.
Delicious Variations
Savory Herb Mummy Brie
Before wrapping, press a generous layer of fresh thyme, rosemary, and a few thinly sliced garlic cloves onto the top of the brie wheel. Wrap over the herbs so they steam into the cheese as it bakes. The finished brie tastes like something from a French bistro — herby, garlicky, and deeply savory. Serve with crusty sourdough and skip the honey entirely.
Jam-Stuffed Mummy Brie
Score a wider, deeper circle in the top of the brie and spoon in two tablespoons of raspberry or fig jam directly onto the cheese before wrapping. As it bakes, the jam melts into the cheese and creates a sweet, fruity pocket inside. When guests break through the crust, they get jam and cheese in one scoop. It’s dramatically good and completely over the top in the best way.
Spicy Jalapeño Mummy Brie
Lay thin slices of pickled jalapeño across the top of the brie before wrapping the dough strips over them. The heat from the jalapeño seeps into the melted cheese as it bakes, creating a spicy-creamy filling that is genuinely addictive. Drizzle with hot honey straight from the oven and serve with buttery crackers. This variation disappears fastest at every party.
Puff Pastry Mummy Brie
Swap crescent roll dough for store-bought puff pastry sheets for a more dramatic, layered result. Puff pastry puffs up significantly more than crescent dough, creating thick, pillowy mummy bandages with an ultra-flaky texture. The bake time increases slightly — start checking at 20 minutes. The result is more elegant and a little less approachable-looking, which works perfectly for a sophisticated Halloween dinner party.
Storage Instructions
Refrigerator
Mummy wrapped brie is genuinely best eaten within 15 minutes of coming out of the oven, but if you have leftovers, wrap them loosely in foil and refrigerate for up to two days. The dough will soften significantly in the fridge as the cheese moisture seeps in, so don’t expect it to stay crispy. To reheat, unwrap the foil and place on a baking sheet in a 325°F oven for 8 to 10 minutes until warmed through. The dough won’t be as flaky as fresh, but the cheese will melt nicely again.
Freezer
Freezing is not recommended for this recipe after it has been baked — the brie releases water as it freezes and thaws, which makes the crescent dough soggy and the cheese grainy in texture. If you want to get ahead, assemble the wrapped brie without baking it, freeze it on a parchment-lined tray until solid, then transfer to a zip-lock bag. Bake directly from frozen at 375°F, adding 6 to 8 extra minutes to the bake time and watching closely for even browning.
Make-Ahead
This is a fantastic make-ahead appetizer in its assembled, unbaked form. Wrap the brie in the dough strips up to 24 hours ahead, cover it loosely with plastic wrap, and store it in the fridge on its baking sheet. Pull it out 10 minutes before baking to take the chill off slightly, apply your egg wash fresh right before it goes into the oven, and bake as directed. Everything from pressing in the eyes to drizzling the honey happens fresh out of the oven — that part always needs to be done at the last minute for the best presentation.
For food safety guidelines, visit FDA Safe Food Handling Guidelines.
Frequently Asked Questions
Can I use puff pastry instead of crescent roll dough for mummy wrapped brie?
Absolutely — puff pastry is an excellent upgrade. It creates thicker, flakier, more dramatic mummy bandages than crescent roll dough and has a slightly more buttery flavor. The main difference is bake time: puff pastry typically needs 20 to 25 minutes at 375°F compared to 13 to 16 minutes for crescent dough. Watch it closely and pull it when the dough is deep golden and the cheese is visibly bubbling at the edges.
Do I need to remove the rind from the brie before wrapping it?
No — and you really shouldn’t. The white rind on brie is completely edible and actually serves a critical structural purpose in this recipe. It acts as a casing that holds the melted cheese inside while the crescent dough cooks around it. If you remove the rind, the brie will collapse and leak out the bottom of your mummy before the dough finishes baking. Leave the rind completely intact.
What do you serve with mummy wrapped brie?
The classic pairings are sliced baguette, water crackers, or apple slices for scooping. For dipping, honey and fig jam are the most popular — the sweetness balances the savory, slightly funky richness of melted brie perfectly. You can also serve it alongside a grape cluster and some candied walnuts to build out a mini cheese board around your mummy centerpiece. Hot honey is a fantastic modern twist.
My brie leaked out the bottom — what went wrong?
This usually happens for one of two reasons: the brie was over-baked past the point where the rind can hold the cheese, or the dough strips weren’t tucked firmly enough under the wheel and created gaps at the bottom. To prevent it, bake at exactly 375°F and pull it the moment the dough is golden — don’t push for more color. Also make sure all the strips are fully tucked under the wheel so there are no openings on the underside.
Where do you find candy googly eyes for decorating?
Wilton makes candy eyeball decorations that are sold in the baking aisle of most grocery stores in October, at craft stores like Michaels and Hobby Lobby, and on Amazon year-round. They’re essentially sugar pearls with a black pupil printed on them and they’re completely edible. In a pinch, you can press two black olive slices or two raisin halves into the dough right before serving — not quite as fun, but they work.
Can I make mummy wrapped brie ahead of time?
You can fully assemble it — brie wrapped in dough — up to 24 hours in advance and keep it covered in the fridge. Apply the egg wash right before baking, never ahead of time. The baking itself always needs to happen fresh, as close to serving time as possible. Baked brie firms back up within 20 minutes of cooling and loses that molten, gooey center quality that makes it so good. Give yourself a 30-minute window before guests arrive to bake and serve.
More Recipes You Will Love
👉 Perfect Sheet Pan Sausage & Veggies Recipe
👉 Perfect Greek Chicken & Rice Recipe
👉 Perfect Chicken Caesar Wraps Recipe
This mummy wrapped brie is genuinely one of those recipes that earns you a reputation as the host who always brings something worth talking about. It takes 25 minutes, costs almost nothing, and looks like you tried way harder than you did. Make it for your Halloween party, watch it disappear in under five minutes, and then come back here to tell me what dipping sauce you served it with — I’d love to know.