
- Prep: 20 Minutes
- Cook: 0 Minutes (Plus 1 Hour Chilling)
- Total: 20 Minutes
- Servings: 16 bars
A Quick Note Before You Start
These no-bake peanut butter chocolate bars taste exactly like a homemade Reese’s — but better. The secret is using natural peanut butter with just a touch of powdered sugar so the filling stays soft and fudgy, not dry and crumbly. Make them the night before for the cleanest cuts.
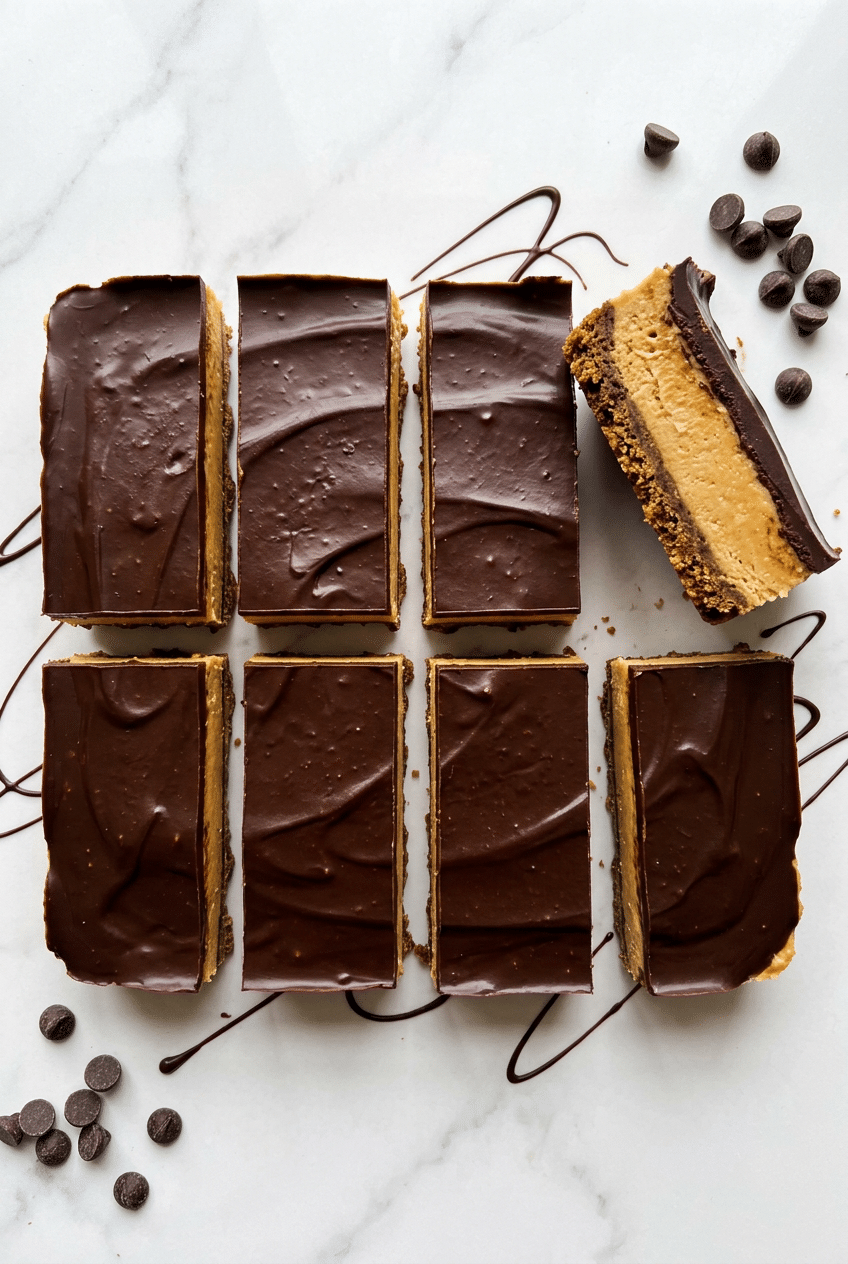
Peanut butter chocolate is one of those flavor combinations that never needs an explanation. These no-bake bars have a thick, creamy peanut butter filling sandwiched under a snappy dark chocolate top — ready in 20 minutes flat with zero oven required.
We tested this recipe against six popular versions online and combined the best techniques: the right ratio of peanut butter to powdered sugar, a graham cracker base that holds its shape, and a chocolate layer that snaps instead of crumbles.
Ingredients for Peanut Butter Chocolate Bars
For the Peanut Butter Base
- 1 cup (250g) natural creamy peanut butter — use a stir-and-pour style like Justin’s Classic Peanut Butter for the smoothest, richest filling
- 1/2 cup (115g) unsalted butter, melted — binds everything and adds richness
- 1 1/2 cups (180g) powdered sugar, sifted — sweetens the filling without adding crunch
- 1 1/2 cups (135g) graham cracker crumbs — about 11 full graham crackers, finely crushed
- 1/2 tsp fine sea salt — cuts the sweetness and makes the peanut butter flavor pop
- 1 tsp pure vanilla extract — rounds out the flavor
For the Chocolate Topping
- 2 cups (340g) semi-sweet chocolate chips — we love Ghirardelli Semi-Sweet Chocolate Chips for their deep cocoa flavor and smooth melt
- 2 tbsp coconut oil or unsalted butter — keeps the chocolate layer glossy and prevents it from cracking when you slice the bars
Optional Add-Ins
- 1/4 tsp cinnamon in the peanut butter layer for warmth
- 1 tbsp honey instead of some powdered sugar for a floral sweetness
- Flaky sea salt sprinkled on top before the chocolate sets
- 1/2 cup crushed pretzels mixed into the base for a salty crunch
- 1/4 cup mini chocolate chips pressed into the chocolate layer while still warm
How to Make Peanut Butter Chocolate Bars Step by Step
Step 1: Prep Your Pan
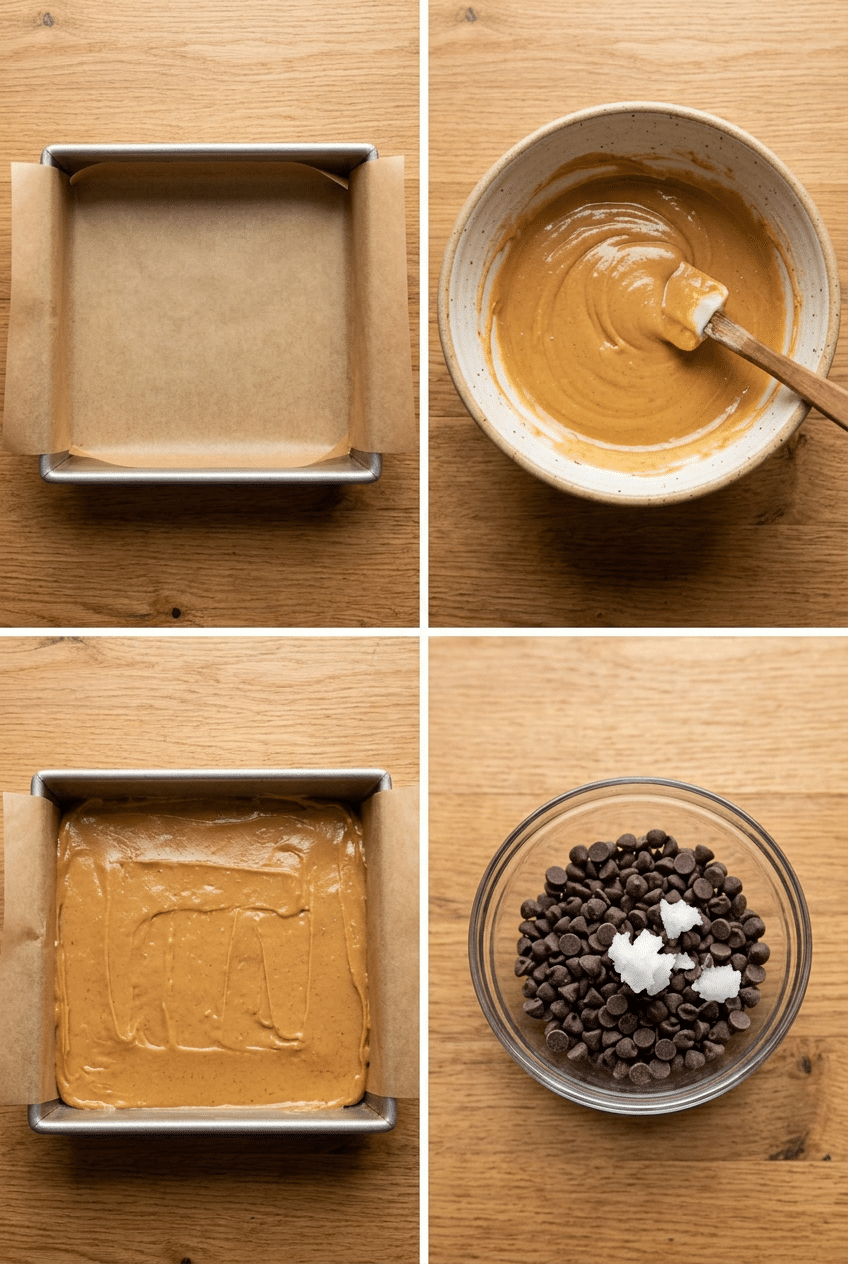
Line an 8×8-inch or 9×9-inch square baking pan with parchment paper, letting it overhang on two sides by about two inches. This overhang is your built-in handle — after the bars chill, you’ll lift the whole slab out cleanly and slice on a cutting board. No struggling to dig out the first piece.
Press the parchment flat into the corners as best you can. A small glass works great for smoothing it down. If you’re using a 9×9 pan, your bars will be slightly thinner and will chill faster — either size works perfectly here.
👉 8×8 Inch Glass Baking Dish with Lid — A glass dish with a snap lid means you can chill, store, and transport these bars without any extra wrapping.
Step 2: Make the Peanut Butter Layer
In a large bowl, stir together the melted butter and peanut butter until completely smooth and combined. Add the powdered sugar, graham cracker crumbs, salt, and vanilla extract, then stir everything together until it forms a thick, uniform dough. It should look like soft cookie dough — moldable but not sticky.
The graham cracker crumbs are doing double duty here: they add a subtle honey-sweet flavor AND give the filling structure so it holds its shape when sliced. If your crumbs are coarse, pulse them in a zip-lock bag with a rolling pin for about 30 seconds until they’re fine and sand-like.
👉 Justin’s Classic Peanut Butter — Smooth, natural, and perfectly balanced — this is the peanut butter that makes the filling taste like a real Reese’s.
Step 3: Press In the Filling
Transfer the peanut butter mixture into your prepared pan and press it into an even, flat layer. Use the bottom of a flat measuring cup or a silicone spatula to really pack it down and smooth the surface — an even layer means every bar gets the same thickness. Take your time here because the chocolate goes right on top.
The layer should feel firm and compact, not crumbly. If it seems too dry and won’t press together, add one extra tablespoon of melted butter. If it’s too soft and greasy, add two tablespoons more graham cracker crumbs. Natural peanut butter brands vary slightly in oil content, so small adjustments are totally normal.
Step 4: Melt the Chocolate
Combine the chocolate chips and coconut oil in a microwave-safe bowl. Microwave in 30-second intervals, stirring between each one, until the chocolate is fully melted and glossy — usually two to three intervals total. Don’t rush this with longer bursts or the chocolate will seize up and turn grainy, which can’t be fixed. Slow and steady wins here.
The coconut oil is non-negotiable if you want that satisfying snap when you bite in. It lowers the melting point of the chocolate just enough to keep the top layer from shattering completely when sliced cold. Two tablespoons is the sweet spot — more than that and the top layer stays too soft.
👉 Ghirardelli Semi-Sweet Chocolate Chips — Richer cocoa flavor than grocery-store chips, and they melt into an impossibly glossy topping.
Step 5: Pour and Spread the Chocolate
Pour the melted chocolate directly over the peanut butter layer and use a spatula to spread it into an even layer all the way to the edges. Work quickly because the cool peanut butter filling will start to set the chocolate almost immediately once it makes contact. You have about 90 seconds to get it perfectly smooth.
If you want to add flaky sea salt or mini chocolate chips on top, do it right now while the chocolate is still liquid — they’ll sink in just slightly and anchor themselves as it sets. This is also the moment to add any decorative chocolate drizzle using a contrasting white chocolate for a nice visual.
👉 Maldon Sea Salt Flakes — A pinch of Maldon flakes on top of the chocolate layer takes these bars from great to next-level — the crunch and salty contrast is everything.
Step 6: Chill Until Fully Set
Slide the pan into the refrigerator and let the bars chill for at least one hour, or up to overnight. The chocolate needs to fully harden and the peanut butter layer needs to firm up so you get clean slices instead of smooshed edges. Resist the urge to peek and poke — just leave them alone.
This is the hardest part. While the bars are chilling, they’re transforming from a loose filling into a firm, sliceable slab. An hour gets you there, but two hours gives you truly clean cuts. If you’re in a hurry, 30 minutes in the freezer works too — just don’t freeze them longer or the chocolate layer will crack dramatically when sliced.
Step 7: Slice and Serve
Lift the entire slab out of the pan using the parchment paper overhang and place it on a cutting board. Use a sharp chef’s knife warmed under hot water and dried off — a warm blade glides through chocolate without cracking it. Cut into 16 squares (four cuts each direction) using one smooth downward press per cut, not a sawing motion.
If the chocolate still cracks slightly at the edges, that’s totally fine and honestly looks rustic and beautiful. Serve the bars cold straight from the fridge or let them sit at room temperature for five minutes for a slightly softer bite. Both ways are delicious — cold is more fudge-like, room temp is more creamy.
Nutrition Information
- Per serving (1 bar): 285 cal
- 18g fat
- 28g carbs
- 5g protein
- 2g fiber
- 20g sugar
- 120mg sodium
Pro Tips
Use room temperature peanut butter: Cold peanut butter straight from the fridge is stiff and won’t mix smoothly with the butter. Let it sit out for 20 minutes first and the whole mixture comes together in about 60 seconds of stirring. This single step prevents the filling from looking greasy or separated.
Sift your powdered sugar: Unsifted powdered sugar has tiny lumps that don’t dissolve into the peanut butter filling — you’ll bite into a gritty patch and wonder what went wrong. A 30-second sift through a fine mesh strainer guarantees a silky, smooth texture every single time.
Warm your knife before slicing: Run your chef’s knife under hot tap water, wipe it dry, then slice immediately. The warmth helps the blade glide through the hardened chocolate layer without cracking it across the whole bar. Repeat the warm-and-dry process after every two cuts for the cleanest edges.
Don’t skip the salt: Half a teaspoon of fine sea salt in the peanut butter layer sounds like a lot, but this filling is very sweet from the powdered sugar. Salt balances the sweetness and makes the peanut butter flavor more pronounced — without it, the bars taste flat and one-dimensional.
Line with parchment, not foil: Aluminum foil sticks to the chocolate layer and rips apart when you try to peel it away, leaving shiny flecks in your bars. Parchment paper releases cleanly every time. The overhang handles are also a game-changer for getting the whole slab out in one piece.
Delicious Variations
Dark Chocolate Sea Salt Bars
Swap the semi-sweet chips for Ghirardelli 60% cacao dark chocolate chips and immediately sprinkle Maldon flaky sea salt over the chocolate layer after spreading. The bittersweet chocolate and salt cut through the sweet peanut butter filling in the most satisfying way. These taste more grown-up and slightly less sweet — ideal if you usually find Reese’s a bit too sugary.
Oreo Crust Peanut Butter Bars
Replace the graham cracker crumbs with finely crushed Oreo cookies — just the cookies, no filling needed, though you can leave it in for extra sweetness. The chocolate cookie crust adds a deeper, more complex chocolate-on-chocolate-on-peanut-butter effect. Use a food processor to get the Oreos into fine crumbs and reduce the powdered sugar by two tablespoons since Oreos are already quite sweet.
Almond Butter Chocolate Bars
Substitute Justin’s Classic Almond Butter 1:1 for the peanut butter for a slightly lighter, nuttier flavor profile. Almond butter is less sweet than peanut butter and has a more delicate flavor, so consider adding a tablespoon of honey to the filling to compensate. Top with dark chocolate and a sprinkle of chopped roasted almonds on top while the chocolate is still wet for texture and visual appeal.
Pretzel Peanut Butter Chocolate Bars
Replace half the graham cracker crumbs with finely crushed pretzels for a salty, crunchy base layer that plays beautifully against the sweet chocolate top. Press the filling down firmly since pretzels don’t bind quite as tightly as graham crackers. The sweet-salty-crunchy combination in every bite is genuinely addictive — these tend to disappear faster than any other version at parties.
White Chocolate Drizzle Bars
After spreading the semi-sweet chocolate top layer, let it set for just five minutes so it’s firm but still slightly tacky. Melt two ounces of white chocolate chips with half a teaspoon of coconut oil, pour into a zip-lock bag, snip the corner, and drizzle back and forth across the bars in thin lines. The visual contrast between dark and white chocolate is stunning and makes these look like a professional bakery made them.
Storage Instructions
Refrigerator
Store your peanut butter chocolate bars in an airtight container or covered baking dish in the refrigerator for up to one week. Layer them between sheets of parchment paper if stacking so the chocolate tops don’t scratch each other. The bars actually taste better on day two and three as the flavors meld together — the peanut butter layer becomes even more fudgy and the chocolate top develops a deeper flavor. Keep them cold right up until serving for the cleanest bite.
Freezer
These bars freeze beautifully for up to three months. Slice them first, then layer between parchment sheets in a freezer-safe zip-lock bag or airtight container. When you’re ready to eat, pull one out and let it thaw on the counter for about 15 minutes — or eat it straight from frozen for an almost ice-cream-bar-like texture that is genuinely incredible. Freezing is also a great strategy if you made a big batch for a party and want to keep them fresh without eating them all in a week.
Make-Ahead
These bars are an ideal make-ahead dessert because they need chilling time anyway. Make them the night before any event and keep them covered in the fridge — they slice cleanly after an overnight rest and hold their shape at room temperature for about two hours at a party. You can also make and freeze them up to two weeks ahead, then transfer from the freezer to the fridge the morning of your event to thaw slowly. The texture is perfect by party time with zero day-of stress.
For food safety guidelines, visit FDA Safe Food Handling Guidelines.
Frequently Asked Questions
Can I use regular peanut butter instead of natural for these peanut butter chocolate bars?
Yes, you can use Jif or Skippy-style peanut butter — it actually makes the filling slightly firmer and less oily because those brands contain added stabilizers. The trade-off is a slightly sweeter, less intense peanut butter flavor. If you use regular peanut butter, reduce the powdered sugar by two tablespoons since it’s already sweetened. Natural peanut butter gives you that deep, roasted peanut flavor that tastes more like a homemade version — but both work well.
Why did my chocolate top crack when I sliced the bars?
The two most common causes are slicing the bars too cold (straight from the freezer) or skipping the coconut oil in the chocolate. Coconut oil keeps the chocolate layer slightly more flexible so it bends rather than shatters. To fix cracked bars: let them sit at room temperature for five minutes before slicing, always use a warm dry knife, and press straight down rather than using a sawing motion. A small amount of cracking at the very edge of each bar is completely normal and doesn’t affect the taste at all.
Can I make these peanut butter chocolate bars vegan?
Absolutely. Swap the butter in the peanut butter layer for refined coconut oil — use the same amount, melted. Use dairy-free chocolate chips like Enjoy Life semi-sweet chips for the topping, and make sure your graham crackers are vegan (most Nabisco Honey Maid grahams contain honey, so look for a vegan-certified alternative). The rest of the recipe is already plant-based. The texture and flavor are nearly identical to the original version and nobody at the table will notice the swap.
How do I get perfectly clean cuts on peanut butter chocolate bars?
Three things make the biggest difference: chill the bars for at least two hours (not just one), run your knife under hot water and dry it before each cut, and use a single downward pressing motion rather than dragging the knife forward and back. The warm blade melts through the chocolate layer without cracking it. If you want truly professional-looking cuts, wipe the blade clean between each slice with a damp paper towel — this prevents chocolate smearing on the peanut butter layer edges.
Can I make these bars in a 9×13 pan for a larger crowd?
Yes — just double the recipe completely and use a 9×13-inch pan lined with parchment. The filling layer will be slightly thinner than the 8×8 version, which actually makes the chocolate-to-peanut-butter ratio a bit more balanced. Chill for the same amount of time (one to two hours). A doubled batch makes about 32 bars, which is perfect for potlucks, bake sales, or holiday cookie trays. The bars store and freeze exactly the same way regardless of pan size.
My peanut butter filling is too crumbly and won’t press together — what went wrong?
This usually happens when the natural peanut butter is too thick or the butter wasn’t fully melted. The fix is simple: add one tablespoon of melted butter at a time, stirring well between additions, until the mixture holds together when you squeeze a small amount in your fist. Different brands of natural peanut butter have different oil contents, and even the same brand varies slightly between jars. Don’t worry — it’s a very forgiving recipe and a small adjustment always brings it back to the right consistency.
More Recipes You Will Love
👉 Perfect Homemade Uncrustables Recipe
👉 Perfect Mini Bagel Sandwiches Recipe
👉 Perfect Ham And Cheese Wraps Recipe
These peanut butter chocolate bars are the kind of recipe you make once and then get asked for at every party, potluck, and holiday gathering forever. They take 20 minutes of actual work and taste like you spent all day in the kitchen. Make a batch this weekend, let them chill overnight, and slice them up for the people you love. Drop a comment below and tell me which variation you tried first — I want to know!