
- Prep: 10 Minutes
- Cook: 5 Minutes
- Total: 15 Minutes
- Servings: 4 servings
Table of Contents
A Quick Note Before You Start
These wraps work cold OR toasted — both are great, but a quick pan toast takes them from “lunchbox basic” to genuinely crave-worthy. Use room-temperature cream cheese so it spreads without tearing the tortilla.
Ham and cheese wraps are the kind of recipe you make once and then wonder why you ever bought a sandwich instead. Ten minutes, zero stress, and they taste like you actually tried.
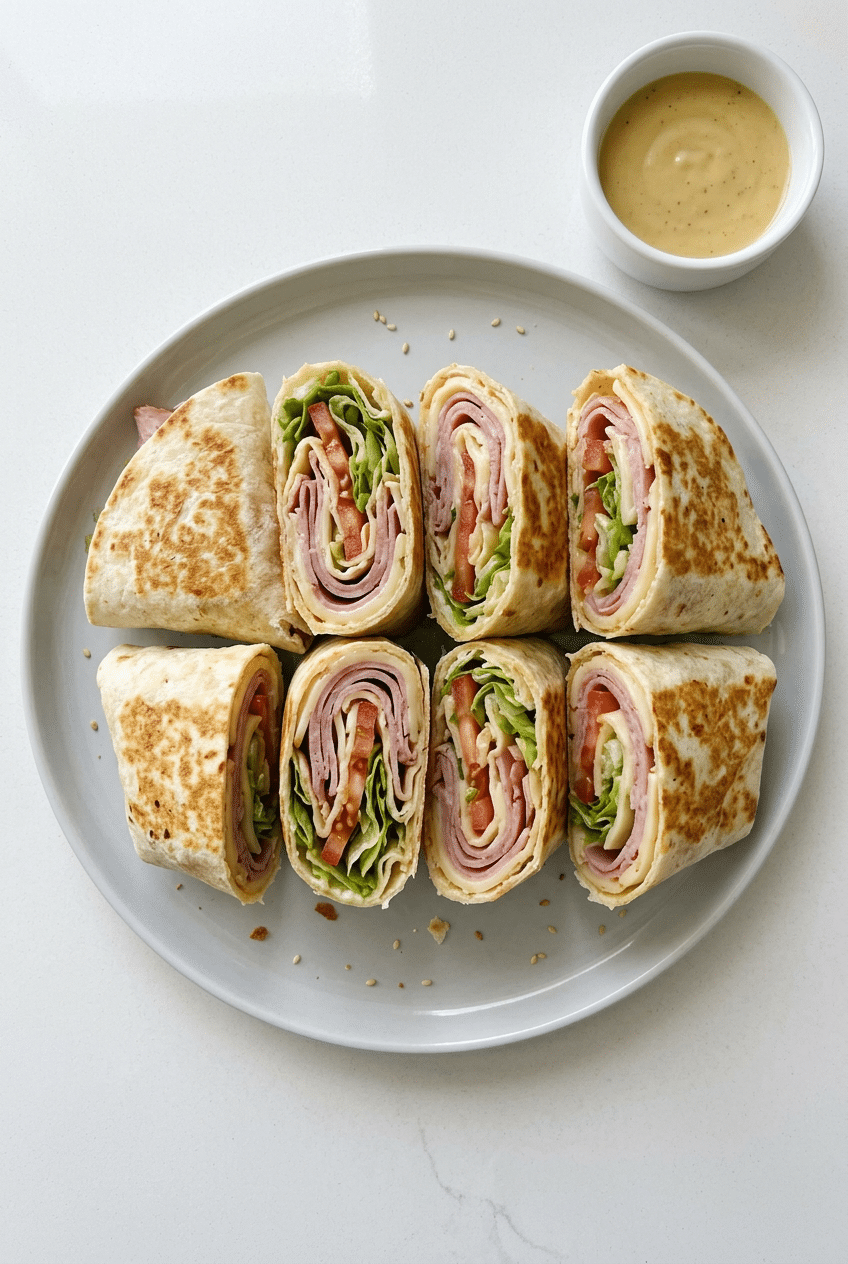
We’re layering deli ham, melty Swiss, a tangy honey mustard spread, and crunchy fresh veggies into a golden-toasted tortilla. Simple ingredients, smart technique, big flavor payoff.
Ingredients for Ham & Cheese Wraps
For the Wraps
- 4 large flour tortillas (10-inch burrito size) — larger tortillas give you room to roll without tearing
- 12 oz deli ham, thinly sliced — black forest or honey ham both work great
- 6 oz Swiss cheese, thinly sliced — provolone or Havarti are excellent swaps
- 1 cup shredded romaine lettuce — adds crunch and keeps things fresh
- 1 medium tomato, thinly sliced — pat slices dry so the wrap doesn’t get soggy
- 1/4 small red onion, thinly sliced — adds a sharp bite that cuts through the richness
For the Honey Mustard Spread
- 3 tablespoons Dijon mustard — the backbone of the spread; don’t substitute yellow mustard here
- 2 tablespoons mayonnaise — Hellmann’s Real Mayonnaise gives the creamiest, most stable texture
- 1 tablespoon honey — balances the tang and helps the spread caramelize slightly when toasted
- 1/4 teaspoon garlic powder — a quiet background flavor that ties everything together
- 1/4 teaspoon smoked paprika — adds color and a subtle smokiness to the spread
For Toasting (Optional but Recommended)
- 1 tablespoon unsalted butter — for pan-toasting; gives the outside a golden, slightly crisp crust
Optional Add-Ins
- 2 oz cream cheese, softened (spread directly on tortilla for extra richness)
- 4 slices crispy cooked bacon (adds crunch and a smoky layer)
- 1/4 cup sliced dill pickles (tangy crunch that plays off the ham beautifully)
- 1/2 avocado, sliced (creaminess and healthy fat)
- 1 teaspoon Everything Bagel Seasoning sprinkled inside (instant flavor upgrade)
- Handful of baby spinach (swap for romaine for extra nutrients)
How to Make Ham and Cheese Wraps Step by Step
Step 1: Mix the Honey Mustard Spread
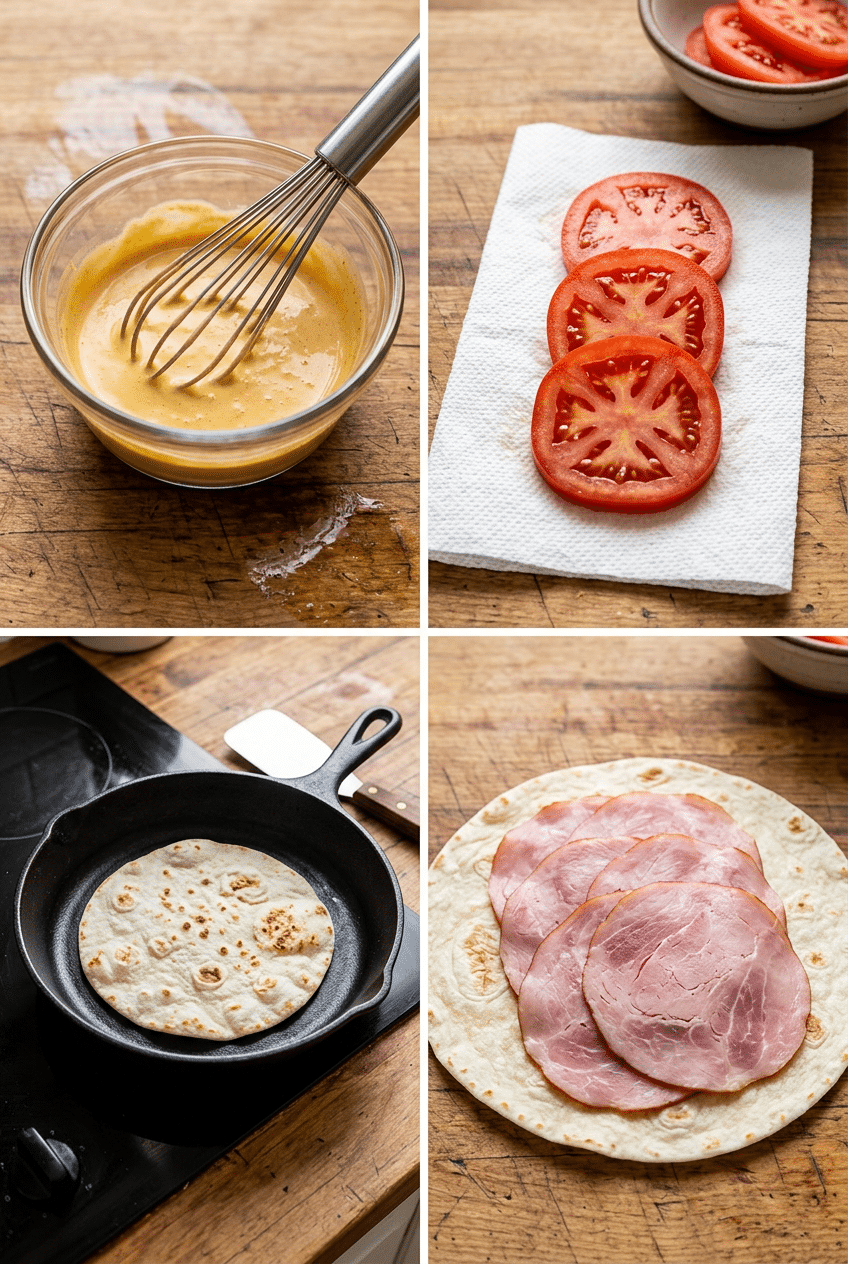
In a small bowl, whisk together the Dijon mustard, mayonnaise, honey, garlic powder, and smoked paprika until completely smooth and uniform in color. It should look like a pale golden, creamy sauce with no visible streaks. This takes about 30 seconds — don’t overthink it.
Making the spread first gives the flavors a minute to meld while you prep everything else. The smoked paprika in particular blooms quickly in the mayo and transforms from raw spice dust into something that actually tastes intentional. Taste it and adjust — want more tang? Add a little more Dijon. Want it sweeter? Another drop of honey.
👉 Hellmann’s Real Mayonnaise — Hellmann’s gives the creamiest, most stable base for the honey mustard spread — generic mayo breaks and goes watery.
Step 2: Prep Your Fillings
Slice your tomato thinly — about 1/4 inch — and lay the slices on a paper towel. Press another paper towel on top and let them sit for two minutes. This pulls out excess moisture that would otherwise turn your wrap into a soggy mess within minutes of rolling.
Slice your red onion as thin as you possibly can. A mandoline makes this effortless and gives you those translucent, paper-thin rings that don’t overpower every bite. If you’re slicing by hand, hold the onion firmly and go slow — thin slices distribute the flavor without dominating it.
👉 OXO Good Grips Adjustable Handheld Mandoline Slicer — Paper-thin onion slices in seconds — this mandoline gets you the translucent rings that make wraps actually look restaurant-quality.
Step 3: Warm and Lay Out the Tortillas
Warm each tortilla in a dry skillet over medium heat for about 20 seconds per side, or wrap all four in a damp paper towel and microwave for 25 seconds. A warm tortilla is pliable and flexible — a cold one cracks at the fold and blows out the sides when you roll it.
Lay the warmed tortilla flat on your work surface. Spread about 1.5 tablespoons of the honey mustard mixture across the center, leaving a 2-inch border all the way around. That border is your insurance policy — it’s what keeps the filling inside when you fold in the sides.
Step 4: Layer the Ham and Cheese
Lay 3 oz of ham slices across the center of the tortilla, overlapping them slightly so you get even coverage in every bite. Then lay 2-3 slices of Swiss cheese directly on top of the ham. Think of this as building a foundation — the cheese acts like glue once it melts, holding the whole structure together.
If you’re making these cold (no toasting), put the cheese down first, then the ham on top. Cold cheese slices slide less when they’re closest to the tortilla. If you’re toasting, the order you see here — ham first, cheese on top — means the cheese gets direct heat and melts beautifully.
Step 5: Add the Vegetables
Scatter the shredded romaine over the cheese, then add your pat-dried tomato slices and the thin red onion rings. Keep everything centered in that middle zone — don’t let fillings creep toward the edges or your roll will be lopsided and harder to cut cleanly.
The lettuce goes on last (before rolling) for cold wraps, but if you’re toasting, you’ll add the lettuce AFTER toasting so it stays crisp. Heat wilts romaine fast, and a wilted wrap has a sad, soggy texture that no one wants. This small step makes a noticeable difference in the final bite.
Step 6: Roll the Wrap Tightly
Fold the left and right sides of the tortilla inward over the filling — about 2 inches each. Then, starting from the bottom edge closest to you, roll the tortilla up and away from you, keeping steady tension as you go. The folded sides should stay tucked in as the wrap forms a tight cylinder.
The tighter your roll, the cleaner your cuts will be. Loose rolls fall apart when sliced and don’t hold their shape on a plate. If you feel the filling shifting, stop, press it back toward center, and continue rolling. Once fully rolled, place it seam-side down and press gently with your hand to seal.
👉 Parchment Paper Pre-Cut Sheets — Pre-cut parchment sheets wrap around rolled wraps perfectly for meal prep — keeps them tight, portable, and easy to grab.
Step 7: Toast to Golden Perfection
Melt half a tablespoon of butter in a large skillet over medium heat. Place the wrap seam-side down first — this seals it shut before you ever have to worry about it unrolling. Cook for 2 minutes until golden and lightly crisp, then carefully roll it a quarter turn and cook another 30-60 seconds per side.
You’re looking for an even golden-brown color across the surface and that satisfying slight crunch when you tap it with your finger. The butter encourages browning at a lower temperature so the tortilla doesn’t burn before the cheese melts. If you skip the butter and go dry, you get uneven dark spots — fine, but not as good.
Step 8: Slice and Serve
Transfer the toasted wrap to a cutting board and let it rest for 60 seconds before cutting — this lets the melted cheese set up slightly so the filling doesn’t slide out. Then slice it diagonally in half with one confident, decisive cut using a sharp serrated knife. Sawing back and forth compresses the wrap.
Serve immediately with a small bowl of extra honey mustard on the side for dipping, or alongside a handful of kettle chips and a dill pickle spear. If you’re packing these for lunch, wrap each uncut wrap tightly in foil or parchment and slice just before eating to keep everything intact.
👉 Anthropologie-Style Ceramic Dipping Bowls Set — A small ceramic dipping bowl makes that honey mustard sauce look intentional and photo-worthy on the plate.
Nutrition Information
- Per serving (1 toasted wrap): 420 cal
- 21g fat
- 34g carbs
- 26g protein
- 2g fiber
- 980mg sodium
Pro Tips
Pat-dry your tomatoes obsessively: The single biggest reason wraps go soggy is tomato moisture. After patting with paper towels, let slices sit for a full two minutes. You’ll see the towel pull out a surprising amount of liquid. This one step keeps your wrap firm and sliceable even hours after assembly.
Warm the tortilla every single time: Cold tortillas crack. It takes 25 seconds in the microwave and it changes everything about how the wrap rolls and holds. A pliable tortilla rolls tight and stays closed — a cold one tears at the fold and creates structural failures that show up when you slice.
Seam-side down first in the pan: Always start your toast seam-side down. The heat seals the tortilla shut before you flip it, so you never have to babysit it to keep it from unrolling. It’s a small thing that makes the whole process hands-free and stress-free.
Don’t overfill: More is not better here. If you pile in too much filling, you can’t roll tightly, the sides blow out, and the finished wrap is impossible to slice cleanly. Use the amounts listed, trust the recipe, and you’ll have a tight, photogenic, restaurant-quality result every time.
Add lettuce after toasting: If you toast your wraps, always add the lettuce after the pan — not inside before. Tuck a pinch of fresh shredded romaine into the cut end right before serving. It stays crunchy and bright green instead of turning limp and sad inside the warm tortilla.
Delicious Variations
Buffalo Ham & Cheese Wrap
Swap the honey mustard spread for a mix of 2 tablespoons Frank’s RedHot Buffalo Sauce and 2 tablespoons cream cheese. Use pepper jack instead of Swiss, and add thinly sliced celery for crunch. Toast as directed. The buffalo cream cheese spread gets gooey and spicy and is completely addictive — this one disappears fast at parties.
Italian Deli Wrap
Replace the honey mustard with a thin layer of basil pesto. Swap the Swiss for provolone and the regular ham for a mix of capicola and salami. Add a few thin-sliced banana pepper rings and a drizzle of Italian dressing. This is the wrap that tastes like a great sub shop made it, and it comes together in the same 10 minutes.
Breakfast Ham & Cheese Wrap
Scramble two eggs with a splash of milk and cook until just set — still slightly glossy. Layer them with ham and cheddar (not Swiss) on the tortilla, skip the lettuce and tomato, and add a few dashes of hot sauce. Roll tight and toast in butter. This is a legitimately great grab-and-go breakfast that keeps you full until lunch.
Cold Deli-Style Wrap (No Cook)
Skip toasting entirely. Use whipped cream cheese instead of the honey mustard spread, add deli ham, Swiss, lettuce, tomato, cucumber slices, and a sprinkle of Everything Bagel Seasoning. Roll tight, wrap in parchment, and refrigerate for up to 4 hours. This is the version for lunchboxes, picnics, and road trips — no heat required, no compromise on flavor.
Low-Carb Lettuce Wrap Version
Swap the flour tortilla for two large iceberg lettuce leaves layered on top of each other for structure. Use the full honey mustard spread, all the ham and cheese, and skip the tomato to keep moisture low. Fold rather than roll — fold the bottom up, then fold both sides in. These are light, crunchy, and surprisingly satisfying for a no-carb lunch.
Storage Instructions
Refrigerator
Store uncut, untoasted wraps tightly wrapped in foil or plastic wrap in the refrigerator for up to 3 days. Keep the lettuce and tomato out if you’re making them ahead — add fresh veggies right before serving to prevent sogginess. The honey mustard spread actually improves overnight as the flavors meld, so assembled (minus veggies) wraps are great for Sunday meal prep.
Freezer
Toasted wraps without lettuce or tomato freeze reasonably well for up to 1 month. Wrap each one individually in plastic wrap, then foil, and freeze flat. Reheat straight from frozen in a 350°F oven for 12-15 minutes or in an air fryer at 350°F for 8 minutes. The texture won’t be quite as crisp as fresh, but it’s a solid grab-and-go option for busy weeks.
Make-Ahead
These wraps are genuinely great for meal prep. Make a full batch of the honey mustard spread on Sunday and refrigerate in a small container — it keeps for 2 weeks. Pre-slice your vegetables and store them separately in airtight containers. Then each morning, assemble and roll a fresh wrap in under 3 minutes. For packed lunches, wrap tightly in parchment or foil and slice just before eating.
For food safety guidelines, visit FDA Safe Food Handling Guidelines.
Frequently Asked Questions
Can I make ham and cheese wraps ahead of time?
Yes — with one condition. Assemble the wraps with the spread, ham, and cheese, but leave the lettuce and tomato out. Wrap them tightly in foil and refrigerate for up to 24 hours. When you’re ready to eat, either toast them straight from the fridge (add 1 extra minute to the cook time) and add fresh veggies after, or unwrap, add the cold veggies, and eat cold. This method keeps everything crisp and prevents the dreaded soggy wrap.
What’s the best ham for ham and cheese wraps?
Black forest ham is the gold standard — it has a slightly smoky, complex flavor that makes the wrap taste like something from a real deli. Honey ham is sweeter and works beautifully with the honey mustard spread. Smoked ham adds depth. What you want to avoid is the ultra-thin, pressed luncheon meat that’s mostly water and falls apart. Ask for your ham sliced at medium thickness at the deli counter — it makes a real difference in texture and flavor.
How do I keep my wrap from falling apart when I cut it?
Three things: roll it tight, rest it before cutting, and use a serrated knife. A tight roll means the filling is compressed and has nowhere to go. Resting for 60 seconds after toasting lets the cheese set up slightly, acting like glue that holds the cross-section together. And a serrated knife cuts without pressing down and squishing — draw it back and forth with gentle pressure rather than pressing straight down. These three steps give you that clean, photogenic cut every time.
Can I use spinach tortillas or whole wheat tortillas?
Absolutely. Spinach tortillas add a mild earthy flavor and look beautiful on the plate — the green color makes the finished wrap look intentional and vibrant. Whole wheat tortillas have a slightly nutty flavor that pairs well with the ham. Both work exactly the same as regular flour tortillas — same rolling technique, same toast time. Just make sure you’re buying a 10-inch burrito-size tortilla regardless of flavor, so you have enough room to work with.
What cheese works best in ham and cheese wraps?
Swiss is the classic choice because its mild, slightly nutty flavor doesn’t compete with the ham. Provolone is a close second — it melts beautifully and has a bit more sharpness. Havarti is wonderfully creamy and melty. Sharp cheddar adds a bolder, more assertive flavor. Pepper jack adds heat. The key is to use a cheese that melts well if you’re toasting — avoid anything crumbly like feta, which won’t melt and creates texture problems.
Can I make ham and cheese wraps in an air fryer?
Yes, and honestly it’s one of the best ways to do it. Place seam-side down in the air fryer basket, spray lightly with cooking oil, and air fry at 375°F for 4-5 minutes, flipping once halfway through. You get an incredibly crispy, evenly browned exterior without any butter in the pan. The air fryer is especially great if you’re making a big batch — you can do two wraps at a time while the first two are resting.
More Recipes You Will Love
👉 Perfect BBQ Baby Back Ribs Recipe (Fall-Off-Bone)
👉 All-American Burger Recipe (Juicy & Classic)
👉 Perfect Corn on the Cob Recipe (5 Easy Ways)
👉 Perfect Patriotic Fruit Pizza Recipe (Easy & Festive)
Ham and cheese wraps are proof that the simplest things, done right, are the most satisfying. Make a batch this week, try the honey mustard spread, and let the pan toast do its thing. Then come back and tell me in the comments which variation you tried — I read every single one. And if you loved this, share it with someone who still thinks sandwiches are exciting.