
- Prep: 20 Minutes
- Cook: 4 Hours (freezing time)
- Total: 24 Minutes
- Servings: 8 popsicles
A Quick Note Before You Start
These patriotic popsicles need time between each layer to freeze properly. Start early in the day for evening parties. The key is patience between layers.
Patriotic popsicles transform simple ingredients into stunning red, white, and blue frozen treats that scream summer celebration. These layered beauties use fresh strawberries, creamy coconut, and blueberries for natural colors.
The secret lies in the freezing technique and getting each layer perfectly set before adding the next. With just 20 minutes of active prep, you’ll have Instagram-worthy treats ready for any patriotic gathering.

Ingredients for Perfect Patriotic Popsicles
For the Red Layer
- 1 cup fresh strawberries — hulled and chopped for natural red color
- 2 tablespoons honey — balances tartness and helps texture
- 1 tablespoon lemon juice — brightens flavor and prevents browning
For the White Layer
- 1 cup coconut milk — full-fat for creaminess
- 2 tablespoons maple syrup — sweetens without overpowering
- 1 teaspoon vanilla extract — adds depth to coconut flavor
For the Blue Layer
- 1 cup fresh blueberries — provides natural blue-purple hue
- 2 tablespoons agave nectar — complements berry flavor
- 1 tablespoon lime juice — enhances berry brightness
Optional Add-Ins
- 1/4 cup mini chocolate chips for texture
- 1 tablespoon chia seeds for nutrition boost
- Food coloring for more vibrant colors
How to Make Patriotic Popsicles Step by Step
Step 1: Prepare Red Strawberry Layer
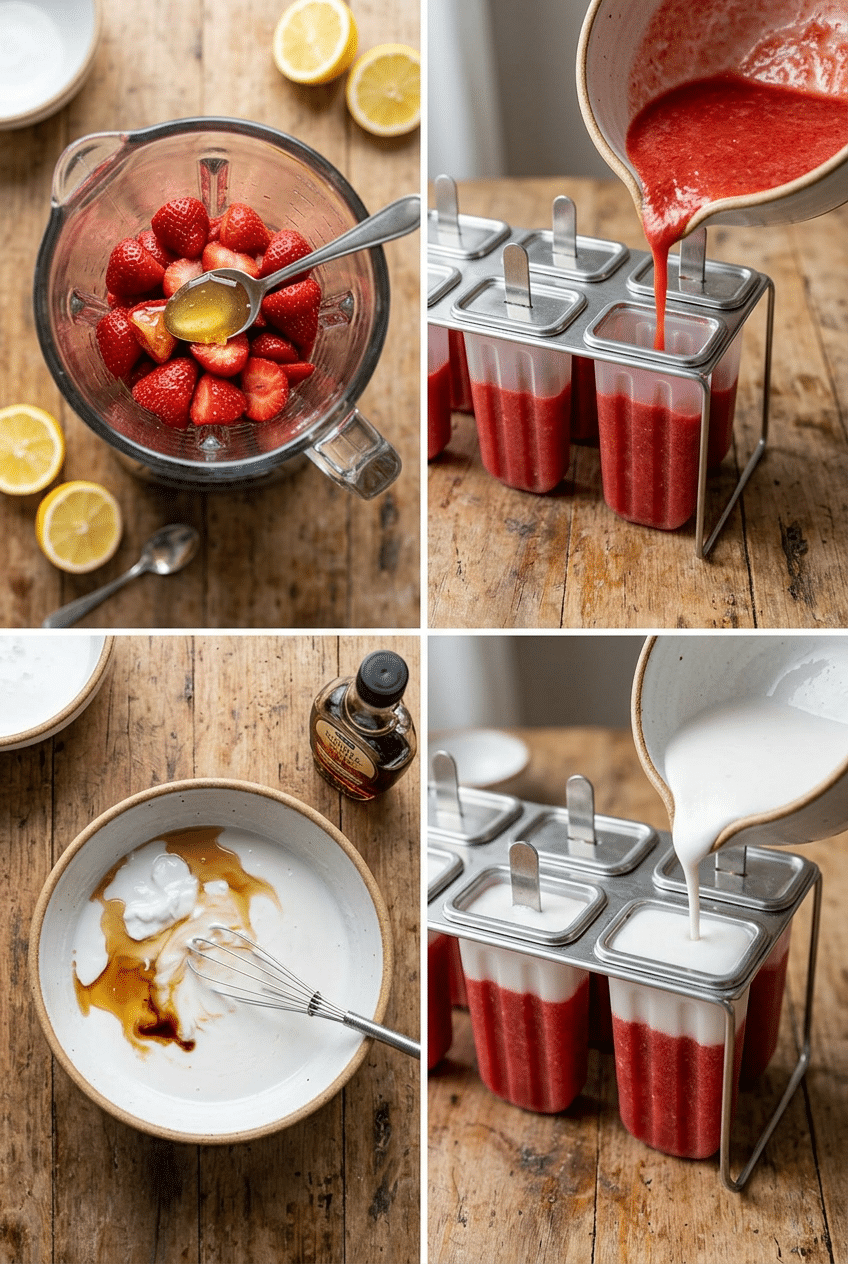
Combine hulled strawberries, honey, and lemon juice in a blender or food processor. Blend until completely smooth, about 60 seconds. The mixture should be thick enough to coat a spoon but still pourable.
This red layer forms the foundation of your patriotic design. The honey prevents ice crystals while lemon juice keeps the color vibrant and adds necessary acidity to balance sweetness.
High-speed blender — A good blender makes silky smooth layers that freeze evenly without ice chunks.

- INCREASED MOTOR POWER: The Ninja Professional Plus features a new modern design and a more powerful motor than Ninja’s o…
- POWERFUL ICE CRUSHING: Total Crushing blades give you perfectly crushed ice for smoothies and frozen drinks with peak pr…
- POWERFUL ICE CRUSHING: Total Crushing blades give you perfectly crushed ice for smoothies and frozen drinks with peak pr…
Step 2: Fill Bottom Red Layer
Pour the strawberry mixture into popsicle molds, filling each about one-third full. Tap molds gently on counter to release air bubbles and level the surface. Place in freezer for exactly 45 minutes.
The timing matters here because you need this layer firm enough to support the white layer without mixing, but not so frozen that the next layer won’t adhere properly.
Popsicle molds with sticks — Clear molds let you see the beautiful layers as you build them.

- Upgraded Design: The dual-purpose concept of the Miaowoof popsicle molds perfectly accommodates both reusable plastic st…
- Quality Silicone: Our popsicle molds are made from high-quality silicone, ensuring no harm to your homemade popsicles an…
- Easy to Remove: Thanks to the high-quality silicone material of our popsicle molds, the ice pops are easy to take out. I…
Step 3: Create White Coconut Layer
While red layer sets, whisk together coconut milk, maple syrup, and vanilla extract in a bowl until completely combined. The mixture should be smooth and creamy without any separation.
Full-fat coconut milk is essential here because the fat content creates the creamy texture and opaque white color that makes this layer pop against the red and blue.
Step 4: Add White Middle Layer
Remove molds from freezer and carefully pour white coconut mixture over the semi-frozen red layer, filling another third of each mold. The coconut mixture should sit cleanly on top without sinking through.
Work quickly but carefully during this step. If the red layer has frozen too hard, let molds sit at room temperature for 2-3 minutes before adding the white layer to ensure proper adhesion.
Having trouble with even layers? A small measuring cup with a pour spout makes this process much cleaner and more controlled than trying to pour from a bowl.
Step 5: Freeze White Layer
Return molds to freezer for another 45 minutes. This middle layer needs to be completely set before adding the final blue layer to maintain distinct color separation.
Resist the urge to check early. Opening the freezer door repeatedly changes temperature and can affect how evenly your layers freeze.
Step 6: Blend Blue Berry Layer
Combine blueberries, agave nectar, and lime juice in the same blender you used for strawberries. Blend until smooth, about 90 seconds. Blueberries take longer to break down completely than strawberries.
The lime juice brightens the deep purple-blue color of blueberries and prevents the mixture from looking muddy. Fresh berries work best, but frozen berries work if thawed first.
Step 7: Complete with Blue Layer
Pour blueberry mixture into remaining space in each mold, leaving about 1/4 inch from the top for expansion during freezing. Insert popsicle sticks now, pushing them down through all three layers.
The sticks should go deep enough to anchor in the red layer but not pierce through the bottom. This ensures your popsicle won’t fall off the stick when you’re enjoying it.
Step 8: Final Freeze and Unmold
Freeze popsicles for at least 3 hours or overnight until completely solid. To remove, run warm water over the outside of molds for 10-15 seconds, then gently pull on sticks.
Don’t rush this final freeze. Partially frozen popsicles will break apart when you try to remove them, ruining all your careful layering work.
Nutrition Information
- Per serving: 95 calories
- 3g fat
- 18g carbs
- 1g protein
Pro Tips
Temperature Control: Keep ingredients at room temperature before blending for smoother textures and better color distribution.
Layer Timing: Each layer needs exactly 45 minutes to reach the perfect semi-frozen state for the next layer to adhere properly.
Color Boost: Add a tiny drop of natural food coloring to make colors more vibrant without affecting taste.
Stick Insertion: Insert sticks at a slight angle rather than perfectly straight for easier eating and better stability.
Unmolding Secret: If popsicles stick, place a warm damp towel around molds for 30 seconds instead of running under water.
Delicious Variations
Tropical Patriotic
Replace strawberries with watermelon, use coconut cream for white layer, and substitute blueberries with blue spirulina-tinted coconut water for a tropical twist on the patriotic theme.
Yogurt-Based Version
Use Greek yogurt mixed with pureed strawberries for red, plain Greek yogurt with honey for white, and Greek yogurt with blueberry puree for blue layers. Higher protein and tangier flavor.
Adult Patriotic Pops
Add 1 tablespoon of rum to the coconut layer and 1 tablespoon of vodka to the berry layers for grown-up pool parties. Alcohol prevents complete freezing so texture stays softer.
Chia Seed Patriotic
Add 1 teaspoon chia seeds to each layer for extra nutrition and interesting texture. Let mixtures sit 10 minutes before pouring to allow chia seeds to plump up slightly.
Storage Instructions
Refrigerator
These patriotic popsicles don’t belong in the refrigerator as they’ll melt completely. If you need to soften them slightly for easier eating, let them sit at room temperature for 2-3 minutes before serving.
Freezer
Store popsicles in freezer for up to 2 months in their original molds or transfer to freezer bags once completely frozen. Wrap individually in plastic wrap if storing longer than 1 week to prevent freezer burn and maintain distinct layer colors.
Make-Ahead
Perfect make-ahead treat for parties. Complete popsicles can be made up to 1 week before your event. For best presentation, make them 1-2 days ahead when colors and flavors are at their peak freshness.
For food safety guidelines, visit USDA Food Safety Guidelines.
Frequently Asked Questions
Why did my patriotic popsicle layers mix together instead of staying separate?
Layer mixing happens when you add the next layer too soon or when the previous layer wasn’t cold enough. Each layer needs exactly 45 minutes to reach the right semi-frozen consistency. If layers are too liquid, they’ll blend together. If too frozen, layers won’t adhere properly and may separate when eating.
Can I use frozen berries for patriotic popsicles?
Yes, but thaw frozen berries completely and drain excess liquid before blending. Frozen berries often release more water than fresh, which can make layers too thin and affect freezing. Pat thawed berries dry with paper towels for best results and most vibrant colors.
How do I get brighter red and blue colors in my patriotic popsicles?
Natural colors can be enhanced by choosing the ripest, darkest berries available. For more vibrant results, add 1-2 drops of natural food coloring to each layer. Avoid artificial colors if serving to children, and remember that natural colors will be more muted but healthier.
What’s the best way to remove patriotic popsicles from molds without breaking them?
Run lukewarm (not hot) water over the outside of molds for 10-15 seconds, then gently twist and pull sticks straight up. Never yank or pull at an angle as this can break the stick or crack the popsicle layers. If still stuck, repeat the warm water process for another 10 seconds.
More Recipes You Will Love
👉 Perfect Homemade Popsicles Recipe (5 Amazing Flavors)
👉 Perfect Frozen Lemonade Recipe (Slushy & Sweet)
👉 No-Churn Ice Cream Recipe (2-Ingredient Easy)
👉 Perfect Watermelon Recipes (3 Fresh Summer Ideas)
These patriotic popsicles prove that homemade frozen treats can be both stunning and delicious. The layered technique works for any color combination, so experiment with different fruits and flavors. Share your creations in the comments below and let me know which layer was your family’s favorite!