
- Prep: 10 Minutes
- Cook: 0 Minutes
- Total: 10 Minutes
- Servings: 6 servings
A Quick Note Before You Start
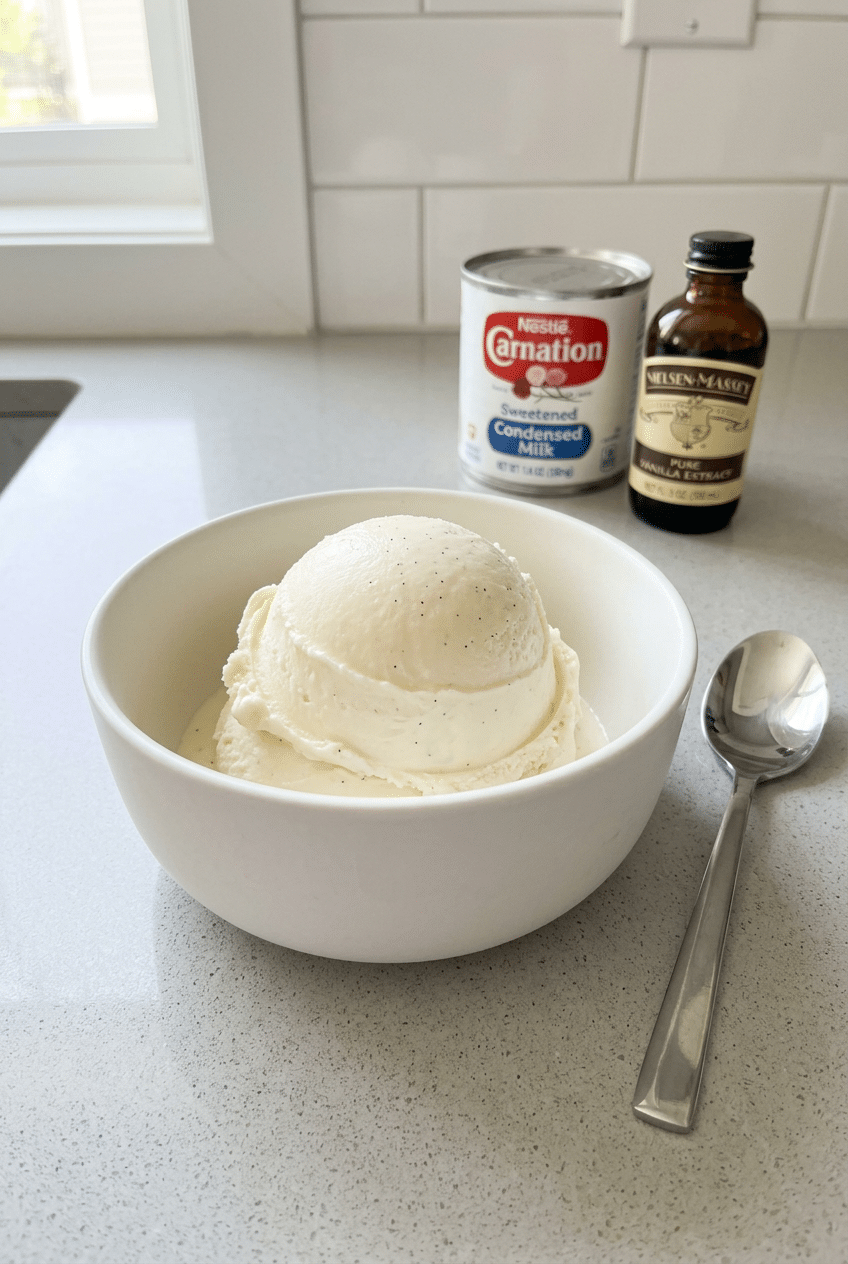
This no-churn ice cream requires just heavy cream and sweetened condensed milk. The secret is whipping the cream to stiff peaks first.
No-churn ice cream transforms two simple ingredients into creamy frozen perfection without any special equipment. This foolproof method creates silky smooth ice cream that rivals any store-bought variety.
The technique relies on whipped heavy cream folded into sweetened condensed milk, creating air bubbles that prevent ice crystals from forming during freezing.
Ingredients for Perfect No-Churn Ice Cream
Base Ingredients
- 2 cups heavy whipping cream — creates the creamy texture and volume
- 1 (14 oz) can sweetened condensed milk — provides sweetness and prevents ice crystals
- 1 teaspoon vanilla extract — adds essential flavor depth
- 1/4 teaspoon salt — enhances all flavors and balances sweetness
Optional Add-Ins
- 1/2 cup chocolate chips
- 1/2 cup crushed cookies
- 1/4 cup cocoa powder
- 2 tablespoons peanut butter
How to Make No-Churn Ice Cream Step by Step
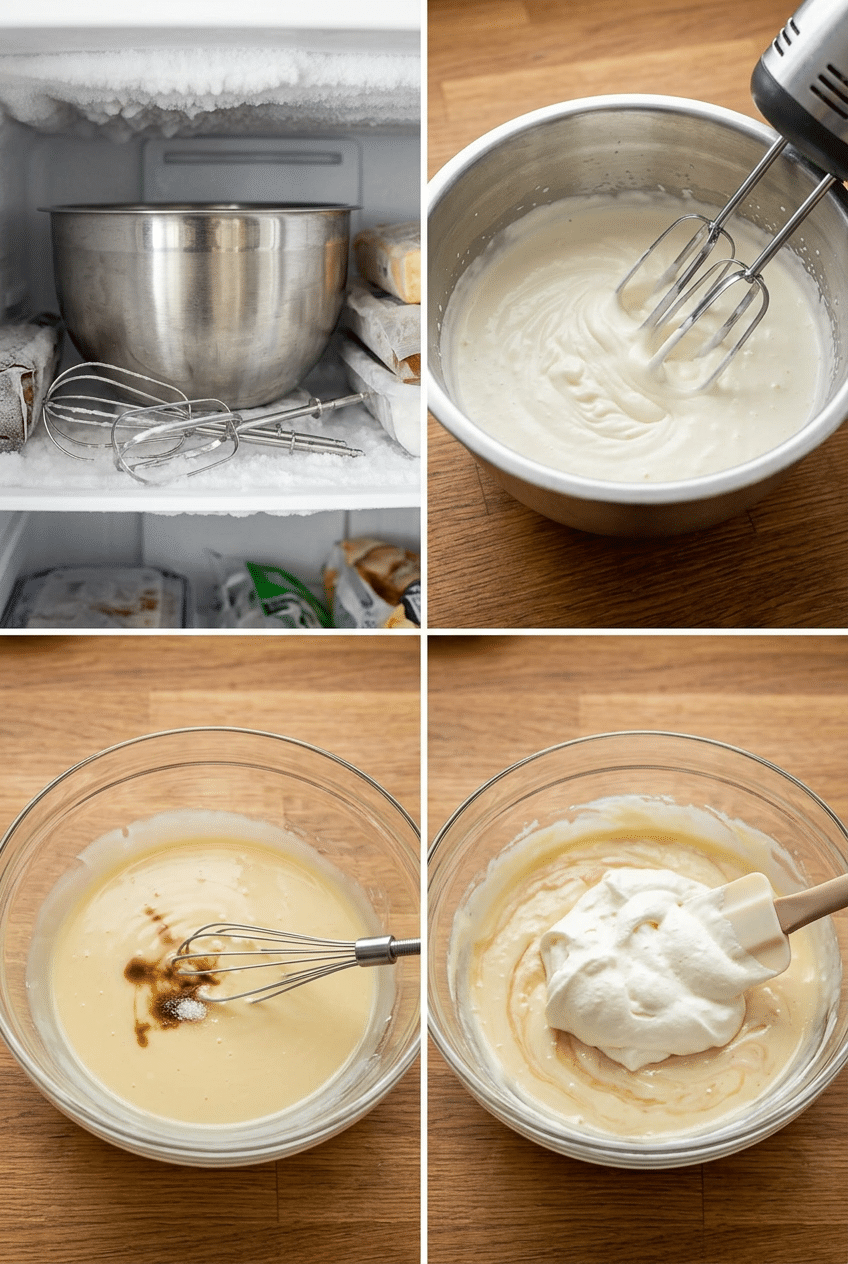
Step 1: Chill Your Equipment
Place your mixing bowl and beaters in the freezer for 15 minutes before starting. Cold equipment helps the cream whip faster and hold its shape better.
This step prevents the cream from warming up during whipping, which can cause it to break or turn into butter instead of forming stable peaks.
Step 2: Whip the Heavy Cream
Pour the heavy cream into your chilled bowl and begin whipping on medium speed. Gradually increase to high speed as the cream thickens, watching carefully for stiff peaks to form after 3-4 minutes.
Stiff peaks hold their shape when you lift the beaters and don’t droop or fall over. This creates the air structure that keeps your ice cream light and creamy.
Whipping cream by hand with a whisk takes forever and leaves your arm aching. The KitchenAid Stand Mixer whips cream to perfect peaks in under 3 minutes while you prep other ingredients.
KitchenAid Stand Mixer — Whips cream to perfect stiff peaks in under 3 minutes with no effort.

- Built to take it all on with the durable and built-to-last metal construction, and 59 touchpoints around the mixer bowl …
- 5 Quart Stainless Steel Bowl with comfortable handle for small or large batches, to mix up 9 dozen cookies* in a single …
- Easily add ingredients with the tilt-head design, because you’ll have better access to the bowl – lock the head in place…
Step 3: Prepare the Base Mixture
In a separate bowl, whisk together the sweetened condensed milk, vanilla extract, and salt until completely smooth. The mixture should be evenly combined with no streaks of vanilla.
Sweetened condensed milk is already thick, so gentle whisking is sufficient to incorporate the flavoring agents without creating unnecessary bubbles.
Step 4: Fold Everything Together
Add about one-third of the whipped cream to the condensed milk mixture and gently fold together using a rubber spatula. This lightens the base and makes the final folding easier.
Pour this lightened mixture back into the remaining whipped cream and fold gently from bottom to top, rotating the bowl as you work. The goal is to maintain as much air as possible while achieving an even color.
Heavy folding deflates the air bubbles that create your ice cream’s texture. A flexible silicone spatula like the GIR Mini Spatula curves perfectly around bowl edges and folds gently without breaking the cream structure.
GIR Mini Spatula — Flexible silicone curves around bowls for gentle folding without deflating whipped cream.

- [Versatile Spatula 5-Piece]: Coukre Silicone spatulas heat resistant,1 large spatula, 1 small spatula, 1 large scoop sp…
- [Food grade material & High temperature resistance]: 100% made in Food Grade Material. Low Carbon and Environmentally Fr…
- [Stronger & More Flexible]: Coukre Silicone Spatula has a reinforced plastic core inside for extra strength.And the flex…
Step 5: Add Mix-ins (Optional)
If using chocolate chips, cookies, or other mix-ins, fold them in now with just a few gentle strokes. Distribute evenly but don’t overmix, as this can deflate your carefully whipped cream.
Heavier mix-ins like nuts or chocolate pieces can sink during freezing, so fold them in last and use a light touch.
Step 6: Transfer and Freeze
Pour the mixture into a freezer-safe container, preferably a metal loaf pan or shallow dish that allows for even freezing. Smooth the top gently with your spatula but don’t compact it.
Cover tightly with plastic wrap, pressing it directly onto the surface of the ice cream to prevent ice crystals from forming. Then add a lid or aluminum foil for extra protection.
Freeze for at least 4 hours or overnight until completely firm. The ice cream will be ready to scoop when a spoon pressed into the surface leaves a clean indentation.
Nutrition Information
- Per serving: 285 cal
- 18g fat
- 28g carbs
- 5g protein
Pro Tips
Temperature Control: Keep your cream and bowl as cold as possible throughout the process. Warm cream won’t whip properly and can result in a grainy texture in your finished ice cream.
Folding Technique: Use a gentle cutting motion straight down through the mixture, then sweep along the bottom and up the sides. This preserves the air bubbles that make your ice cream light and creamy.
Container Choice: Metal containers conduct cold better than plastic, resulting in faster, more even freezing. A shallow, wide container freezes faster than a deep, narrow one.
Storage Secret: Press plastic wrap directly onto the ice cream surface before adding a lid. This prevents ice crystals from forming and keeps your ice cream smooth for weeks.
Scooping Ease: Let the ice cream sit at room temperature for 5-10 minutes before scooping if it’s frozen very hard. A warm ice cream scoop also helps create perfect scoops.
Delicious Variations
Chocolate No-Churn Ice Cream
Add 1/4 cup unsweetened cocoa powder to the sweetened condensed milk mixture. Whisk until completely smooth before folding into the whipped cream. The cocoa creates a rich, deep chocolate flavor without affecting the creamy texture.
Strawberry No-Churn Ice Cream
Puree 1 cup fresh strawberries with 2 tablespoons sugar and fold into the condensed milk mixture. The natural fruit adds fresh flavor and a beautiful pink color. Strain out seeds if you prefer a smoother texture.
Cookies and Cream
Crush 20 chocolate sandwich cookies and fold into the finished mixture just before freezing. Reserve some cookie pieces to sprinkle on top for extra crunch and visual appeal.
Mint Chocolate Chip
Replace vanilla with 1 teaspoon mint extract and add 2-3 drops green food coloring. Fold in 1/2 cup mini chocolate chips. Be careful not to over-extract the mint, as it can become overwhelming.
Peanut Butter Swirl
Warm 1/3 cup peanut butter until pourable and drizzle over the ice cream mixture in the container. Use a knife to create swirl patterns. Don’t mix completely to maintain distinct peanut butter ribbons.
Storage Instructions
Refrigerator
No-churn ice cream should not be stored in the refrigerator as it will not freeze properly. The mixture needs temperatures below 32°F to achieve the proper frozen texture. If you need to soften it slightly for scooping, leave it at room temperature for 5-10 minutes instead.
Freezer
Store covered in the freezer for up to 2 months for best quality. Press plastic wrap directly onto the surface before covering with a lid to prevent ice crystals. Use an airtight container to prevent the ice cream from absorbing freezer odors. Label with the date and flavor for easy identification.
Make-Ahead
The ice cream base can be prepared and frozen up to 1 week in advance. For best results, consume within the first month when the texture is at its creamiest. The longer it stays frozen, the harder it becomes, though the flavor remains excellent throughout the storage period.
For food safety guidelines, visit FDA Food Safety Guidelines.
Frequently Asked Questions
Why didn’t my no-churn ice cream turn out creamy?
The most common cause is under-whipped cream or deflated whipped cream from over-folding. Make sure your cream reaches stiff peaks before folding, and use gentle motions when combining ingredients. Also ensure your equipment is properly chilled, as warm cream won’t whip properly and can result in a grainy texture.
Can I make no-churn ice cream without sweetened condensed milk?
Sweetened condensed milk is essential for the texture and anti-freeze properties of no-churn ice cream. You can make your own by simmering 2 cups whole milk with 2/3 cup sugar until reduced by half and thickened. However, store-bought sweetened condensed milk provides the most consistent results and proper sugar concentration.
How long does homemade no-churn ice cream last?
Properly stored no-churn ice cream lasts 1-2 months in the freezer for best quality. After this time, it may develop ice crystals or lose its creamy texture, though it remains safe to eat. Always store with plastic wrap pressed directly against the surface to minimize ice crystal formation.
Can I use light cream instead of heavy cream?
Heavy cream with at least 35% fat content is necessary for proper whipping and texture. Light cream or half-and-half won’t whip to stiff peaks and will result in icy, dense ice cream. The high fat content in heavy cream is what creates the smooth, creamy texture that makes no-churn ice cream work.
More Recipes You Will Love
👉 Perfect Strawberry Lemonade Recipe (Fresh & Easy)
👉 Perfect Watermelon Feta Salad Recipe (Summer Fresh)
👉 Perfect Grilled Chicken Kabobs Recipe
This no-churn ice cream recipe proves that homemade frozen treats don’t require expensive equipment or complicated techniques. With just two main ingredients and simple folding, you can create creamy, professional-quality ice cream that rivals any premium brand. Try this basic vanilla version first, then experiment with the flavor variations to find your family’s favorites. Share your favorite mix-in combinations in the comments below!