
🛑 Stop! Don’t Have a Ninja Creami Yet?
This recipe strictly requires a Ninja Creami machine. Because of how the machine shaves ice, you cannot make this in a regular blender, food processor, or traditional ice cream maker.
If you are here because you keep seeing viral Creami recipes and are on the fence about buying one, read this first: Before you spend $200+, check out our Ninja Creami Review: 6-Month Test & Model Comparison. We break down exactly which model is actually worth the money, which one is the quietest, and how to score it for up to 40% off.
Already have your Creami on the counter? Let’s get to the recipe!
- Prep: 10 Minutes
- Cook: 24 Hours Freezing
- Total: 34 Minutes
- Servings: 4 servings
A Quick Note Before You Start
This peanut butter cup protein ice cream needs a full 24-hour freeze before processing. The longer freeze creates the perfect creamy texture that rivals premium ice cream.
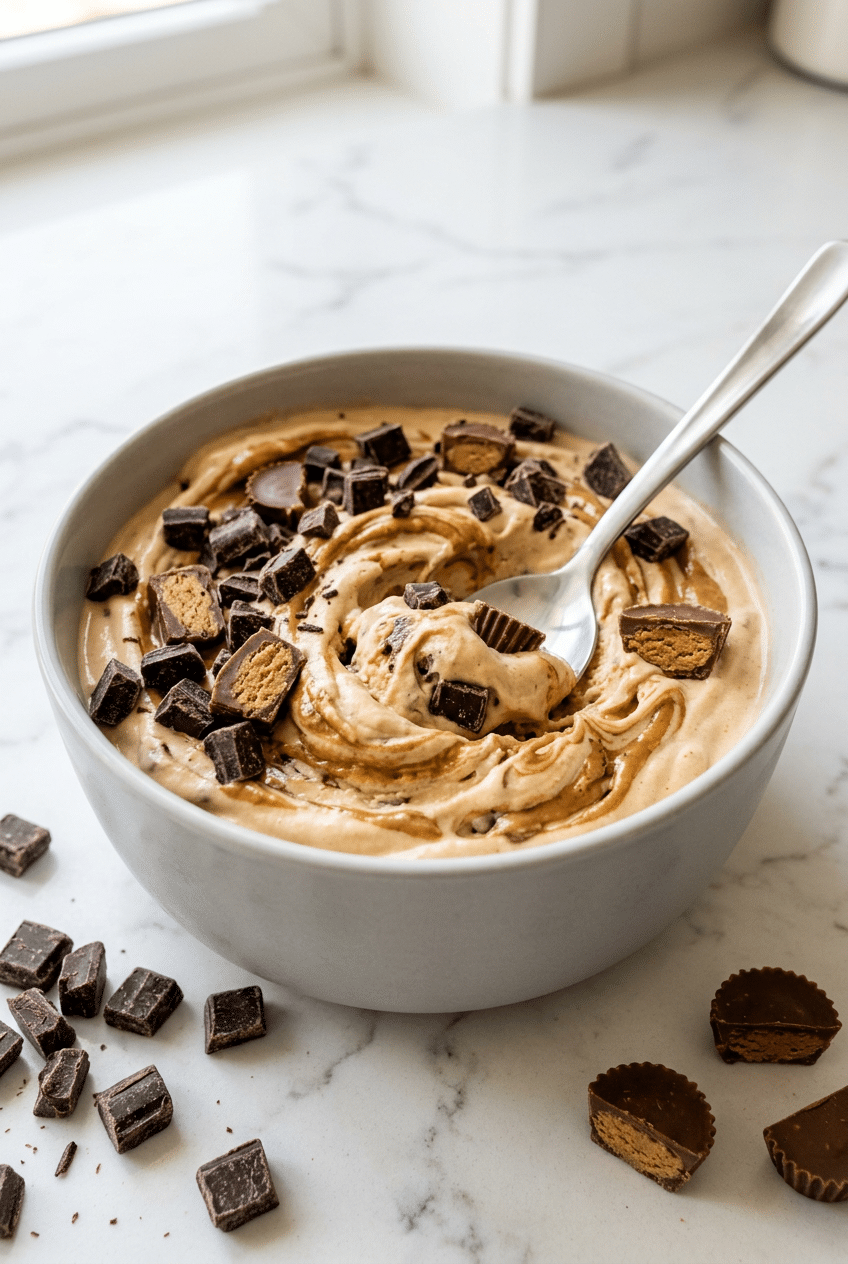
Peanut butter cup protein ice cream transforms your favorite candy into a guilt-free frozen treat that packs 20 grams of protein per serving.
The Ninja Creami’s unique blade system creates incredibly smooth texture while chocolate chunks provide that signature peanut butter cup experience.
Ingredients for Perfect Peanut Butter Cup Protein Ice Cream
For the Base
- 1 cup unsweetened almond milk — creates creamy base without excess calories
- 1/2 cup Greek yogurt (plain, nonfat) — adds protein and tang
- 1/3 cup natural peanut butter — provides rich flavor and healthy fats
- 2 scoops vanilla protein powder — boosts protein to 20g per serving
- 3 tablespoons sugar-free maple syrup — sweetens without blood sugar spike
- 1 teaspoon vanilla extract — enhances overall flavor depth
- 1/4 teaspoon xanthan gum — prevents ice crystals and improves texture
For the Mix-Ins
- 1/4 cup mini dark chocolate chips — creates chocolate chunks throughout
- 3 mini peanut butter cups, chopped — adds authentic peanut butter cup pieces
- 2 tablespoons peanut butter — for swirling extra richness
Optional Add-Ins
- 1/4 cup chopped roasted peanuts
- 2 tablespoons cocoa powder for chocolate base
- 1 tablespoon almond butter instead of extra peanut butter
How to Make Peanut Butter Cup Protein Ice Cream Step by Step
Step 1: Blend the Base
Add almond milk, Greek yogurt, peanut butter, protein powder (I highly recommend PEScience Peanut Butter Cup Protein), maple syrup, vanilla, and a pinch of Anthony’s Xanthan Gum to a high-speed blender. Blend on high for 60 seconds until completely smooth and no protein powder clumps remain. The mixture should look like a thick milkshake with a light tan color.
The xanthan gum prevents ice crystals from forming during the freeze, creating that premium ice cream texture. Without it, your final product becomes icy and grainy instead of creamy and scoopable.
💡 The Secret to a Silk-Smooth Base Struggling with protein powder clumps that won’t break down? A powerful blender eliminates protein powder chunks that create a chalky texture in the final ice cream. I use the Vitamix 5200 because its aircraft-grade blades pulverize even the stickiest protein powders in under a minute, while cheaper blenders leave gritty pockets behind.
Step 2: Add the Swirl
Pour the blended mixture into your Ninja Creami pint container. Warm the 2 tablespoons of peanut butter in the microwave for 15 seconds until it’s drizzle-able but not hot. Drizzle the warm peanut butter over the mixture in zigzag patterns.
Use a knife or thin spatula to gently swirl the peanut butter through the mixture, creating marbled streaks. Don’t overmix—you want distinct ribbons of peanut butter throughout the finished ice cream, not a uniform color.
Step 3: Freeze Completely
Cover the pint container with the included lid and freeze for exactly 24 hours. The mixture must freeze solid all the way through—no soft spots in the center. This complete freeze is crucial for the Ninja Creami’s processing blades to work properly.
💡 The #1 Ninja Creami Mistake to Avoid Waiting 24 hours is the hardest part. If you only have the two containers that came with your machine, you’ll constantly be waiting a whole day just to make your next batch! I highly recommend grabbing an extra 4-Pack of Official Ninja Creami Pints. (Make sure to buy the official Ninja ones, as cheap knockoffs can strip your machine’s blade!)
Mark your calendar or set a phone reminder. Attempting to process before 24 hours results in a soupy mess instead of ice cream. The Ninja Creami needs that solid frozen block to create its signature creamy texture.
Step 4: Process in Creami
Remove the container from the freezer and let it sit at room temperature for 5 minutes. This slight thaw prevents the motor from overworking. Install the container in your Ninja NC301 CREAMi Ice Cream Maker and select the ‘Lite Ice Cream’ function. The machine’s unique dual-blade system will run for about 2 minutes, creating an impossibly smooth protein ice cream texture that traditional churns can’t achieve.

- 7-IN-1 ICE CREAM MAKER — A FROZEN TREAT FOR EVERY CRAVING: Choose from 7 one-touch programs — Ice Cream, Gelato, Sorbe…
- CREAMIFY TECHNOLOGY — INCREDIBLY SMOOTH, CREAMY RESULTS: Ninja’s exclusive Creamify Technology finely shaves through a …
- MAKE IT YOUR WAY — TOTAL INGREDIENT CONTROL: Create protein-packed ice cream, low-sugar sorbet, dairy-free treats, and …
If the mixture looks crumbly after the first cycle, don’t panic. Select ‘Re-spin’ and process again. Sometimes frozen protein bases need two cycles to reach perfect consistency.
Step 5: Add Mix-Ins
Create a well in the center of the processed ice cream using a spoon. Add your chopped Lily’s Sugar-Free Chocolate Chips and Quest Mini Peanut Butter Cups to the well. Select the ‘Mix-In’ mode on the Ninja Creami, which will gently fold the chunks throughout without pulverizing them.
The Mix-In function uses a slower blade speed specifically designed to distribute chunks evenly. This preserves those satisfying bites of chocolate and peanut butter cup that make this ice cream special.
Step 6: Final Texture Check
Remove the container and check the consistency. The ice cream should hold its shape when scooped but still be creamy and smooth. If it seems too firm, let it sit at room temperature for 2-3 minutes before serving. (Pro tip: Slide your finished pint into a Neoprene Creami Pint Koozie Sleeve to keep your hands warm while you eat!)
Perfect peanut butter cup protein ice cream has a texture similar to premium store-bought varieties but with visible chunks of chocolate and peanut butter cups distributed throughout. Each spoonful delivers creamy peanut butter flavor with bursts of chocolate richness.
Nutrition Information
- Per serving: 245 calories
- 12g fat
- 18g carbs
- 20g protein
- 8g sugar
- 4g fiber
Pro Tips
Double Peanut Butter Power: Use both natural peanut butter in the base and powdered peanut butter for extra flavor without added oils that can make ice cream too rich.
Temperature Matters: Let frozen pints sit 5 minutes before processing—this prevents motor strain and creates smoother results on the first cycle.
Chunk Size Strategy: Chop peanut butter cups into pea-sized pieces—larger chunks get pulverized while smaller pieces distribute unevenly throughout the ice cream.
Protein Powder Selection: Vanilla whey protein creates the smoothest texture, while casein protein makes ice cream denser and more filling but slightly grittier.
Storage Secret: Press plastic wrap directly onto ice cream surface before covering with lid—this prevents freezer burn and maintains creamy texture for up to 2 weeks.
Delicious Variations
Chocolate Peanut Butter Cup
Add 2 tablespoons unsweetened cocoa powder to the base mixture for rich chocolate flavor. Increase maple syrup by 1 tablespoon to balance the cocoa’s bitterness. The result tastes like frozen Reese’s cups.
Crunchy Peanut Butter Cup
Replace smooth peanut butter with crunchy variety and add 2 tablespoons chopped roasted peanuts as mix-ins. This creates multiple textures—creamy ice cream, smooth peanut butter swirls, and crunchy peanut pieces.
White Chocolate Version
Substitute white chocolate chips for dark chocolate and add 1 tablespoon vanilla extract to the base. Use almond butter instead of peanut butter for a sophisticated flavor profile that’s less sweet than traditional versions.
Keto-Friendly Adaptation
Replace maple syrup with powdered erythritol and use full-fat coconut milk instead of almond milk. Add MCT oil powder for extra healthy fats while maintaining the creamy texture keto dieters crave.
Storage Instructions
Refrigerator
This protein ice cream doesn’t store well in the refrigerator—it becomes too soft and loses its structure within 2 hours. If you need to soften it slightly, let it sit at room temperature for 3-5 minutes instead of refrigerating. The protein content makes it more temperature-sensitive than regular ice cream.
Freezer
Store covered peanut butter cup protein ice cream in the freezer for up to 2 weeks maximum. After that, ice crystals form and texture deteriorates significantly. Always press plastic wrap directly onto the surface before adding the lid—this prevents freezer burn. When ready to serve, let it sit at room temperature for 2-3 minutes for perfect scooping consistency.
Make-Ahead
You can prepare the base mixture up to 2 days before freezing, storing it covered in the refrigerator. This actually improves flavor as ingredients meld together. However, once you add the peanut butter swirl, freeze immediately to prevent separation. The mix-ins should only be added after the Ninja Creami processing for best texture results.
For food safety guidelines, visit USDA Protein Requirements.
Frequently Asked Questions
Why is my peanut butter cup protein ice cream still crumbly after processing?
Protein ice cream often needs two processing cycles in the Ninja Creami to achieve smooth texture. The high protein content creates a different consistency than regular ice cream. Run the ‘Re-spin’ cycle once more, and if it’s still crumbly, let it sit 2-3 minutes at room temperature, then re-spin again. The protein base requires more processing than dairy-based recipes.
Can I use different protein powder flavors in this recipe?
Absolutely! Chocolate protein powder creates a double chocolate effect, while peanut butter protein powder intensifies the peanut flavor. However, avoid fruity flavors like strawberry as they clash with chocolate and peanut butter. Unflavored protein powder works well too—just add an extra teaspoon of vanilla extract to compensate for lost flavor.
How do I prevent ice crystals in my protein ice cream?
Xanthan gum is crucial for preventing ice crystals—don’t skip it. Also ensure your mixture is completely smooth before freezing, as any lumps become icy spots. Store with plastic wrap pressed directly on the surface, and don’t let the ice cream sit out too long before returning to the freezer. Protein ice cream is more susceptible to ice crystal formation than regular varieties.
Why does my ice cream taste chalky despite blending well?
This usually indicates low-quality protein powder or insufficient blending time. Whey protein isolate creates smoother texture than concentrate. Blend for a full 60 seconds in a high-speed blender, stopping to scrape sides if needed. Some plant-based proteins are naturally grittier—try adding an extra tablespoon of Greek yogurt to mask the texture.
More Recipes You Will Love
👉 Perfect Strawberry Shortcake Recipe (Fluffy Biscuits)
👉 Perfect Tiramisu Recipe (Classic Italian)
👉 Perfect Brunch Board Recipe (Ultimate Grazing Guide)
This peanut butter cup protein ice cream proves healthy desserts don’t require sacrifice. The Ninja Creami transforms simple ingredients into creamy perfection that satisfies both sweet cravings and fitness goals. Try this recipe tonight and discover how protein-packed treats can taste better than the original. Share your results in the comments—I love seeing your creative mix-in combinations!