
- Prep: 45 Minutes
- Cook: 12 Minutes
- Total: 57 Minutes
- Servings: 36 cookies
A Quick Note Before You Start
Chill your dough for at least 2 hours — this is the single biggest secret to cookies that hold their shape perfectly in the oven. Don’t skip it, even if you’re in a hurry.
Halloween sugar cookies are the ultimate October baking project — buttery, soft-centered cutouts decorated with vivid royal icing in classic spooky shapes like ghosts, pumpkins, and black cats.
This recipe gives you dough that rolls without cracking, cookies that bake flat every time, and a royal icing that dries smooth and firm so your decorations actually look like the ones you saved on Pinterest.
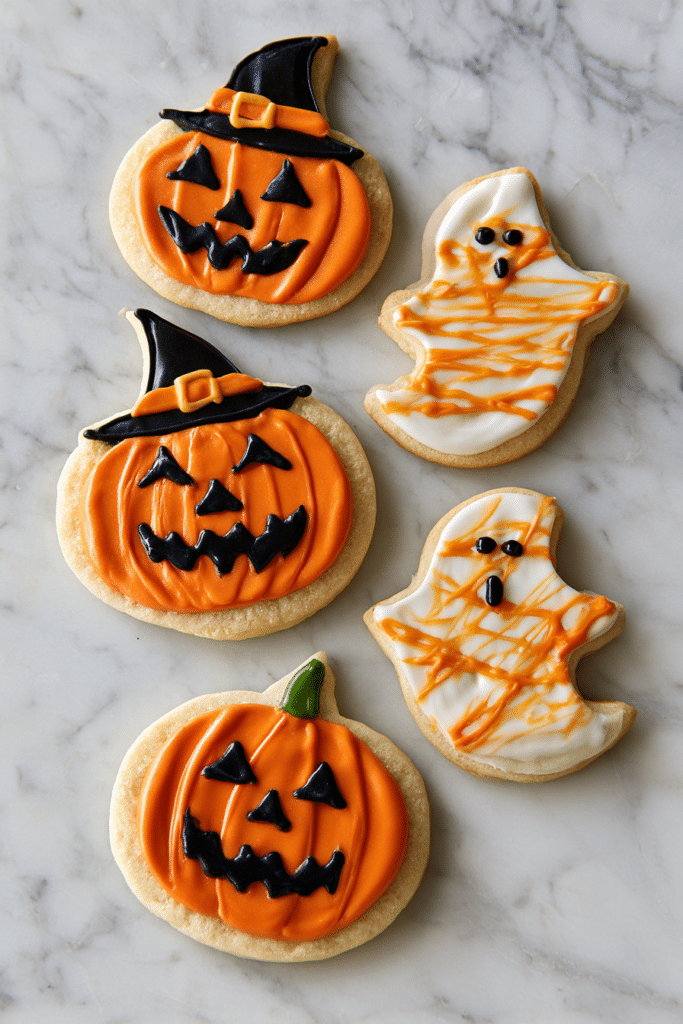
Ingredients for Halloween Sugar Cookies
For the Sugar Cookie Dough
- 3 cups (360g) all-purpose flour — spooned and leveled, not scooped, so your dough isn’t dry
- 1 tsp baking powder — just enough lift without making cookies puff and lose their shape
- 1/2 tsp fine sea salt — balances the sweetness and brings out the butter flavor
- 1 cup (2 sticks / 227g) unsalted butter, softened to room temperature — the foundation of flavor; don’t use melted or cold
- 1 cup (200g) granulated sugar
- 1 large egg — room temperature so it incorporates smoothly
- 2 tsp pure vanilla extract — use real vanilla, not imitation; it makes a noticeable difference in the final flavor
- 1 tsp almond extract (optional but highly recommended) — this is the secret ingredient in bakery-style sugar cookies
For the Royal Icing
- 4 cups (480g) powdered sugar, sifted — sifting prevents lumps that clog your piping tip
- 3 tbsp meringue powder — Wilton Meringue Powder is the most reliable option; it gives you stable icing that dries hard without raw egg whites
- 6–8 tbsp warm water — added gradually to control consistency
- 1 tsp clear vanilla extract — clear keeps your white icing bright white
- Gel food coloring in orange, black, purple, and green — AmeriColor Soft Gel Paste gives vivid Halloween colors without thinning your icing the way liquid dye does
For Decorating
- Halloween sprinkles and nonpareils — press them in while icing is still wet
- Black sanding sugar — gorgeous on bat and cat cookies
- Edible gold or silver luster dust (optional) — brush over dried icing for a spooky metallic finish
Optional Add-Ins
- 1/2 tsp cinnamon in the dough for a warm autumn flavor
- Orange zest (1 tsp) in the dough for a citrusy Halloween twist
- Chocolate dough version: replace 1/4 cup flour with cocoa powder
How to Make Halloween Sugar Cookies Step by Step
Step 1: Mix the Dry Ingredients
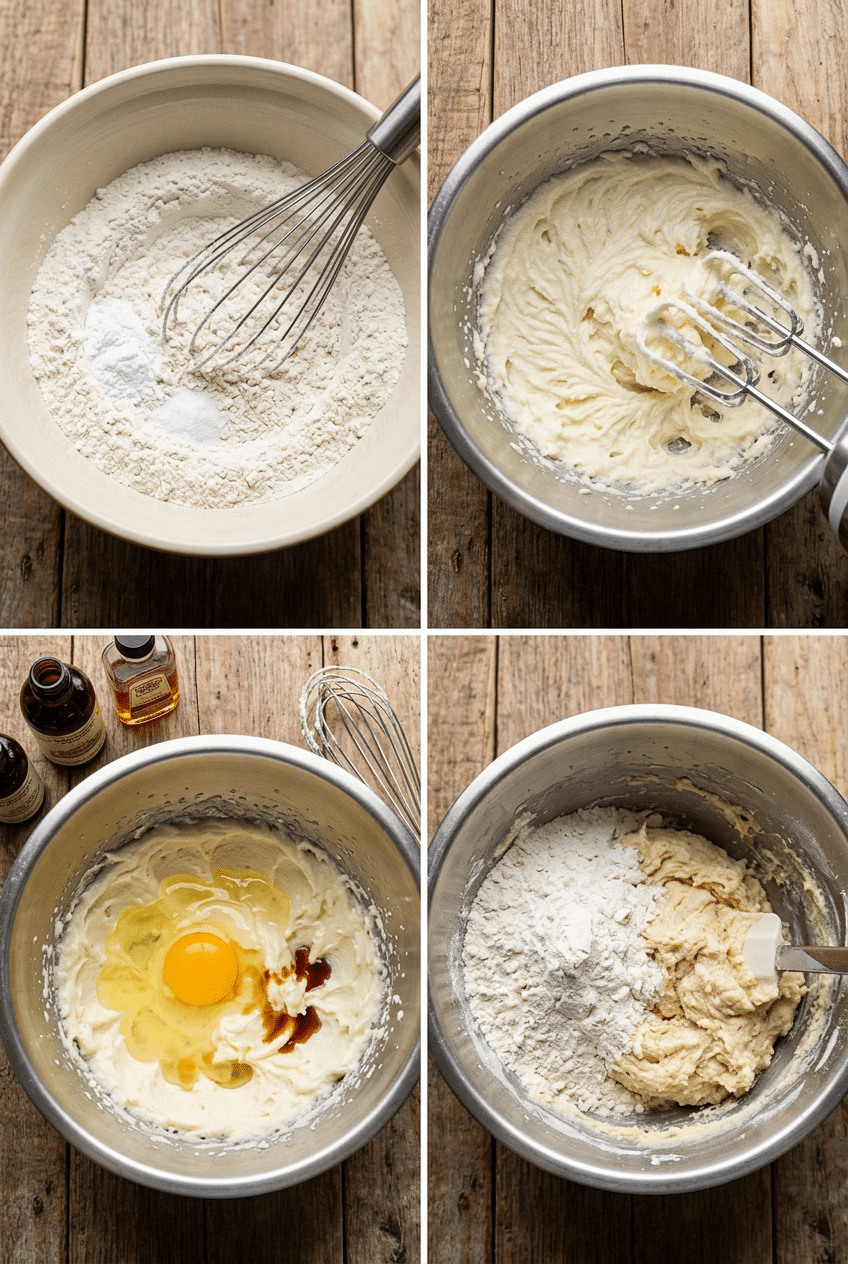
In a medium bowl, whisk together the flour, baking powder, and salt until evenly combined. Whisking your dry ingredients separately takes 30 seconds but means you won’t hit a pocket of salt or baking powder in the middle of your dough — a small step that actually matters.
Set this bowl aside while you work on the butter. Having everything pre-measured and ready before you turn on the mixer is the habit that separates a stressful baking session from a smooth one.
Step 2: Cream Butter and Sugar
Beat the softened butter and granulated sugar together in a large bowl with a hand mixer or stand mixer on medium-high speed for 3 full minutes. You’re looking for a mixture that turns noticeably pale and fluffy — this is where your cookies get their tender texture, so don’t rush it.
Creaming incorporates air into the butter, which gives the cookie a slightly crisp edge and soft center. If your butter is too cold, it won’t cream properly and your cookies will be dense. If it’s melted, you lose the air entirely and the cookies spread into flat puddles.
Step 3: Add Egg and Extracts
Add the egg, vanilla extract, and almond extract to the butter mixture. Beat on medium speed for about 60 seconds until everything is fully incorporated and the mixture looks uniform. Scrape down the sides of the bowl — what’s stuck to the edges doesn’t get mixed in unless you force it.
The almond extract is the move here. It’s the thing that makes people say ‘these taste like a bakery’ without knowing why. A teaspoon sounds like a lot, but it mellows significantly during baking and pairs beautifully with the vanilla.
Step 4: Combine Wet and Dry
Add the flour mixture to the butter mixture in two additions, mixing on low speed just until the dough comes together. Stop the moment you don’t see dry flour — overmixing develops gluten, which makes your cookies tough and causes them to shrink and puff unevenly in the oven.
The dough will be soft but not sticky. It should pull away from the sides of the bowl cleanly. If it feels sticky and clings to your fingers, add flour one tablespoon at a time until it’s manageable. If it’s crumbly and dry, a splash of milk brings it back.
Step 5: Chill the Dough
Divide the dough in half, flatten each half into a disc about an inch thick, wrap tightly in plastic wrap, and refrigerate for at least 2 hours — overnight is even better. The chill firms the butter back up so your cookies hold every crisp edge of your Halloween cutters without spreading into blobs.
This rest period also lets the flour fully hydrate, which makes the dough roll out smoother and crack less at the edges. If your dough cracks when you roll it, it just needs another 10 minutes on the counter to soften slightly.
Step 6: Roll and Cut the Cookies
Preheat your oven to 350°F (175°C) and line two baking sheets with parchment paper or a silicone baking mat. Remove one disc of dough from the fridge and roll it out on a lightly floured surface to exactly 1/4 inch thick — any thinner and the cookies get crunchy, any thicker and the centers stay doughy. A rolling pin with thickness guide rings takes the guesswork out completely.
Press your Halloween cookie cutters firmly straight down without twisting — twisting seals the edges and makes it harder to release the shape cleanly. Place cut cookies on your lined baking sheets, spacing them about 1.5 inches apart. They don’t spread much, but they need a little breathing room.
👉 Halloween Cookie Cutter Set (stainless steel) — Sharp stainless steel cutters give you clean ghost, pumpkin, bat, and cat shapes every single time.
Step 7: Bake to Perfect Pale Gold
Bake for 10–12 minutes, until the edges are just barely set and the tops look matte rather than glossy. Pull them when they still look slightly underdone in the center — they finish cooking on the hot pan as they cool. The moment you see golden brown edges, you’ve gone a minute too long for soft cookies.
Let the cookies cool on the baking sheet for 5 minutes before transferring to a wire rack. Moving them too soon while they’re hot means they’ll flex and break because they haven’t firmed up yet. Let them cool completely — at least 30 minutes — before you touch the icing.
Step 8: Make the Royal Icing
Beat together the sifted powdered sugar, meringue powder, and 6 tablespoons of warm water with a hand mixer on medium-high speed for 5 minutes. The icing is ready when it holds stiff peaks and looks glossy. This stiff consistency is your base — from here you thin it down for different uses.
For piping outlines, use the icing at stiff consistency or add water one teaspoon at a time until it reaches a toothpaste-like texture. For flooding (filling in the outlined area), thin it further until a drizzle of icing disappears back into the bowl in about 10 seconds — this is called ’10-second icing’ and it’s the standard flood consistency.
👉 Wilton Meringue Powder — The most reliable meringue powder available — gives you stable, food-safe royal icing that dries rock hard.
Step 9: Color and Decorate
Divide the icing into separate bowls and color each one using gel paste food coloring, starting with just a toothpick-tip amount and adding more until you hit the intensity you want. Fit piping bags with a small round tip (Wilton #2 or #3) for outlines and detail work, and use a squeeze bottle or spoon for flooding larger areas.
The classic Halloween method: pipe an outline around the cookie edge first, then flood the interior while the outline is still wet so everything fuses together with no visible seam. While the flood icing is still glossy and wet, add sprinkles, sanding sugar, or detail piping — anything you add after it dries will just slide off. Let decorated cookies dry uncovered at room temperature for at least 4–6 hours, or overnight for fully set, stackable cookies.
👉 AmeriColor Soft Gel Paste Student Kit — Vivid Halloween colors without watering down your icing — one kit covers every color you’ll ever need.
Nutrition Information
- Per cookie (1 of 36
- with icing): 145 cal
- 5g fat
- 23g carbs
- 1g protein
Pro Tips
Chill your cut cookies before baking: After cutting shapes, slide the whole baking sheet into the fridge for 15 minutes before it goes in the oven. Cold butter = zero spread. Your ghost won’t look like a melted blob — the edges stay razor-sharp, and details in the cutter actually show up on the finished cookie.
Use the ‘flood and detail’ two-stage method: Always pipe an outline first with stiff icing, then immediately flood with thinned icing while the outline is still wet. This creates a seamless surface. If you wait for the outline to dry first, you’ll get a visible raised ridge around the edge — which is fine for rustic looks but not for that clean, professional finish.
Color your icing a shade darker than you want: Royal icing darkens noticeably as it dries. Mix your orange one shade lighter than the target, your black will be fine since you’re going deep, but purples and greens can shift dramatically — always test a small amount on parchment and let it dry before committing to a full batch.
Freeze your baked, undecorated cookies: If you’re doing a big Halloween cookie project, bake the cookies up to 3 weeks ahead and freeze them in a single layer, then stack with parchment between. Decorate the day before or day of. This breaks the project into manageable sessions instead of one 6-hour marathon.
Toothpick is your best decorating tool: Keep a cup of toothpicks at your decorating station. Use them to pop air bubbles in wet flood icing, drag wet icing into corners, create swirl patterns, and fix any drips or mistakes before the icing sets. Professional cookie decorators use them constantly — they’re more useful than any fancy decorating tool.
Delicious Variations
Brown Butter Halloween Sugar Cookies
Brown your butter before creaming it — melt it in a light-colored pan over medium heat, swirling until the milk solids turn amber and it smells nutty, then cool it back to solid in the fridge. This adds a toasty, caramel-like depth that makes plain sugar cookies taste sophisticated. The cookies bake up slightly golden and have incredible flavor even before icing.
Cream Cheese Sugar Cookies
Replace 2 tablespoons of butter with 2 oz of full-fat cream cheese (softened) and add it to the creaming step. Cream cheese adds a subtle tang that balances the sweetness, and it makes the cookies noticeably more tender with a slightly denser, cakier texture. These are especially good for kids who find straight sugar cookies too sweet.
Chocolate Halloween Sugar Cookies
Replace 1/4 cup of the flour with Dutch-process cocoa powder and add an extra tablespoon of sugar. The dough turns deep chocolate brown — almost black — which makes it naturally spooky and a gorgeous backdrop for orange and white icing. The chocolate flavor isn’t overwhelming; it tastes like a rich shortbread. Perfect for bat and black cat shapes.
Spiced Pumpkin Sugar Cookies
Add 1 teaspoon of pumpkin pie spice and 1/4 teaspoon of cinnamon to the dry ingredients, and reduce vanilla to 1 teaspoon. The warmth of the spices turns these into something that tastes like October — like if a snickerdoodle and a sugar cookie had a Halloween baby. Ice them with orange royal icing and black jack-o-lantern faces.
Gluten-Free Halloween Sugar Cookies
Swap the all-purpose flour for a 1:1 gluten-free baking flour like Bob’s Red Mill or King Arthur Measure for Measure — these are specifically formulated to replace regular flour without adjusting the recipe. Chill the dough an extra hour since gluten-free doughs tend to be stickier and need more firming time. The final cookies taste nearly identical to the original.
Storage Instructions
Refrigerator
Store decorated cookies in an airtight container at room temperature for up to 5 days — not the fridge. The refrigerator actually draws moisture into the royal icing and makes it sticky and soft, which ruins the decoration. Keep them in a single layer if you can, or separate layers with a sheet of parchment paper. They taste best on days 2 and 3 after the flavors have had time to meld.
Freezer
Undecorated baked cookies freeze beautifully for up to 3 months. Let them cool completely, then freeze in a single layer on a baking sheet until solid (about 2 hours), and transfer to a zip-lock freezer bag with parchment between layers. Thaw at room temperature for about 30 minutes before decorating. Decorated cookies can also be frozen but the icing can crack slightly when thawing, so freeze undecorated when possible.
Make-Ahead
The cookie dough can be made up to 3 days ahead and kept wrapped in the fridge, or frozen as a disc for up to 2 months — thaw overnight in the fridge before rolling. Royal icing can be made a day ahead and stored in an airtight container with plastic wrap pressed directly against the surface to prevent crusting. Re-whip briefly before using since it will stiffen up. You can also bake and freeze the plain cookies weeks ahead, then decorate the night before your event.
For food safety guidelines, visit FDA Food Safety Guidelines for Baking with Eggs.
Frequently Asked Questions
Why do my Halloween sugar cookies spread and lose their shape?
The number one cause of spreading is butter that’s too warm. If your butter is melted or very soft, it spreads in the oven before the cookie sets. Always chill your dough for at least 2 hours, and for extra insurance, chill the cut-out shapes on the baking sheet for 15 minutes before baking. Also make sure your baking sheets are fully cooled between batches — a hot pan starts melting the butter before the cookie even hits the oven.
Can I use store-bought icing instead of royal icing?
You can, but it won’t give you the same smooth, professional finish. Store-bought frosting stays soft and never fully sets, which means your cookies can’t be stacked without smearing and the decorations stay tacky. Royal icing is what gives decorated cookies that clean, dry surface. If you absolutely need a shortcut, look for pre-made royal icing squeeze bottles specifically made for cookie decorating — these are a much better option than buttercream.
How do I get royal icing to the right consistency?
Start with stiff icing (holds peaks firmly) and add warm water one teaspoon at a time. For piping outlines and details, you want it slightly thicker than toothpaste. For flooding, thin it until a spoonful drizzled back into the bowl disappears completely within 10 seconds — this is the benchmark professional decorators use. Too thin and it runs off the cookie; too thick and it won’t self-level into a smooth surface.
How far in advance can I make Halloween sugar cookies?
Fully decorated Halloween sugar cookies stay fresh for up to 5 days at room temperature in an airtight container. For a big Halloween party or cookie exchange, bake the plain cookies up to 3 weeks ahead and freeze them, then decorate 1–2 days before the event. The royal icing seals in freshness, so decorated cookies actually stay soft longer than plain ones because the icing acts as a protective layer.
What’s the best way to do the black royal icing without turning the whole batch gray?
Black is the hardest royal icing color to achieve because it requires a huge amount of food coloring, which can affect texture and make the icing taste bitter. The trick is to start with a dark chocolate or dark cocoa base icing, then add black gel coloring — you’ll reach true black with far less dye. AmeriColor’s Super Black gel is the strongest on the market and gives you true black without the bitterness of cheaper options. Make black icing at least 2 hours ahead — it deepens as it sits.
Do Halloween sugar cookies need to be refrigerated?
No — room temperature storage is actually better for decorated sugar cookies. The fridge introduces humidity that softens royal icing and makes it sticky. Store them in an airtight container on the counter, away from direct sunlight. The one exception is if you’ve made a custom filling that contains fresh dairy (like a cream cheese filling), in which case refrigerate and eat within 3 days.
More Recipes You Will Love
👉 Perfect Sheet Pan Sausage & Veggies Recipe
👉 Perfect Greek Chicken & Rice Recipe
👉 Perfect Turkey Meatball Pasta Recipe
These Halloween sugar cookies are worth every minute — the buttery dough, the satisfying crunch-to-chew ratio, and that moment when the icing dries and your ghost actually looks like a ghost. Make a batch this weekend, let the kids go wild with sprinkles, and share your best designs in the comments below. Tag us on Pinterest — we want to see your spookiest cookies!