
- Prep: 20 Minutes
- Cook: 30 Minutes
- Total: 50 Minutes
- Servings: 16 brownies
A Quick Note Before You Start
These spider web brownies are easier than they look — the web design takes less than two minutes with a toothpick. Make the brownie base a day ahead and the ganache stays glossy and draggable. Room temperature eggs are non-negotiable for a smooth, fudgy batter.
Spider web brownies are the Halloween treat that stops everyone in their tracks. One 9×13 pan makes 16 showstopping squares, and that dramatic web design? It takes a toothpick and about 90 seconds of light dragging.
The base is a dense, fudgy scratch brownie — no box mix shortcuts here. We top it with dark chocolate ganache and a white chocolate spiral that drags into a perfect web every single time.
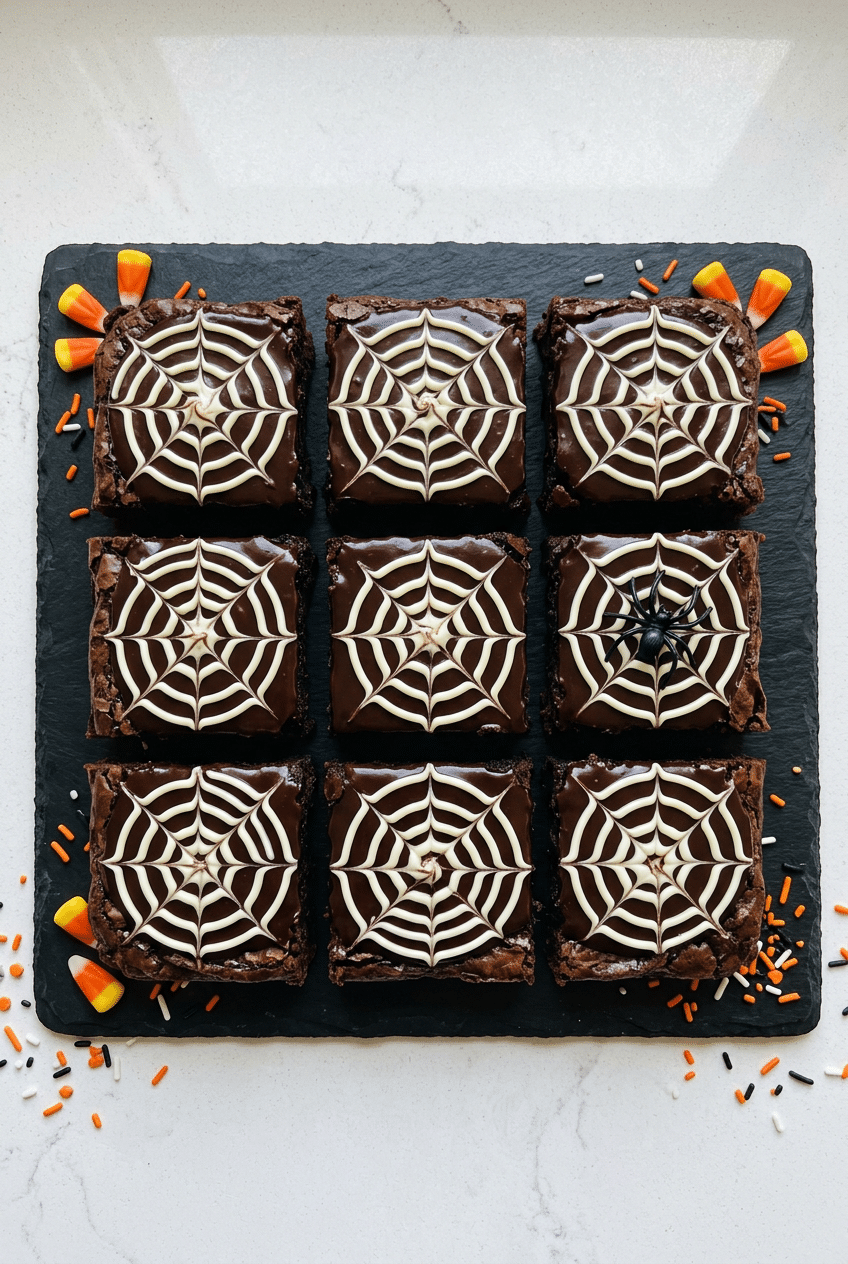
Ingredients for Spider Web Brownies
For the Fudgy Brownie Base
- 1 cup (2 sticks) unsalted butter — melted for maximum fudginess
- 2 cups granulated sugar — creates that crinkly top crust
- 4 large eggs, room temperature — room temp eggs emulsify evenly into the batter
- 2 tsp pure vanilla extract
- 1 cup all-purpose flour — less flour = denser, fudgier brownie
- 3/4 cup Dutch-process cocoa powder — deeper, darker chocolate flavor than natural cocoa
- 1/2 tsp salt
- 1/2 tsp baking powder — just enough lift without making them cakey
- 1 cup semi-sweet chocolate chips — stirred in for melty pockets throughout
For the Dark Chocolate Ganache
- 1 cup heavy cream
- 8 oz dark chocolate (60-70% cacao), finely chopped — Ghirardelli 60% Cacao Bittersweet Chocolate Chips work perfectly here and are easy to find on Amazon
- 1 tbsp unsalted butter — adds gloss and keeps ganache pourable
For the Spider Web Design
- 4 oz white chocolate, melted — Ghirardelli White Chocolate Melting Wafers melt smoothly with zero seizing
- 1-2 tsp vegetable oil or coconut oil — thins the white chocolate so it flows through a piping bag without breaking
- Small plastic spider decorations — optional but incredibly fun for presentation
Optional Add-Ins
- 1/2 tsp espresso powder (deepens chocolate flavor dramatically)
- 1/4 tsp cayenne pepper (Halloween-appropriate heat)
- Orange gel food coloring in the white chocolate (for an orange web instead of white)
- Crushed Oreos pressed into the batter before baking
How to Make Spider Web Brownies Step by Step
Step 1: Prep Your Pan and Oven
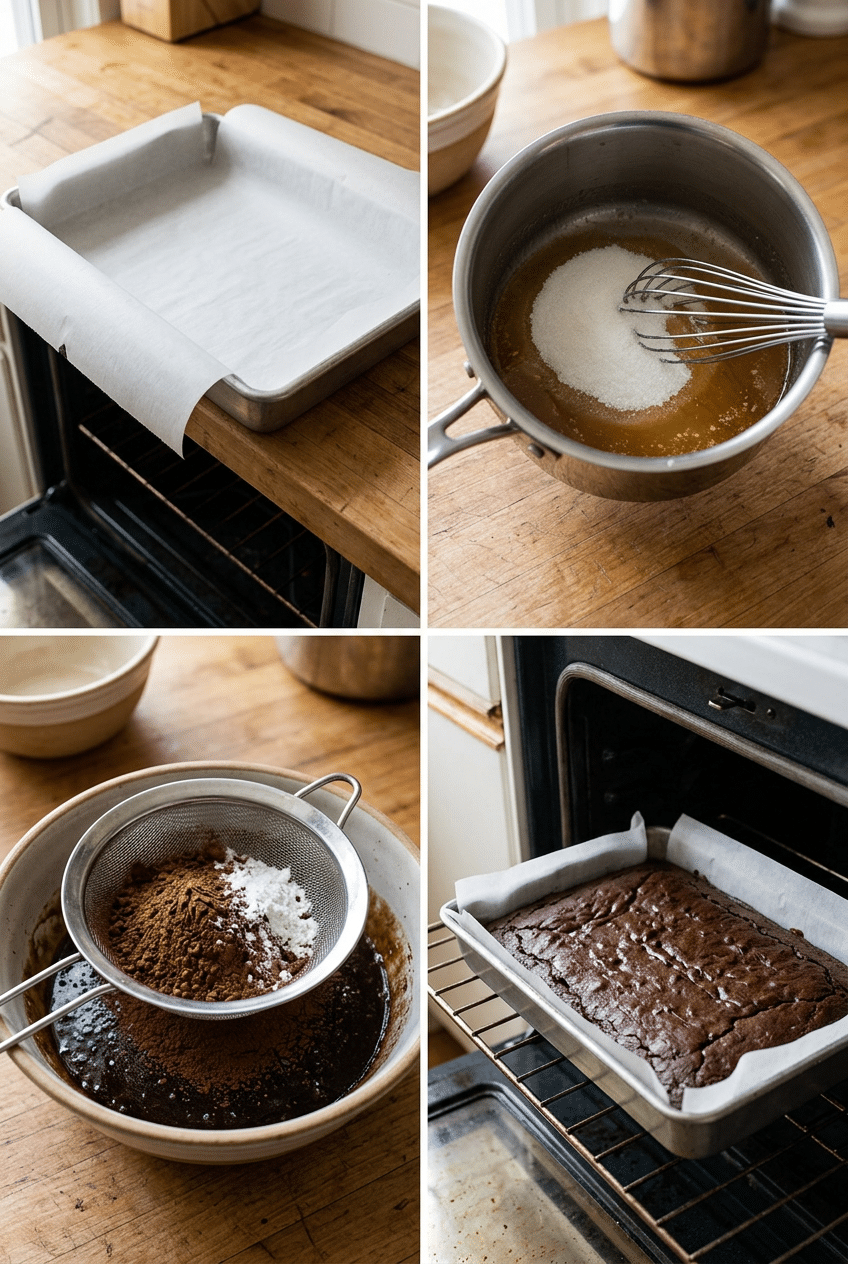
Preheat your oven to 350°F and line a 9×13 inch baking pan with parchment paper, leaving a two-inch overhang on the long sides. That overhang is your built-in handle — it lets you lift the entire slab out cleanly for cutting instead of digging around the edges with a spatula.
Lightly grease the parchment with cooking spray or a thin layer of butter. Even with parchment, a little grease prevents the edges from sticking, especially because the ganache topping makes these stickier than a regular brownie.
Step 2: Melt Butter and Mix Wet Ingredients
Melt your butter in a large saucepan over medium-low heat, then remove from the heat and immediately whisk in the granulated sugar. Keep whisking for a full 60 seconds — this step dissolves the sugar partially and starts building that iconic shiny, crinkled brownie top. Pour the warm butter-sugar mixture into a large mixing bowl and let it cool for 5 minutes before adding eggs.
Add the four room-temperature eggs one at a time, whisking vigorously after each addition. Then add the vanilla extract and whisk until the mixture looks thick, pale, and slightly ribbony. Rushing the egg step is why brownies sometimes turn out greasy on top — patience here is what makes the difference between a good brownie and a great one.
Step 3: Add Dry Ingredients and Chocolate Chips
Sift in the cocoa powder, flour, salt, and baking powder directly over your wet ingredients. Switch from a whisk to a rubber spatula and fold — don’t stir aggressively — until just combined. You want to stop the moment you can’t see dry streaks because overworked gluten makes brownies tough instead of fudgy.
Fold in the chocolate chips last and spread the batter evenly into your prepared pan. The batter will be thick and sticky — use an offset spatula or the back of a spoon dipped in warm water to smooth it out evenly to the corners. Uneven batter means uneven baking, so take 30 extra seconds here.
Step 4: Bake the Brownies
Bake at 350°F for 28 to 32 minutes. Start checking at 28 minutes — insert a toothpick into the center and you’re looking for moist crumbs, not wet batter, and not a clean toothpick. A clean toothpick means overbaked and dry. Moist crumbs clinging to the toothpick is exactly where you want to be.
Pull the pan and let the brownies cool completely in the pan — at least 1.5 to 2 hours at room temperature. Do not rush this with the fridge. The structure needs time to fully set, or the ganache will melt and slide right off when you pour it over a warm brownie base.
Step 5: Make the Dark Chocolate Ganache
Heat the heavy cream in a small saucepan over medium heat until you see tiny bubbles forming around the edges — that’s just below a boil, around 185°F. Pour the hot cream directly over your finely chopped dark chocolate in a heatproof bowl. Let it sit untouched for exactly two minutes, then stir slowly from the center outward in small circles until it becomes smooth and glossy. Add the tablespoon of butter and stir until incorporated.
Let the ganache cool at room temperature for 10 to 15 minutes until it’s pourable but slightly thickened — think the consistency of warm maple syrup. If it’s too hot and thin, it’ll run over the edges of your brownies. If it’s too cool and thick, you won’t be able to spread it smoothly before the white chocolate web sets.
👉 Ghirardelli 60% Cacao Bittersweet Chocolate Chips — These melt into the smoothest ganache — no seizing, no graininess, just deep chocolate flavor.
Step 6: Pour the Ganache and Create the Web
Lift the cooled brownie slab out of the pan using the parchment overhang and place it on a flat cutting board or baking sheet. Pour the ganache over the top and use an offset spatula to spread it evenly to all four edges in a thin, smooth layer — about 1/4 inch thick. Work quickly but confidently: you have about three minutes before the ganache starts to set.
Immediately fill a small piping bag, zip-top bag with the corner snipped, or even a squeeze bottle with your melted white chocolate. Starting from the center, pipe a tight spiral outward toward the edges — about five or six rings total. Then take a toothpick and drag it from the center outward to the edge, like clock hands. Repeat every inch all the way around. That dragging motion pulls the white chocolate into pointed web strands. The whole design takes about 90 seconds — work fast while the ganache is still wet.
👉 Ghirardelli White Chocolate Melting Wafers — White melting wafers stay smooth in the piping bag long enough to finish your entire web design.
Step 7: Set, Slice, and Decorate
Let the ganache set at room temperature for 30 minutes, or slide the whole board into the fridge for 15 minutes if you’re in a hurry. Once the ganache is firm to the touch, use a large sharp knife to cut the slab into 16 squares. Wipe the knife clean with a warm damp cloth between each cut — this is the secret to sharp, clean edges that show off the web design on every single piece.
Press a small plastic spider decoration into the center of each web for the full effect. If you want to serve these at a party, transfer each square to a mini cupcake liner or set them on a black platter with orange sprinkles scattered around. They’ll look like you spent hours on them.
👉 Mini Plastic Halloween Spider Decorations — A bag of tiny plastic spiders costs almost nothing and makes the finished brownies absolutely perfect.
Nutrition Information
- Per serving (1 brownie): approximately 320 cal
- 18g fat
- 38g carbs
- 4g protein
- 2g fiber
- 28g sugar
Pro Tips
Use Dutch-process cocoa, not natural: Dutch-process cocoa has been treated to neutralize acidity, which gives you a darker color and a smoother, more intense chocolate flavor. Natural cocoa works in a pinch, but your brownies will be slightly lighter in color and slightly less rich. King Arthur Baking Dutch-process cocoa is widely available and makes a visible difference in the final color and depth of flavor.
The spiral-then-drag technique is everything: Pipe your white chocolate in a tight spiral first — starting dead center, winding outward. Then drag a toothpick from center to edge like spokes on a wheel. The closer together your spokes, the more intricate the web looks. Spacing them about one inch apart gives you a clean, defined design that reads clearly once you cut the brownies into squares.
Temperature timing is your biggest variable: The ganache needs to be pourable but not hot, and the brownie base needs to be completely cool. If either condition is off, the web design won’t work properly — hot ganache runs, and a warm brownie makes the ganache too thin to hold the white chocolate pattern. Give yourself time and don’t rush either cooling window.
Cut with a warm knife for clean web edges: Dip your knife in hot water, wipe it dry, make one cut. Repeat. This sounds fussy but it takes 30 seconds total and is the difference between professional-looking squares and smeared, ugly cuts. Cold ganache on a cold knife drags and ruins the design you just spent time creating.
Add espresso powder for deeper chocolate flavor: Even if you don’t like coffee, 1/2 teaspoon of espresso powder stirred into your dry ingredients makes the chocolate taste significantly more intense and complex. It doesn’t make the brownies taste like coffee — it just amplifies the cocoa the same way salt amplifies savory food.
Delicious Variations
Orange Spider Web Brownies
Add a few drops of orange gel food coloring to your melted white chocolate before piping. The orange spiral on dark ganache is visually stunning and makes the Halloween theme unmistakable. Use gel food coloring, not liquid — liquid food coloring can cause white chocolate to seize and become grainy, which ruins the smooth piping consistency you need for the web design.
Peanut Butter Web Brownies
Swap the white chocolate for warmed, thinned peanut butter as your web medium. Mix 1/2 cup smooth peanut butter with 2 tablespoons of powdered sugar and 1 to 2 teaspoons of warm cream until it’s thin enough to pipe. The peanut butter-chocolate combination is a crowd-pleaser and the web technique works exactly the same way.
Cream Cheese Spider Web Brownies
Pipe the web using a sweetened cream cheese mixture instead of white chocolate — beat 4 oz softened cream cheese with 3 tablespoons powdered sugar and 1 teaspoon vanilla until smooth and pipe-able. This version is slightly less sweet and has a tangy contrast against the rich dark chocolate ganache. It also sets more slowly, giving you a longer window to drag your toothpick.
Gluten-Free Spider Web Brownies
Replace the all-purpose flour with a 1:1 gluten-free flour blend like Bob’s Red Mill 1-to-1 Baking Flour. The texture is nearly identical — dense, fudgy, and moist. Add an extra egg yolk to compensate for the slightly reduced binding in GF flour. Everything else in the recipe stays exactly the same, including the ganache and web design.
Storage Instructions
Refrigerator
Store spider web brownies in an airtight container in the fridge for up to 5 days. Because the ganache topping is cream-based, refrigeration keeps it fresh and prevents it from becoming tacky at room temperature. Let the brownies sit at room temp for 15 to 20 minutes before serving — cold ganache is slightly firm and a little less glossy, but warm ganache softens back to that gorgeous, fudgy texture you want in every bite.
Freezer
These brownies freeze beautifully for up to 3 months. Freeze individual squares on a parchment-lined baking sheet first, uncovered, for about 2 hours until the ganache is completely solid. Then wrap each square in plastic wrap and transfer to a freezer-safe zip-top bag. This double-wrap method prevents freezer burn and keeps the web design intact. Thaw in the fridge overnight or at room temperature for 45 minutes before serving.
Make-Ahead
Spider web brownies are an ideal make-ahead Halloween dessert. Bake the brownie base up to 2 days in advance and store it uncut, wrapped tightly in plastic wrap at room temperature. On the day you’re serving, make the ganache fresh, decorate the web, let it set, then slice. The ganache and web design are best done the same day for maximum gloss and sharpness. If you need to make them fully ahead, refrigerate completed brownies overnight — they still look and taste great the next day.
For food safety guidelines, visit FDA Safe Food Handling Guidelines.
Frequently Asked Questions
How do you make the spider web design on brownies?
The spider web design on brownies is a two-step technique. First, pipe melted white chocolate in a tight spiral over wet ganache, starting from the center and spiraling outward. Then drag a toothpick from the center of the spiral outward to the edge, repeating every inch around the clock like spokes on a wheel. The toothpick pulls the spiral into pointed web strands. It takes about 90 seconds and the ganache must still be wet when you do it — this is why timing matters so much.
Why did my spider web design smear instead of dragging cleanly?
This happens for two reasons: either the ganache was too set before you piped the white chocolate, or the white chocolate was too thick. The ganache needs to be wet and slightly sticky when you pipe the white chocolate spiral — if it’s already firm, the toothpick can’t drag the colors together cleanly. Make sure your white chocolate is thinned with a teaspoon of vegetable oil so it flows in a thin, controlled line rather than sitting in thick blobs on the surface.
Can I use a box brownie mix for spider web brownies?
Yes, absolutely. A box mix works fine as the base — prepare it according to package directions in a 9×13 pan, bake, and cool completely. Then proceed with the ganache and web design exactly as described. The homemade base gives you a denser, richer result, but the visual effect is identical. If you’re short on time before a Halloween party, starting with a box mix is a totally valid shortcut that still produces a showstopping dessert.
How do I keep my brownies from being cakey instead of fudgy?
Three things make brownies cakey instead of fudgy: too much flour, too many eggs, and overbaking. This recipe uses only 1 cup of flour for a full 9×13 pan, which keeps the ratio firmly in fudgy territory. Use all four eggs as written and pull the pan at 28 to 30 minutes when a toothpick still shows moist crumbs. The brownies will continue cooking from residual heat as they cool — that carry-over cooking is what finishes the center without drying it out.
What can I use instead of a piping bag for the web design?
A zip-top plastic bag with a tiny corner snipped off works just as well as a piping bag for the web design. The key is making the hole very small — start with the tiniest snip possible and test on parchment before going onto the brownie. You can also use a squeeze bottle if you have one, which gives you slightly more control and pressure. In a pinch, even a spoon dragged in thin lines across the ganache can create a looser, more rustic web effect.
Can I make spider web brownies ahead for a Halloween party?
Definitely — they’re actually better the next day once everything has fully set. Bake the brownies and cool them completely, then apply the ganache and web design the night before your party. Store the finished, uncut slab covered loosely in the fridge overnight. Slice them the morning of your event for the cleanest cuts, and let them come to room temperature before serving so the ganache softens back to its glossy best.
More Recipes You Will Love
👉 Perfect Sheet Pan Sausage & Veggies Recipe
👉 Perfect Turkey Meatball Pasta Recipe
👉 Perfect Chicken Burrito Bowls Recipe
These spider web brownies are genuinely the most fun Halloween baking project I know — and the payoff is way bigger than the effort. That ganache web takes 90 seconds and makes everyone think you spent hours decorating. Try them this Halloween, drop a comment below telling me how the web turned out, and share a photo on Instagram if you make them. Tag us — I love seeing your spooky creations.