
- Prep: 20 Minutes
- Cook: 15 Minutes
- Total: 35 Minutes
- Servings: 24 treats
A Quick Note Before You Start
These Halloween treats for kids are designed to be fun, not fussy. Most take under 30 minutes and use ingredients you probably already have. The mummy hot dogs are always the first to disappear at every party.
Halloween treats for kids don’t have to mean store-bought candy bags and stress. These 10 spooky, fun recipes are easy enough for a Tuesday night and impressive enough for the class party.
We’re covering everything from chocolate mummy pretzels to jack-o’-lantern clementines — mix and match, make a big batch, and let the kids help. Half the fun is in the making.
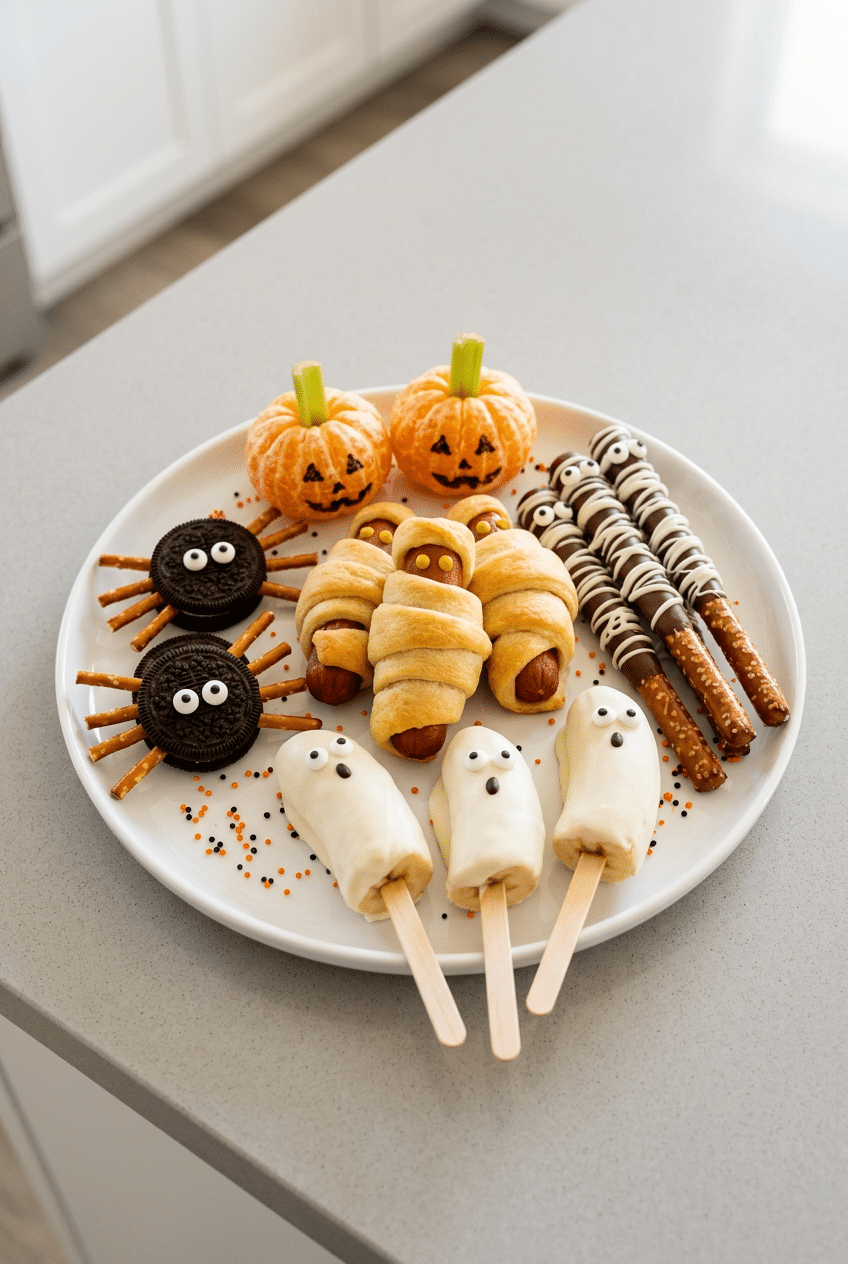
Ingredients for Halloween Treats for Kids
Mummy Pretzel Rods
- 12 pretzel rods — the sturdy base for dipping
- 1 cup white chocolate chips (Ghirardelli White Melting Wafers melt the smoothest and set with a glossy finish) — for the mummy wrapping drizzle
- 1 tbsp coconut oil — thins the chocolate for easy drizzling
- 24 mini candy eyes (Wilton Candy Eyeballs come in a big bag and work for every recipe here) — for the mummy face
Jack-o’-Lantern Clementines
- 12 clementines — peeled but keeping the shape intact
- 6 celery stalks — cut into 1-inch pieces for the stems
- 1 black food-safe marker (Wilton FoodWriter Edible Markers — draw faces directly on the peel, no mess) — for drawing jack-o’-lantern faces
Oreo Spider Cookies
- 12 Oreo cookies — double stuffed work best so the legs stick
- 48 thin pretzel sticks — the spider legs
- 1/4 cup black decorator icing (Wilton Ready-to-Use Black Decorator Icing — no mixing, just squeeze) — for dotting the eyes and body detail
- 24 mini candy eyes — same bag as above
Mummy Hot Dogs
- 8 beef hot dogs — regular size, not jumbo
- 1 can (8 oz) refrigerated crescent roll dough (Pillsbury Original Crescent Rolls — the classic choice, tears into strips perfectly) — for the mummy wrapping
- Yellow mustard in a squeeze bottle — for the tiny dot eyes
- 1 egg — beaten, for egg wash so the dough turns golden
Ghost Banana Pops
- 4 ripe bananas — halved crosswise, not lengthwise
- 8 popsicle sticks (Wooden Craft Popsicle Sticks — a bulk pack handles this and every future frozen treat) — inserted into banana halves
- 1.5 cups white chocolate chips — for dipping
- 1 tbsp coconut oil — for smooth melting
- Mini chocolate chips — for the ghost eyes and mouth
For Decorating (Universal)
- Orange and black sprinkles (Fancy Sprinkles Halloween Mix — one bag covers everything on this list) — for finishing touches across all treats
- Orange food coloring gel — optional, for tinting white chocolate orange on the banana pops
Optional Add-Ins
- Black sesame seeds for spider body texture
- Red gel food coloring for ‘bloody’ drizzle effect on pretzels
- Crushed Oreos for ‘dirt’ garnish on banana pops
- Googly candy eyes in multiple sizes for variety
- Caramel dipping sauce for clementine jack-o’-lanterns
How to Make Halloween Treats for Kids Step by Step
Step 1: Freeze the Banana Pops First
Start here because the banana pops need freeze time — everything else comes together while they firm up. Peel your bananas and cut each one in half crosswise. Push a popsicle stick about 1.5 inches into the flat cut end of each half, pressing firmly so it holds. Lay them on a parchment-lined baking sheet and slide the whole tray into the freezer.
They need at least 2 hours to freeze solid before dipping — if you dip a soft banana in warm chocolate, it slides right off and the whole thing collapses. Solid frozen banana = clean dip every time. Pop them in the freezer first thing and come back to them at the end.
Step 2: Make the Mummy Hot Dogs
Preheat your oven to 375°F. Open the crescent roll can and unroll the dough onto a cutting board. Instead of separating it at the perforations, keep it as one flat sheet and use a sharp knife or pizza cutter to slice it into long, thin strips — about 1/4 inch wide. Wrap each hot dog from one end to the other, leaving a small gap near one end for the face. The strips don’t need to be perfect; messy wrapping actually looks more like a real mummy.
Place the wrapped dogs on a parchment-lined baking sheet, brush lightly with the beaten egg for color, and bake for 12 to 14 minutes until the dough is golden and puffed. Once they come out of the oven and cool for just a couple of minutes, use your mustard squeeze bottle to add two tiny dots for eyes in that little gap you left. They look best served warm.
Step 3: Melt Chocolate and Dip the Pretzels
Pour your white chocolate chips into a microwave-safe mug or tall narrow bowl — a mug works better than a wide bowl because it gives you depth to dip the pretzel rod straight down. Add the coconut oil and microwave in 30-second bursts, stirring between each, until fully melted and smooth. Three rounds of 30 seconds is usually enough. Don’t overheat or it’ll seize up and get grainy.
Dip each pretzel rod about two-thirds of the way into the white chocolate, letting the excess drip back into the mug for a few seconds. Lay it on a parchment-lined sheet. While the coating is still wet, use a fork dipped in leftover melted chocolate to drizzle thin lines back and forth across the pretzel — this creates the mummy bandage look. Press two candy eyes into the chocolate before it sets. Let them rest at room temperature for 15 minutes or pop them in the fridge for 5 to set faster.
👉 Ghirardelli White Melting Wafers — Melts silky smooth, sets glossy — no seizing like cheap white chips.
Step 4: Assemble the Oreo Spiders
This one takes about 4 minutes and kids absolutely love doing it themselves. Separate your pretzel sticks into groups of 8 — those are the 8 legs per spider. Carefully twist open each Oreo and press 4 pretzel sticks into the cream filling on each side, fanning them out slightly like legs. The double-stuff filling is thick enough to hold them in place without any extra adhesive.
Close the cookie gently so it sandwiches the pretzel legs in place. Use your black decorator icing to pipe two small dots on top of the Oreo for eyes, then press a candy eyeball into each dot before the icing sets. That’s literally it. Arrange them on a plate so the legs splay out — they look like they’re crawling and kids completely lose their minds over them.
👉 Wilton Ready-to-Use Black Decorator Icing Tube — Pre-loaded, no mixing — perfect for tiny spider details and quick eyes.
Step 5: Make the Jack-o’-Lantern Clementines
Peel all your clementines carefully, keeping the segments intact so the fruit holds its round shape. The peeled clementine looks almost exactly like a little pumpkin already — orange, round, slightly segmented. Set them on a tray and use your edible food marker to draw a jack-o’-lantern face on each one. Triangle eyes, a jagged smile — the marker goes on smoothly and doesn’t bleed if you use a light, confident stroke.
Press one piece of celery into the top center of each clementine where the stem would be — it snaps right in and stays put. These are the healthiest thing on the table and somehow always the most Instagrammable. Kids who normally skip fruit will eat these at a Halloween party. Refrigerate until you’re ready to serve.
👉 Wilton FoodWriter Edible Markers Black — Draws clean lines on clementine peel without bleeding — no food coloring mess.
Step 6: Dip the Frozen Banana Ghosts
Pull your frozen banana halves out of the freezer — they should be rock solid. Melt your remaining white chocolate chips with coconut oil using the same microwave method as before. Work quickly now because the frozen banana will start to make the chocolate set almost immediately, which is actually what you want. Dip each banana straight down into the chocolate, twisting it gently as you lift it out to get an even coat.
Hold the banana above the bowl for about 10 seconds while the coating sets — it firms up fast on the frozen surface. While it’s still slightly tacky, press two mini chocolate chips in for eyes and one small chip below for a little mouth, making a ghost expression. Set them back on the parchment sheet. If you want an orange ghost instead of white, stir a tiny drop of orange gel food coloring into the chocolate before dipping. They’re ready to eat in minutes.
Step 7: Plate Everything Together
Arrange all five treats on a large serving platter or across multiple plates. The contrast of colors does the work for you — orange clementines, white mummy pretzels, dark Oreo spiders, golden hot dogs, and ghostly banana pops all together looks like you spent hours. Scatter some orange and black sprinkles across the platter for extra Halloween flair.
If you’re bringing these to a party or school event, pack each treat type separately in small containers — the mummy pretzels especially will break if they jostle around together. The clementines and Oreo spiders travel the best. The banana pops should be the last thing packed and kept cold.
👉 Halloween Sprinkles Mix (orange and black) — One bag instantly makes any platter look like a Halloween spread.
Nutrition Information
- Per treat (average across all 5 recipes): ~145 cal
- 6g fat
- 21g carbs
- 3g protein
Pro Tips
Freeze bananas the night before: If you know Halloween party day is coming, stick the banana pops in the freezer overnight instead of just 2 hours. Overnight-frozen bananas dip cleaner, hold their shape longer at room temperature, and the chocolate sets in seconds instead of 10. This is the single best thing you can do to make the banana ghost step stress-free.
Use a tall mug for dipping: For both the pretzels and the banana pops, melt your chocolate in a tall, narrow mug rather than a wide bowl. The depth lets you fully submerge a pretzel rod or banana half in one smooth motion without having to tilt or awkwardly coat the sides. Less fuss, less dripping, cleaner results every time.
Prep crescent strips ahead of time: Cut your crescent roll dough into strips, separate them on a piece of parchment, and refrigerate up to 2 hours before you need them. Cold dough is easier to handle and wraps around the hot dogs without tearing. Warm dough from a just-opened can sticks to your fingers and stretches out unevenly.
Set up an assembly line: When making 24+ treats, lay out all your decorating tools in a row — chocolate, eyes, icing, sprinkles — before you start step one. The chocolate window on pretzels and banana pops is narrow (about 60 seconds before it fully sets), so having everything at your fingertips means you decorate while it’s still sticky. No scrambling for the candy eyes.
Double the Oreo spiders: They take 4 minutes, require zero cooking, and disappear faster than anything else on the table. If you’re bringing these to a class party with 20+ kids, double or triple the Oreo batch. They also travel better than the chocolate-dipped items — stack them in a single layer in a lidded container.
Delicious Variations
Witch Hat Cookies
Place a Hershey’s Kiss in the center of a round chocolate cookie (like a Fudge Stripe), using a dab of black decorator icing to glue it in place. Add an orange frosting ring around the base of the Kiss for the hat brim detail. These take under 10 minutes, require zero baking, and look genuinely impressive on a party platter.
Frankenstein Rice Krispie Treats
Make or buy rectangular Rice Krispie treats and dip the top half in green-tinted white chocolate. Use black and white decorator icing to pipe on Frankenstein hair, bolt details, and a stitched mouth. Press two candy eyes above the stitching. Let set on parchment. The green dip is the one step that makes everything look completely different from a standard marshmallow bar.
Candy Corn Fruit Cups
Layer pineapple chunks at the bottom of a clear plastic cup, mandarin orange segments in the middle, and whipped cream on top. The yellow, orange, and white layers mimic a candy corn perfectly from the side. Use clear plastic cups so the layers show — opaque cups completely ruin the effect. These are the healthy crowd-pleaser that adults reach for too.
Monster Deviled Eggs
Make your standard deviled eggs but tint the yolk filling green with food coloring gel. Pipe the filling in a tall dome shape, then stick two olive slices on top for monster eyes. Use a toothpick dipped in hot sauce or ketchup to draw tiny pupils. These work perfectly for parties where you want one savory item among all the sweets.
Pumpkin Brownie Bites
Bake boxed brownie batter in a mini muffin tin for 12 to 14 minutes. Once cooled, press a pretzel rod piece into the top of each brownie as a stem. Pipe a simple jack-o’-lantern face on top with orange and black decorator icing. The contrast of fudgy brownie and Halloween face decorating makes these look much more involved than they actually are.
Storage Instructions
Refrigerator
The mummy pretzels keep well in an airtight container at room temperature for up to 3 days — refrigerating them can make the chocolate sweat and turn sticky when they come back to room temp. The jack-o’-lantern clementines should be refrigerated and eaten within 24 hours since the peeled fruit dries out quickly. The Oreo spiders can sit at room temperature in a covered container for 2 to 3 days. Mummy hot dogs should be refrigerated and reheated in the oven at 325°F for 8 minutes before serving.
Freezer
The banana ghost pops are freezer-native — once dipped and decorated, store them in a single layer in a freezer-safe container (not stacked or the chocolate cracks) for up to 2 weeks. Lay parchment between layers if you need to stack. Pull them out 3 to 5 minutes before serving so they’re not rock-hard. The Oreo spiders and mummy pretzels do not freeze well — the moisture ruins the texture of the cracker and chocolate coating.
Make-Ahead
This is a great make-ahead spread. The banana pops can be prepped up to 2 weeks ahead (freezer). The mummy pretzels and Oreo spiders can be made 2 days in advance and stored in airtight containers. The crescent dough mummy hot dogs are best made the day of — you can cut the dough strips and refrigerate them overnight, then wrap and bake right before the party. Clementines should be decorated the morning of the party for best appearance.
For food safety guidelines, visit FDA Food Safety Guidelines.
Frequently Asked Questions
How far in advance can I make Halloween treats for kids?
Most of these can be prepped 1 to 2 days ahead. The mummy pretzels and Oreo spiders are the best make-ahead options — store them in airtight containers at room temperature and they hold up beautifully. The banana ghost pops can be made up to 2 weeks ahead and kept in the freezer. The clementines and hot dogs are best made the same day for freshness and best appearance.
What’s the easiest Halloween treat on this list for young kids to help make?
The Oreo spiders are the clear winner for little hands — no heat, no melting, no special skills. Kids just push pretzel sticks into the cream filling and press candy eyes onto the icing. The jack-o’-lantern clementines are a close second, especially if you let them draw the faces with the edible marker. Both activities take about 5 minutes and require zero adult supervision for the actual assembly steps.
Can I use dark or milk chocolate instead of white chocolate?
Absolutely. Dark chocolate actually looks even spookier on the mummy pretzels and gives a more dramatic contrast for the drizzle lines. For the banana ghost pops, white chocolate is part of the ‘ghost’ look, but if you want to make dark chocolate skeleton pops instead, dark chocolate works great — just press white chocolate chip ‘bones’ into the surface before it sets for a fun variation.
What if my white chocolate keeps seizing up in the microwave?
Seized white chocolate (when it goes stiff and grainy) almost always means it got too hot or came into contact with even a tiny drop of water. Use a completely dry bowl, microwave in short 20 to 30 second bursts, and stir between each. Adding a teaspoon of coconut oil helps it stay fluid longer and recover if it starts to get thick. If it fully seizes, add coconut oil a teaspoon at a time and stir vigorously — it usually recovers.
How do I transport Halloween treats for kids to a school party without breaking them?
Pack each type of treat in its own container rather than mixing them together. Mummy pretzels go in a tall container standing upright so they don’t break. Oreo spiders travel flat in a single layer. Hot dogs reheat fine so you can pack them in a foil-lined container. Clementines are basically indestructible. The banana pops should be your last-packed item and kept in a cooler — they soften quickly at room temperature.
Are these Halloween treats allergy-friendly?
As written, most of these contain gluten (pretzels, crescent dough, Oreos) and dairy (white chocolate). For a gluten-free version, swap pretzel rods with gluten-free pretzel sticks and use gluten-free crescent-style dough. For dairy-free, use vegan white chocolate chips (Enjoy Life brand works well for dipping). The jack-o’-lantern clementines are naturally vegan, gluten-free, and nut-free, making them the universal crowd-pleaser for allergy-conscious classrooms.
More Recipes You Will Love
👉 Perfect Sheet Pan Sausage & Veggies Recipe
👉 Perfect Taco Meat Recipe (Better Than Takeout)
👉 Perfect Chicken Burrito Bowls Recipe
Halloween treats for kids are supposed to be fun — not a three-day baking project. Pick two or three from this list, make a double batch, and let the kids help with the easy stuff. The mummy hot dogs are dinner AND a treat. The Oreo spiders are 4 minutes. The banana pops look like you hired a pastry chef. Make them, share them, and tell us in the comments which one disappeared first at your party.