
- Prep: 10 Minutes
- Cook: 5 Minutes
- Total: 15 Minutes
- Servings: 12 mini sandwiches
A Quick Note Before You Start
These mini bagel sandwiches come together in about 15 minutes flat, which makes them my go-to for last-minute gatherings. Toast the bagels first — even lightly — because it keeps them from getting soggy under all those toppings. Trust me on this one.
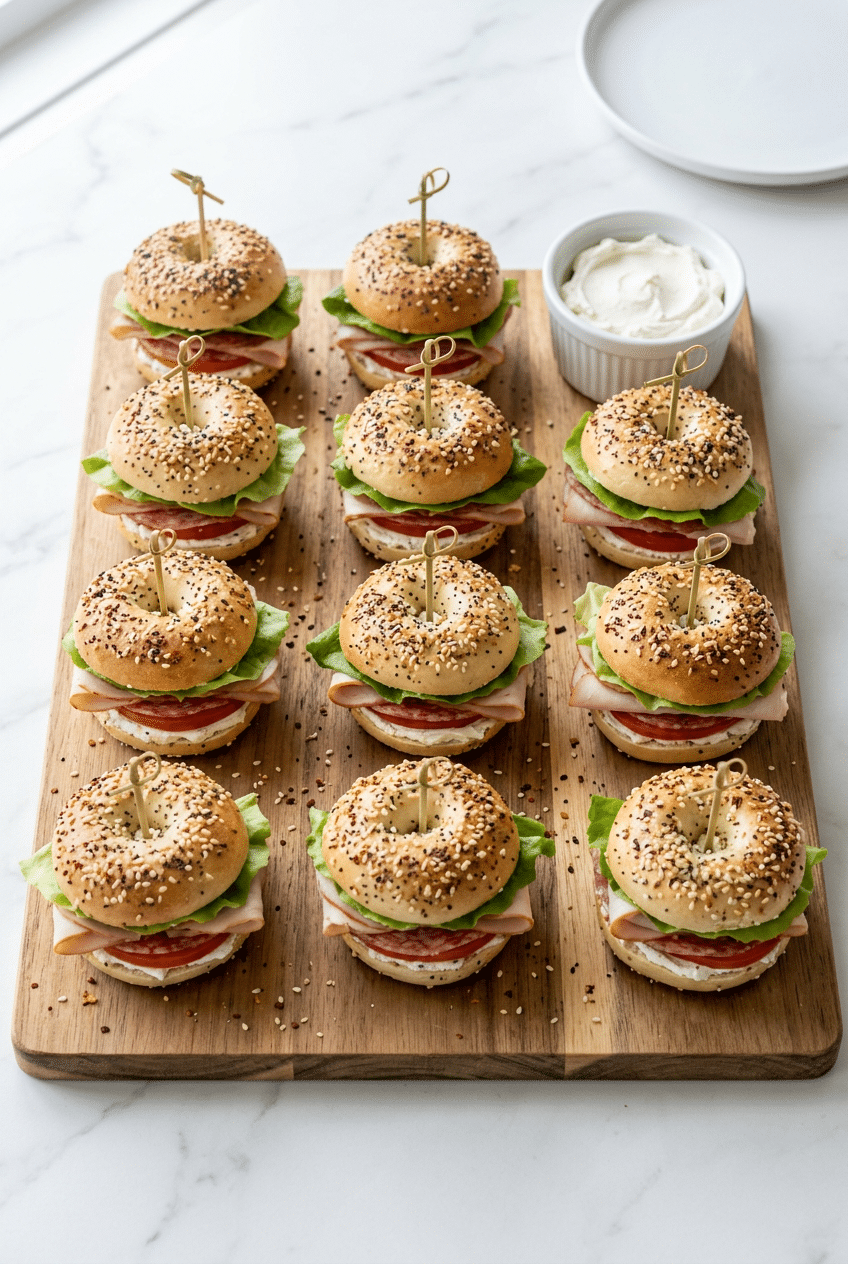
Mini bagel sandwiches are the kind of recipe that disappears from the platter before you even finish setting out the napkins. Two bites of toasty bagel, creamy spread, stacked deli meat, and crisp toppings — they punch way above their weight.
What makes this version special is the layering technique and the whipped herb cream cheese that ties every bite together. We’ll also walk through four filling combos so you can build a full spread with almost zero extra effort.
Ingredients for Mini Bagel Sandwiches
The Base
- 12 mini bagels — plain, everything, or sesame all work great
- 2 tablespoons unsalted butter — for toasting the cut sides in a pan
The Whipped Herb Cream Cheese Spread
- 8 oz block-style cream cheese, softened — full fat gives the creamiest texture
- 2 tablespoons sour cream — makes the spread light and scoopable
- 1 teaspoon fresh chives, finely minced
- 1 teaspoon fresh dill, finely minced
- 1 small garlic clove, grated
- Salt and black pepper to taste
- 1 tablespoon Everything But the Bagel Seasoning (Trader Joe’s or McCormick brand) — sprinkle on top of the spread for that signature crunch and flavor hit
The Fillings (Classic Deli Build)
- 6 oz thinly sliced deli turkey — Boar’s Head or your favorite brand, folded into ruffles
- 4 oz thinly sliced salami or ham — adds a savory, salty contrast
- 4 oz sliced provolone or Swiss cheese — cut slices in half to fit the mini bagel
- 1 cup baby arugula or green leaf lettuce — arugula adds a peppery bite
- 1 Roma tomato, sliced thin — blot dry with a paper towel so it doesn’t make the bagel soggy
- 1/2 small red onion, sliced paper-thin
- 8 bread-and-butter pickle chips
Finishing Touches
- 1 tablespoon Dijon mustard — spread a thin layer on the top bagel half for a sharp, tangy kick
- Decorative sandwich toothpicks or party picks — keeps everything stacked and makes them look polished on the platter
Optional Add-Ins
- Sliced avocado (adds creaminess)
- Crispy bacon strips, broken in half
- Banana pepper rings for heat
- Sun-dried tomatoes packed in oil
- Thinly sliced cucumber rounds
- Smoked salmon for an elevated brunch version
How to Make Mini Bagel Sandwiches Step by Step
Step 1: Make the Whipped Herb Cream Cheese
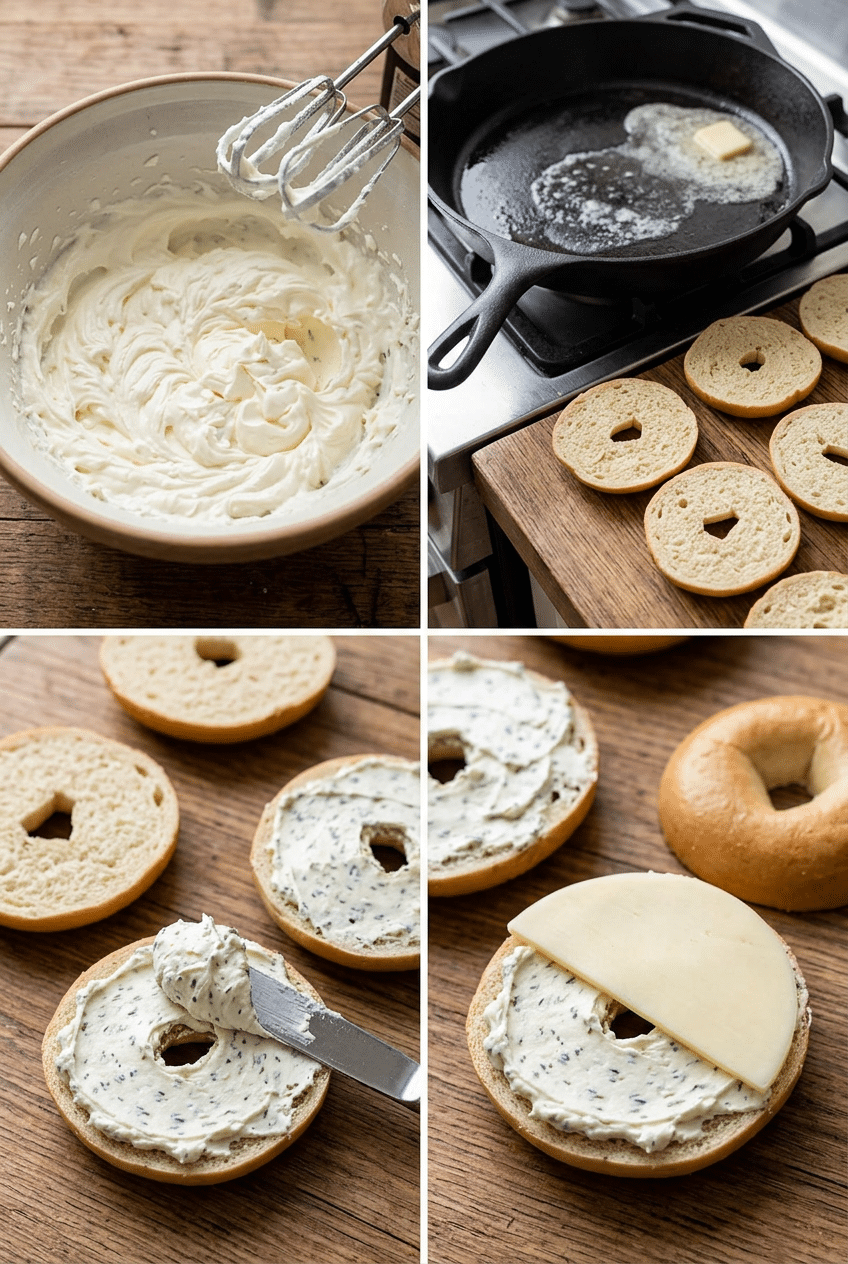
Start by beating the softened cream cheese and sour cream together in a bowl until fluffy and smooth — about 60 seconds with a hand mixer or a good amount of elbow grease with a fork. You want it airy, not dense, so it spreads easily without tearing the soft bagel.
Fold in the minced chives, dill, and grated garlic, then season with salt and a few cracks of black pepper. Taste it. If it needs brightness, add a tiny squeeze of lemon juice. This spread is the flavor backbone of the whole sandwich, so don’t rush this step — it should taste great on its own.
Step 2: Slice and Toast the Mini Bagels
Slice all 12 mini bagels in half horizontally and melt a tablespoon of butter in a large skillet over medium heat. Place the bagel halves cut-side down in batches and let them toast for about 90 seconds until golden and lightly crisp. You’re not looking for dark brown — just enough structure to handle the toppings without going limp.
Toasting is the single most important step people skip. A raw, soft bagel will compress and turn soggy within 10 minutes of assembly, which is a disaster for party food that needs to sit on a platter. Toasting creates a barrier layer that keeps the cream cheese from soaking straight through the bread.
Step 3: Spread the Cream Cheese on Both Halves
Once the bagels cool for a minute or two, spread a generous tablespoon of the whipped herb cream cheese on both the top and bottom halves. Going edge-to-edge matters here — every bite should have that creamy, herby layer. Then sprinkle a small pinch of Everything But the Bagel seasoning right on top of the cream cheese on the bottom half.
The seasoning on the cream cheese (not the outside of the bagel) is a small trick that keeps the sesame seeds and dried onion from falling off everywhere when guests pick them up. It also adds a satisfying crunch in the middle of the sandwich that you won’t get any other way.
👉 McCormick Everything Bagel Seasoning Blend — This is the exact seasoning that gives every bite that signature bagel-shop crunch and flavor.
Step 4: Layer the Fillings in Order
Start with a half-slice of provolone directly on the cream cheese — the cheese acts as another moisture barrier between the spread and the wet ingredients above it. Next, fold two to three thin slices of deli turkey into loose ruffles and nestle them on the cheese, then add one folded slice of salami on top. Folding the meat instead of laying it flat creates volume and makes the sandwich look much more impressive on a platter.
Now add a few leaves of baby arugula, one thin tomato slice (blotted dry — seriously, do not skip this), a couple of red onion rings, and two pickle chips. This order isn’t random: sturdy things go on the bottom, wet things in the middle, and delicate greens right before the top half goes on. That stack order prevents everything from sliding around when guests pick them up.
Step 5: Add Mustard and Close the Sandwiches
Spread a thin, even layer of Dijon mustard on the cream-cheese side of the top bagel half — not too much, just enough to add that sharp, tangy note that cuts through the richness of the cheese and meat. Press the top half down gently but firmly so the whole stack compresses slightly and holds together.
Immediately push a decorative toothpick or party pick straight down through the center of each sandwich. This is your structural support — it keeps the top bagel from sliding off when someone reaches for it. Arrange the finished mini bagel sandwiches on a serving board or platter, cut-side facing out so the colorful layers are visible.
👉 Decorative Party Sandwich Picks / Toothpicks with Flags — These keep every mini bagel sandwich stacked and make the platter look professionally catered.
Step 6: Arrange and Serve
Line a large wooden serving board or slate board with a sheet of parchment paper, then arrange the mini bagel sandwiches in tight rows — close together so they support each other and look abundant. Place a small ramekin of extra whipped cream cheese in one corner for dipping, and scatter a few extra pickle chips around the board for garnish.
For a party spread, build all four filling variations (see the Variations section below) and arrange them in grouped clusters by type, using small labels or toothpick flags to identify each one. Guests love knowing what they’re reaching for, and the visual variety makes the whole platter look like something from a catering company.
👉 Large Bamboo Serving Board with Handles — A wide bamboo board gives you enough real estate to arrange all 12 sandwiches in rows without crowding.
Nutrition Information
- Per serving (1 mini bagel sandwich
- classic deli build): 210 cal
- 10g fat
- 20g carbs
- 11g protein
- 1g fiber
- 480mg sodium
Pro Tips
Blot Your Tomatoes: Lay sliced tomato rounds on a paper towel and press another towel on top for 30 seconds before assembling. Tomatoes release a surprising amount of liquid that will soak through even a toasted bagel within 20 minutes — blotting them first buys you at least an hour of sturdy, non-soggy sandwiches on your party platter.
Soften the Cream Cheese All the Way: Cold cream cheese tears the soft bagel interior and leaves clumps instead of a smooth layer. Pull it out of the fridge at least 45 minutes before you start, or microwave the unwrapped block for 15-second bursts until it gives easily when pressed. The difference in spreadability is night and day.
Fold Don’t Flat-Stack Your Meat: Rather than laying deli slices flat, fold each piece into a loose, ruffled rosette before placing it on the bagel. Folded meat adds visual height, creates air pockets that make the sandwich feel more substantial, and keeps slices from compressing into a dense, flat puck between the bagel halves.
Use a Serrated Knife to Slice Bagels: Mini bagels can be tricky to cut evenly because of their small size and chewy crust. A sharp serrated bread knife saws through cleanly without squashing the bagel or sending it skidding across the counter. Saw gently with light pressure rather than pressing straight down.
Chill the Assembled Sandwiches Before Serving: If you’re making mini bagel sandwiches ahead for a party, assemble them fully, place them in a single layer in a covered container, and refrigerate for at least 20 minutes before serving. The short chill firms up the cream cheese and helps everything bond together so the fillings don’t shift when guests pick them up.
Delicious Variations
BLT Mini Bagels
Swap the deli turkey and salami for four strips of crispy bacon, broken in half to fit the bagel. Keep the whipped herb cream cheese, but add a thin smear of mayo on top of it. Layer bacon, a small butter lettuce leaf, and one blotted tomato slice. The smoke from the bacon plays beautifully against the fresh herb cream cheese and makes these the most popular variety on any mixed platter.
Smoked Salmon Brunch Bagels
This is your elevated brunch move. Skip the mustard entirely and spread a thick layer of whipped cream cheese on both halves. Layer two to three thin slices of smoked salmon, a few capers, paper-thin red onion rings, and a small sprig of fresh dill on top. Finish with a crack of black pepper and a tiny squeeze of lemon. These look stunning on a board and taste like a New York deli.
Caprese Mini Bagels (Vegetarian)
Spread plain cream cheese (skip the herbs), then layer two thin slices of fresh mozzarella, one blotted heirloom tomato round, and two fresh basil leaves. Drizzle a small amount of high-quality balsamic glaze over the filling before closing the sandwich. These are the easiest to make, require almost no prep, and are always the first ones to disappear from the platter — even before the meat versions.
Spicy Italian Mini Bagels
Use everything bagels as your base and layer with Genoa salami, hot capicola, thin-sliced provolone, banana pepper rings, and a few shreds of iceberg lettuce. Replace the herb cream cheese with a garlic-butter-and-oregano spread made by mixing softened butter with half a teaspoon each of garlic powder and dried Italian seasoning. Broil the bottom half for 60 seconds before building for maximum flavor impact.
Storage Instructions
Refrigerator
Store assembled mini bagel sandwiches in a single layer in an airtight container or covered baking dish in the refrigerator for up to 24 hours. Lay a slightly damp paper towel over the sandwiches before sealing to prevent the bagels from drying out. After 24 hours the tomato moisture will start migrating into the bread, so for the best texture, plan to serve them within the day they’re made. They’re still safe to eat on day two, just a little softer.
Freezer
Freezing fully assembled mini bagel sandwiches is not recommended because the fresh vegetables and cream cheese don’t hold their texture after thawing. However, you can freeze the toasted plain bagel halves in a zip-lock bag for up to 2 months. Just pull them out, thaw at room temperature for 15 minutes, and build fresh sandwiches. This is a great time-saving trick if you buy mini bagels in bulk when they’re on sale.
Make-Ahead
The whipped herb cream cheese can be made up to 3 days in advance and stored in a sealed container in the fridge — it actually gets better as the flavors meld. Toast the bagels the morning of your event and store them uncovered at room temperature so they stay crisp. Then assemble the full sandwiches no more than 2 hours before serving, keeping them covered and refrigerated until guests arrive. This make-ahead strategy means you spend less than 10 minutes in the kitchen before the party starts.
For food safety guidelines, visit FDA Safe Food Handling Guidelines.
Frequently Asked Questions
What kind of mini bagels work best for mini bagel sandwiches?
Everything mini bagels are the crowd favorite because the sesame and onion topping adds flavor without any extra effort. Plain mini bagels are the most versatile — they work with every filling combination. For brunch or smoked salmon versions, poppy seed or sesame mini bagels are excellent. Avoid super-soft grocery store mini bagels if you can; slightly denser bakery-style ones hold up much better under toppings and don’t compress into a flat disk when you press them closed.
How do I keep mini bagel sandwiches from getting soggy?
Three things: toast the bagels first, blot your tomatoes dry on a paper towel, and layer cheese directly against the cream cheese as a moisture barrier before adding any wet vegetables. If you’re making them more than an hour ahead, also keep the tomatoes and any wet toppings separate and add them right before serving. The toasting step alone buys you at least 60 to 90 extra minutes of sturdy, non-soggy texture compared to assembling on raw bagels.
How many mini bagel sandwiches should I make per person?
For a party appetizer or finger food spread alongside other dishes, plan on 2 to 3 mini bagel sandwiches per person. If mini bagel sandwiches are the main event — like a lunch or a light dinner — go with 3 to 4 per person. They’re small, two bites each, and people always reach for more than they expect to. It’s safer to make a few extra than to run short. A batch of 24 (two full recipes) comfortably feeds a party of 8 to 10.
Can I make mini bagel sandwiches the night before?
You can, but with a strategy. Make the whipped cream cheese the night before and refrigerate it. Toast the bagels the morning of your event. Assemble the full sandwiches no earlier than 2 hours before serving, and keep them covered in the fridge until needed. If you assemble the night before, the tomatoes will release water and the bread will soften significantly. The flavor will still be good, but the texture won’t be as satisfying as freshly built sandwiches.
What’s the best way to serve mini bagel sandwiches at a party?
A large wooden or bamboo serving board lined with parchment paper is the most visually striking option. Arrange the sandwiches in tight rows, toothpick-side up, grouped by filling type. Add small ramekins of extra cream cheese, a dish of pickle chips, and a few sprigs of fresh dill or basil as garnish. Keep the board in the fridge until 10 minutes before guests arrive, then pull it out and let it come to room temperature slightly — the cream cheese spreads better and the flavors are more pronounced when not ice cold.
Are mini bagel sandwiches good for kids’ lunches?
Absolutely — they’re one of the best lunchbox options out there. Kids love the small size, and you can customize each one with their preferred fillings. Turkey and mild cheddar with a smear of plain cream cheese is always a winner. Pack the assembled sandwiches in a divided container and add an ice pack to keep them cold. For school lunches, skip the red onion and arugula and stick to milder toppings like cucumber slices and butter lettuce.
More Recipes You Will Love
👉 All-American Burger Recipe (Juicy & Classic)
👉 Perfect BBQ Baby Back Ribs Recipe (Fall-Off-Bone)
👉 Perfect Corn on the Cob Recipe (5 Easy Ways)
👉 Perfect Patriotic Fruit Pizza Recipe (Easy & Festive)
Mini bagel sandwiches are proof that the best party food is also the simplest. Make the whipped herb cream cheese, toast those bagels, stack your fillings in order, and you’ll have a platter that looks catered and tastes incredible. Try them this weekend, leave a comment below telling me which filling combo was the biggest hit at your table, and share the recipe with a friend who’s always hunting for easy party food ideas!