
- Prep: 15 Minutes
- Cook: 0 Minutes
- Total: 15 Minutes
- Servings: 8 sandwiches
Table of Contents
A Quick Note Before You Start
Use fresh, soft sandwich bread — not day-old or dense bread. The softer the bread, the better the seal. Make a big batch on Sunday and freeze them all week for effortless lunchboxes.
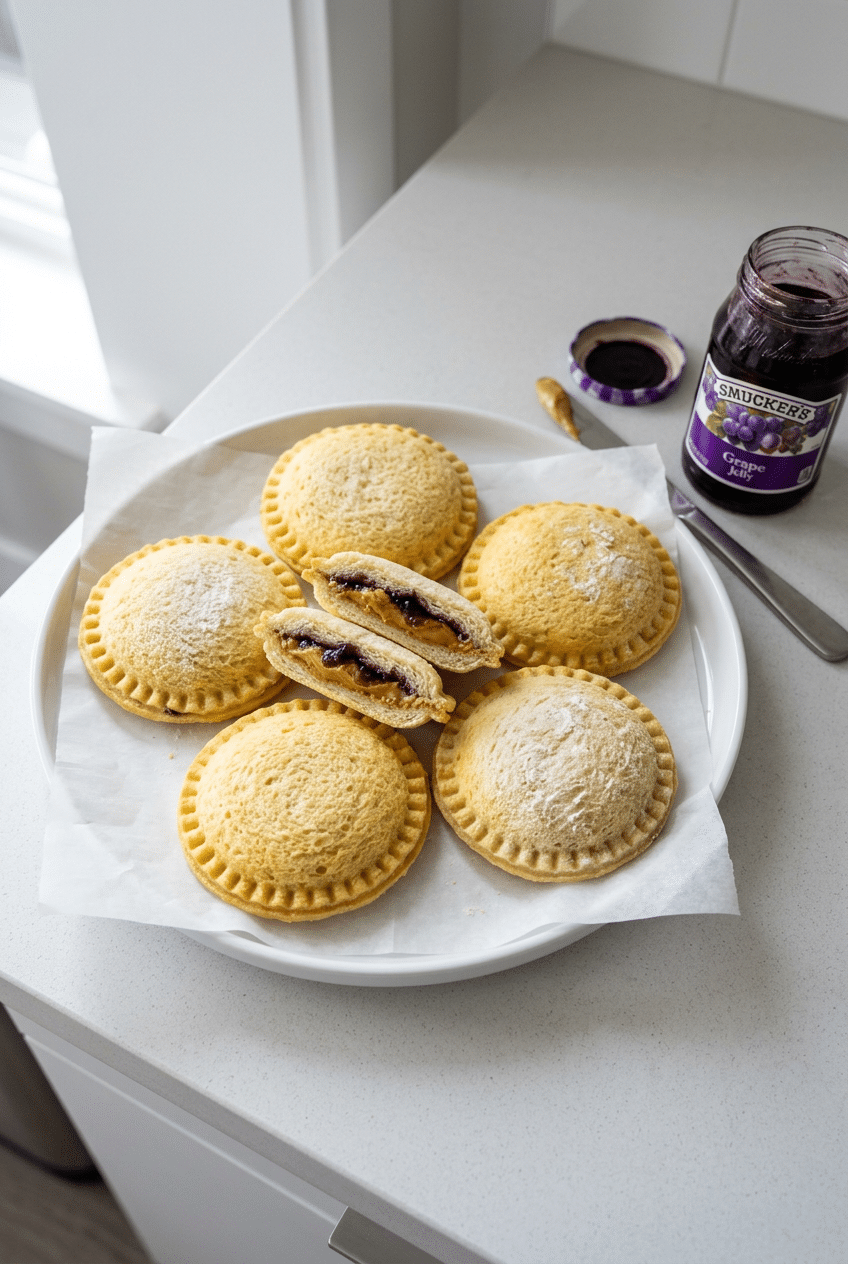
Homemade Uncrustables are the freezer-friendly, lunchbox-ready PB&J pockets your kids already beg you to buy — except you can make 8 of them for the price of one store box, with better ingredients and zero mystery additives.
The secret is in the seal. A simple round sandwich cutter crimps and cuts at the same time, giving you that iconic pillow-shaped pocket. We’ll walk you through the exact technique so every single one comes out perfect.
Ingredients for Homemade Uncrustables
For the Sandwiches
- 16 slices soft white sandwich bread — the softer the better for a clean crimp seal (Pepperidge Farm Farmhouse White works perfectly)
- 1 cup creamy peanut butter — use a no-stir style like Jif Creamy Peanut Butter so it spreads evenly without tearing the bread
- 3/4 cup grape jelly — Smucker’s Concord Grape Jelly is the classic choice; the thick consistency prevents sogginess better than jam
- 1–2 tablespoons all-purpose flour — for dusting the cutter so it doesn’t stick (optional but helpful)
Optional Add-Ins
- 1/2 cup strawberry jam instead of grape jelly
- 1/4 cup Nutella swirled with peanut butter
- 1 tablespoon honey drizzled inside
- Sunflower seed butter for nut-free version
- 1/2 cup almond butter instead of peanut butter
How to Make Homemade Uncrustables Step by Step
Step 1: Set Up Your Work Station
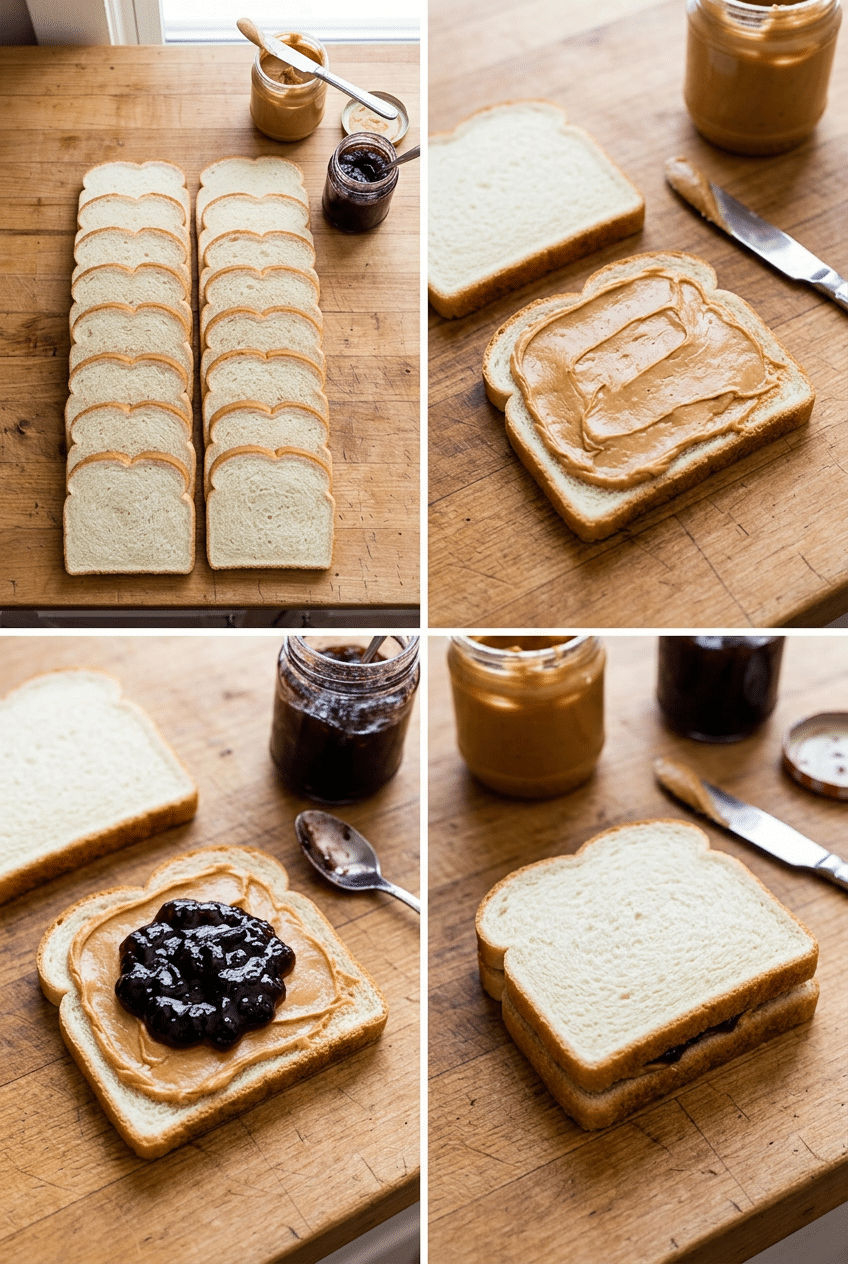
Lay out all 16 slices of bread on a clean countertop or large cutting board, working in pairs. You want to assemble everything before you start cutting because the crimping step works best when the filling hasn’t had time to soak into the bread — speed is your friend here.
Keep a damp paper towel nearby to wipe the sandwich cutter between rounds. A clean cutter gives you a sharper, tighter seal every single time, which matters for freeze-and-go sandwiches that need to hold together for days.
Step 2: Spread Peanut Butter First
Spread about 2 tablespoons of peanut butter onto one slice of each bread pair, going edge to edge but staying about a quarter inch from the border. Covering the full surface acts as a moisture barrier between the jelly and the bread, which is the number one trick that prevents soggy sandwiches.
Use the back of a spoon or an offset spatula and apply even pressure — you want a consistent layer, not thick globs in the center. Uneven peanut butter creates air pockets that break the seal when you press the cutter down.
Step 3: Add the Jelly Layer
Spoon about 1 tablespoon of grape jelly onto the CENTER of the peanut butter side only. Resist the urge to spread it all the way to the edges — when the cutter presses down, it pushes the filling outward, so keeping jelly in the center means it lands exactly where you want it inside the sealed pocket.
Less jelly is actually better here. Too much and it squirts out during the crimp, breaking the seal and creating a sticky mess. One tablespoon might look small but it distributes perfectly once pressed.
👉 Smucker’s Concord Grape Jelly (18 oz) — The thick, smooth consistency seals in without leaking — cheaper jams run and break the crimp.
Step 4: Press the Bread Together
Place the plain bread slice on top of the peanut butter and jelly side, lining up the edges as evenly as possible. Gently press the sandwich flat with your palm using light, even pressure across the whole surface. This removes any air bubbles trapped inside before you cut — air bubbles are the enemy of a tight crimp.
Don’t press hard enough to squish the filling to the edges yet. You’re just tacking the two slices together so they don’t shift when you position the cutter. Think of it like pressing two pieces of clay together before you shape them.
Step 5: Cut and Crimp the Sandwiches
Center your round Uncrustables sandwich cutter over the middle of the sandwich — the filling should be well within the cutter’s circle. Press down firmly and evenly with both hands using your body weight, not just your fingers. You’ll feel it cut through cleanly and you should hear a satisfying soft thud when it hits the cutting board beneath.
Twist the cutter slightly as you press for an even tighter seal on the crimped edge. Lift the cutter straight up and push the sealed pocket out from the bottom. The trimmed crust ring will fall away, and you’re left with a perfect little pillow.
👉 Uncrustables Sandwich Sealer and Cutter Set (Round, 2-Pack) — This is the one tool you can’t skip — it crimps and cuts in one press for that perfect sealed pocket.
Step 6: Freeze or Serve Immediately
If serving right away, eat them within an hour for the freshest texture. For freezing, place the finished Uncrustables in a single layer on a parchment-lined baking sheet and freeze for 1–2 hours until firm. This flash-freeze step is critical — if you skip it and pile them straight into a bag, they’ll stick together and crush each other.
Once frozen solid, transfer them into individual zip-lock snack bags or a freezer-safe container and store for up to one month. Pull one out the night before school and it’ll thaw perfectly in the lunchbox by noon — no microwave needed.
👉 Reusable Sandwich Bags Snack Size (10-Pack) — Freeze and store each Uncrustable individually — no sticking, no freezer burn, eco-friendly.
Nutrition Information
- Per serving (1 sandwich): 285 cal
- 12g fat
- 36g carbs
- 9g protein
- 2g fiber
- 14g sugar
- 210mg sodium
Pro Tips
Use the freshest bread possible: Fresh, pillowy bread crimps cleanly and holds the seal during freezing and thawing. Bread that’s even slightly stale will crack at the edges when you press the cutter down, letting filling leak out. Check the date and always use bread within the first two days of opening the bag.
The 1:2 jelly-to-PB ratio is non-negotiable: More jelly than peanut butter always means a soggy, broken sandwich. Peanut butter acts as a fat barrier that slows moisture migration. Keep jelly at roughly half the volume of your peanut butter layer and your sandwiches will hold up beautifully even after a full day in a lunchbox.
Flash freeze before bagging: Skipping the two-hour flat freeze on a sheet pan is the most common mistake. The sandwiches need to be individually firm before you pile them into a container. Frozen together in a stack, they’ll meld into each other and you’ll tear them apart at the seam — destroying that perfect crimp.
Warm the cutter slightly in your hands: Hold the sandwich cutter in both palms for about 30 seconds before pressing. Just a little body heat softens the plastic slightly and gives you a sharper, cleaner crimp with less force required. This is especially helpful when making a large batch.
Delicious Variations
Sunflower Butter & Strawberry Jam (Nut-Free)
Swap peanut butter for SunButter sunflower seed butter and use Smucker’s strawberry jam. This is the go-to version for nut-free schools and classrooms. SunButter has the same thick, spreadable consistency as peanut butter so the technique stays identical — no adjustments needed. Kids who’ve never had regular Uncrustables will never know the difference.
Nutella & Banana
Spread Nutella on both sides of the bread instead of peanut butter and jelly, then add 2–3 thin banana slices in the center before pressing. The banana softens beautifully in the freezer and thaws into an almost jammy texture by lunchtime. Use ripe but firm bananas — overripe ones release too much moisture and can break the seal.
Almond Butter & Honey
Replace peanut butter with almond butter and skip the jelly entirely, drizzling about a teaspoon of raw honey into the center instead. Honey is thick enough that it won’t run during the crimp. This version is slightly less sweet and works well for adults who want a protein-forward snack without the sugar hit of grape jelly.
Cream Cheese & Strawberry
Spread a thin layer of full-fat cream cheese on both sides of the bread and add a small scoop of strawberry preserves in the center. These are best fresh rather than frozen since cream cheese changes texture slightly in the freezer — they’re perfect for picnics, after-school snacks, or weekend meal prep that you’ll eat within two days.
Chocolate Peanut Butter & Raspberry
Mix 1 tablespoon of unsweetened cocoa powder into half a cup of peanut butter and use seedless raspberry jam instead of grape jelly. The result is a peanut butter cup meets PB&J situation that older kids and adults absolutely lose their minds over. The bitterness of the cocoa balances the sweetness of the raspberry perfectly.
Storage Instructions
Refrigerator
Store finished Uncrustables in the refrigerator for up to 3 days in an airtight container or individual zip-lock bags. The peanut butter keeps the bread from getting soggy for the first day, but by day two and three you’ll notice the bread softening slightly. This is still totally fine for lunchboxes — just don’t stack them or the crimped edges can flatten under the weight.
Freezer
Homemade Uncrustables freeze beautifully for up to one full month. Always flash freeze on a flat parchment-lined sheet pan for 1–2 hours first, then transfer to individual snack bags or a large zip-lock freezer bag with parchment between layers. Thaw at room temperature for 30–60 minutes or simply place in a lunchbox frozen — they’ll be perfectly soft by lunchtime.
Make-Ahead
These are one of the best make-ahead lunch items you can have in your kitchen. Make a double or triple batch on Sunday — it takes about 30 minutes — and you’ll have a full month of lunchbox sandwiches ready to grab. Label the freezer bags with the date and flavor using a permanent marker so you know exactly what you’re grabbing on hectic mornings.
For food safety guidelines, visit FDA Safe Food Handling Guidelines.
Frequently Asked Questions
What bread works best for homemade Uncrustables?
The softer and fresher the bread, the better your seal will be. Pepperidge Farm Farmhouse Soft White, Wonder Classic White, or Nature’s Own Perfectly Crafted White all work excellently. Avoid thick artisan-style breads or anything with a chewy crust — the sandwich sealer needs to press through the bread cleanly in one motion, and denser breads resist the cutter and create cracked, leaky edges.
Do I need a special cutter to make homemade Uncrustables?
Technically you can use a large round cookie cutter and then seal the edges by pressing with a fork, but the result won’t be as tight or clean. A dedicated Uncrustables sandwich sealer cutter does both jobs simultaneously — it cuts the circle AND crimps the border in one press. For about $8–10 on Amazon, it’s genuinely the one tool that makes this recipe work the way it should.
How long do homemade Uncrustables last in the freezer?
Up to one month at peak quality when stored in individual airtight bags. After 30 days, the bread can start to develop freezer flavor and the texture gets a little dense. For best results, try to eat them within two to three weeks. Always flash freeze them individually before bagging so they don’t fuse together — that’s the step most people skip and then regret.
Can I make homemade Uncrustables nut-free for school?
Absolutely, and this is one of the biggest advantages of making them at home. Sunflower seed butter (SunButter) is the most popular swap and behaves almost identically to peanut butter in terms of spreadability and moisture barrier. Wowbutter and soy nut butter also work well. Pair with any jam or jelly and the technique stays exactly the same — no adjustments needed to the recipe.
Why is my crimped seal breaking open after freezing?
There are three common causes. First, the bread was too stiff or slightly stale — always use the freshest, softest bread you can find. Second, you used too much filling and it pushed into the crimp zone when you pressed. Keep jelly in the very center and don’t overfill. Third, you didn’t press the cutter down with enough even force — use body weight, not just finger pressure, and make sure the cutter is fully flat on the sandwich before pressing.
Can homemade Uncrustables go directly into a lunchbox frozen?
Yes — this is actually the recommended method and one of the best things about making them ahead. Pull a frozen sandwich from the freezer in the morning, drop it directly into the lunchbox, and it’ll thaw to soft, room-temperature perfection within 1–2 hours. No heating, no refrigeration needed at school. It also acts as a little ice pack that helps keep other lunchbox items cool.
More Recipes You Will Love
👉 Perfect Patriotic Fruit Pizza Recipe (Easy & Festive)
👉 Perfect 4th of July Cookies (Red, White & Blue)
👉 Perfect Patriotic Popsicles Recipe (Red White Blue)
Now you know exactly how to make homemade Uncrustables that are better than anything from the freezer aisle — fresher ingredients, your choice of fillings, and a fraction of the cost. Make a big batch this Sunday and let the lunchbox chaos become a little more manageable. If you try this recipe, leave a comment below and tell me what filling combo your kids loved most — I read every single one!