
- Prep: 10 Minutes
- Cook: 15 Minutes
- Total: 25 Minutes
- Servings: 4-6 servings
A Quick Note Before You Start
Fresh corn tastes best within 24 hours of purchase. The sugars convert to starch quickly, so use it fast. Room temperature corn cooks more evenly than cold.
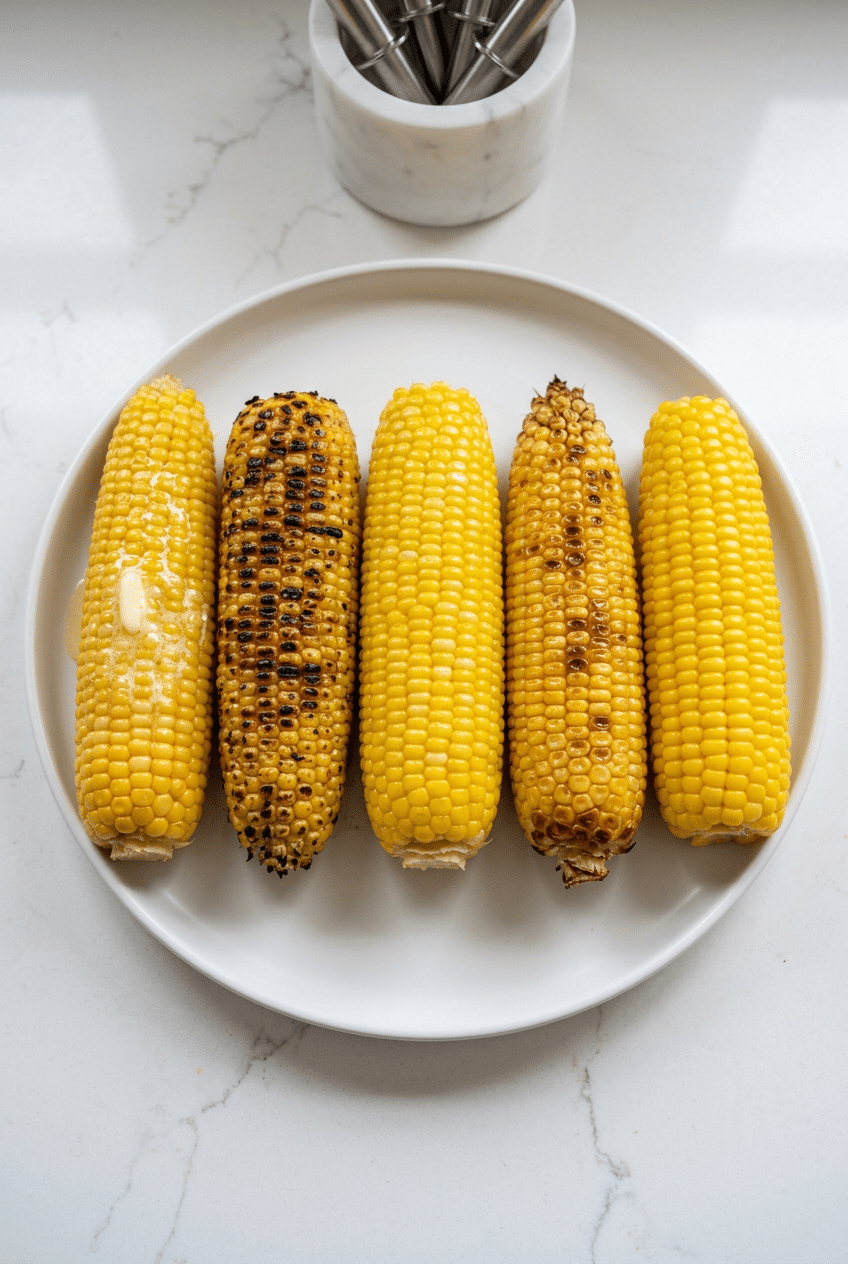
Corn on the cob transforms from good to extraordinary when you nail the cooking method. Each technique brings out different flavors and textures in those sweet kernels.
Whether you want classic boiled simplicity or smoky grilled char, these five methods guarantee perfect corn every single time. No more mushy kernels or tough cobs.
Ingredients for Perfect Corn on the Cob
For All Methods
- 4-6 ears fresh corn — husks removed, silk cleaned off
- Salt to taste — enhances natural sweetness
- 4 tablespoons butter — for serving
- Black pepper — freshly ground preferred
For Grilled Corn
- 2 tablespoons olive oil — prevents sticking
- 1 teaspoon garlic powder — optional seasoning
For Roasted Corn
- 2 tablespoons melted butter — for basting
- 1/2 teaspoon paprika — adds color and flavor
Optional Add-Ins
- 2 tablespoons grated Parmesan cheese
- 1 tablespoon fresh herbs (chives, parsley)
- 1/2 teaspoon chili powder
- Lime wedges for serving
How to Make Perfect Corn on the Cob (5 Ways)
Step 1: Prep Your Corn
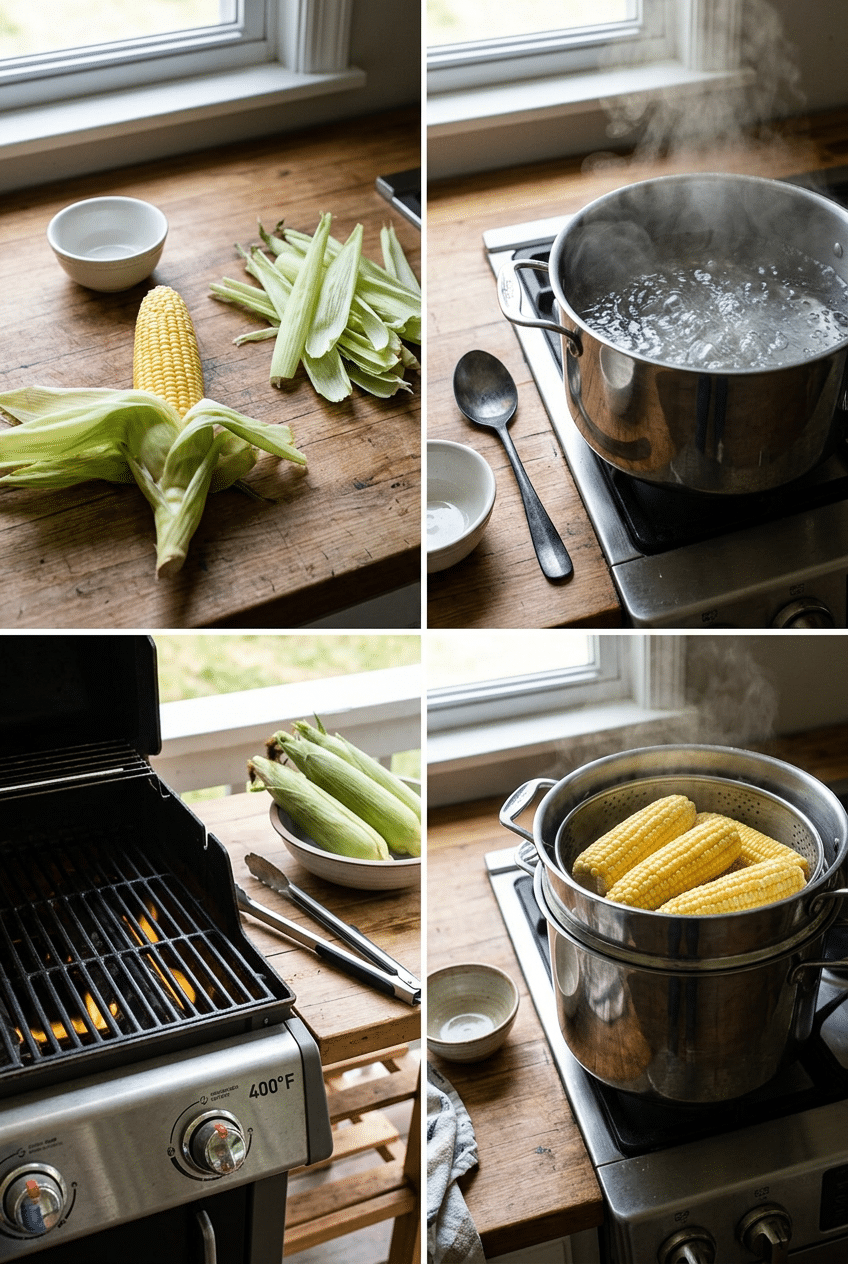
Remove husks by pulling them down from the top, then snap them off at the base. The silks come off easier if you rub the corn with a damp paper towel, working from top to bottom. Rinse under cold water to remove any stubborn silk strands.
Fresh corn should have bright green husks, golden silk, and plump kernels that release milky juice when pierced. Avoid ears with dried husks, brown silk, or dented kernels – these indicate age and will taste starchy instead of sweet.
Step 2: Method 1: Classic Boiled
Fill a large pot with water and bring to a rolling boil over high heat. Add 1 tablespoon of salt to the water – this seasons the corn and helps maintain its bright color. Drop the corn ears into the boiling water and cook for 4-6 minutes, depending on size.
The corn is done when kernels are tender-crisp and bright yellow. Overcooking makes kernels mushy and less sweet, so start checking at 4 minutes. Remove with tongs and serve immediately with butter, salt, and pepper.
Step 3: Method 2: Smoky Grilled
Preheat your grill to medium-high heat, around 400°F. Brush each ear with olive oil and season with salt and garlic powder if using. The oil prevents sticking and helps create those beautiful char marks you want.
Place corn directly on grill grates and cook for 10-15 minutes, turning every 3-4 minutes to char all sides evenly. The kernels should be tender and some should have nice caramelized spots. The slight char adds incredible smoky sweetness that boiling can’t match.
Struggling with corn rolling around on round grill grates? A grill basket solves this problem perfectly. The OXO Good Grips Grilling Basket keeps corn steady while allowing even charring on all sides, plus it makes turning multiple ears effortless.
Grill Basket — Keeps corn steady on round grill grates while allowing even charring.

- Complete High-Quality Grilling Value Set – Conquer the grill with your own tools to help you prepare your famous BBQ rec…
- Perfect Grill Results – Enjoy the ease of grilling whether meats, seafood, veggies, or even s’mores for camping night – …
- Safer and Easier Grilling – The SHIZZO grill basket features a long handle and a secure locking mechanism that allows yo…
Step 4: Method 3: Gentle Steamed
Place a steamer basket in a large pot with 1 inch of water. Bring water to a boil, then reduce to medium heat to maintain steady steam. Arrange corn ears in the steamer basket, cover tightly, and steam for 6-8 minutes.
Steaming preserves more nutrients than boiling and prevents waterlogged kernels. The corn stays incredibly tender while maintaining its natural sweetness. This method works especially well for slightly older corn that might be tougher.
Step 5: Method 4: Oven Roasted
Preheat oven to 425°F and line a baking sheet with parchment paper. Brush each ear with melted butter and sprinkle with salt and paprika. The high heat caramelizes the natural sugars, creating deeper flavor than other methods.
Roast for 15-20 minutes, turning once halfway through cooking. The kernels should be golden and slightly caramelized in spots. This hands-off method lets you prepare other dishes while the corn cooks perfectly on its own.
Step 6: Method 5: Quick Microwave
Wrap each ear in damp paper towels, ensuring the towels cover the entire ear. Microwave on high for 3-4 minutes per ear, adding 1-2 minutes for each additional ear. The steam created by the damp towels cooks the corn evenly.
This fastest method works great for 1-2 ears when you don’t want to heat up the kitchen. The corn comes out surprisingly tender and sweet, though you won’t get the complex flavors that grilling or roasting provide.
Microwave timing varies wildly between models. A microwave with rotating turntable and sensor cooking gives the most consistent results – the Panasonic Countertop Microwave with Inverter Technology cooks corn more evenly than standard models that pulse on and off.
Inverter Microwave — Cooks corn more evenly than standard pulsing models.

- Countertop Microwave Oven with Flatbed Interior: Perfect for reheating various sizes or shapes of dishes, or multiple pl…
- Turntable-Free Design: The flat interior without a traditional turntable offers a stable operation and allows for easy c…
- Origin Inverter Microwave: Ensures even cooking, precise temperature control, better textures, and enhanced flavor prese…
Step 7: Serving and Seasoning
Serve corn immediately while hot for the best texture and flavor. Classic butter, salt, and pepper never fails, but try rolling buttered corn in grated Parmesan or sprinkling with fresh herbs. A squeeze of lime juice adds bright acidity that complements the sweet kernels beautifully.
Nutrition Information
- Per serving: 90 cal
- 1g fat
- 19g carbs
- 3g protein
Pro Tips
Check freshness with the thumbnail test: Press a kernel with your thumbnail – fresh corn releases milky juice while old corn feels dry and dented.
Save the cooking water: Corn cooking water makes an excellent base for vegetable stock since it’s full of natural corn sweetness.
Cut kernels off cleanly: Stand the ear in a large bowl and slice downward with a sharp knife – the bowl catches all the kernels without mess.
Reheat without drying out: Wrap leftover corn in damp paper towels and microwave for 30-45 seconds to restore moisture and heat.
Season the water, not just the corn: Adding sugar to boiling water (1 tablespoon per quart) enhances the corn’s natural sweetness dramatically.
Delicious Variations
Mexican Street Corn Style
After cooking, brush with mayo, sprinkle with cotija cheese, chili powder, and lime juice. This elote-inspired version adds creamy, tangy, spicy flavors that transform plain corn into a restaurant-worthy side dish.
Herb Butter Corn
Mix softened butter with minced fresh herbs like chives, parsley, or cilantro, plus garlic and lemon zest. Spread on hot corn for an elevated flavor that pairs beautifully with grilled meats or fish.
Parmesan Pepper Corn
Roll buttered hot corn in freshly grated Parmesan cheese and cracked black pepper. The cheese melts slightly from the heat, creating a savory coating that adds umami depth to the sweet kernels.
Honey Chipotle Corn
Brush cooked corn with a mixture of honey, melted butter, and chipotle powder. This sweet-smoky-spicy combination creates complex flavors that work especially well with grilled or roasted corn methods.
Storage Instructions
Refrigerator
Store cooked corn on the cob in the refrigerator for up to 3 days wrapped in plastic wrap or foil. The kernels will lose some sweetness but remain safe to eat. Cut kernels off the cob store even better, maintaining more flavor and texture in an airtight container for up to 5 days.
Freezer
Blanch corn for 4 minutes, cool in ice water, then freeze whole ears or cut kernels for up to 8 months. Frozen corn works best in cooked dishes like chowders or casseroles rather than eating on the cob, as freezing breaks down cell walls and changes the texture.
Make-Ahead
You can prep corn by husking and removing silk up to 4 hours ahead – store wrapped in damp paper towels in the fridge. For parties, grill or roast corn completely, then wrap in foil and keep warm in a low oven for up to 2 hours before serving.
For food safety guidelines, visit USDA Food Safety Guidelines.
Frequently Asked Questions
How do you know when corn on the cob is perfectly cooked?
Perfectly cooked corn on the cob has bright yellow kernels that are tender when pierced with a fork but still have a slight bite. The kernels should release their juice easily when pressed. Overcooked corn becomes mushy and loses its sweet flavor, while undercooked corn feels tough and starchy. Most methods take 4-8 minutes depending on the cooking method.
Should you add sugar to the water when boiling corn?
Adding 1 tablespoon of sugar per quart of boiling water enhances corn’s natural sweetness, especially if your corn isn’t super fresh. The sugar doesn’t make the corn taste artificially sweet – it just brings out the natural corn flavors more effectively. Salt also helps, as it seasons the kernels and maintains their bright color during cooking.
Can you cook corn on the cob with the husks on?
Yes, you can grill or roast corn with husks on for a steamed effect. Soak husked corn in water for 15-30 minutes first to prevent burning. Pull back husks, remove silk, then pull husks back up before cooking. This method takes longer (20-25 minutes) but creates incredibly tender, moist kernels with a subtle smoky flavor.
Why does my corn on the cob turn out tough and chewy?
Tough, chewy corn usually means it was overcooked or the corn was old when purchased. Fresh corn has natural sugars that convert to starch over time, making kernels tough. Cook corn for the minimum time needed – usually 4-6 minutes for boiling, and always start timing after the water returns to a boil with corn added.
More Recipes You Will Love
👉 Perfect Cold Pasta Salad Recipe (Easy Summer)
👉 Perfect No-Cook Summer Meals (5 Easy Recipes)
👉 Grilled Corn on the Cob Recipe (Smoky Sweet)
👉 Perfect Watermelon Recipes (3 Fresh Summer Ideas)
Now you have five foolproof ways to make perfect corn on the cob every single time. Whether you choose quick boiled, smoky grilled, or any method in between, you’ll get tender kernels bursting with sweet flavor. Try different seasoning combinations to find your favorite. Which method will you master first? Share your corn success stories in the comments below!