
- Prep: 20 Minutes
- Cook: 5 Hours
- Total: 25 Minutes
- Servings: 4-6 servings
A Quick Note Before You Start
Remove the membrane from the back of ribs for maximum tenderness. This single step makes the difference between good ribs and restaurant-quality ribs.
BBQ baby back ribs become melt-in-your-mouth tender when you nail the low-and-slow cooking method that transforms tough meat into smoky perfection.
This recipe combines a flavorful dry rub, proper smoking technique, and strategic wrapping to deliver ribs that literally fall off the bone every time.
Ingredients for Perfect BBQ Baby Back Ribs
For the Dry Rub
- 2 tablespoons brown sugar — creates caramelization
- 2 tablespoons paprika — adds color and mild smokiness
- 1 tablespoon garlic powder — provides savory depth
- 1 tablespoon onion powder — adds sweetness when caramelized
- 2 teaspoons chili powder — brings gentle heat
- 2 teaspoons ground cumin — adds earthy warmth
- 1 teaspoon black pepper — provides sharp bite
- 1 teaspoon salt — enhances all flavors
- 1/2 teaspoon cayenne pepper — optional heat boost
For the Ribs
- 2 racks baby back ribs (4-5 pounds) — look for meaty, evenly sized racks
- 1/4 cup yellow mustard — helps rub adhere to meat
- 1 cup apple juice — for spritzing during cooking
- 1/2 cup barbecue sauce — for glazing at the end
Optional Add-Ins
- 1 teaspoon smoked paprika for extra smokiness
- 2 tablespoons honey for glazing
- Wood chips (apple, cherry, or hickory)
How to Make Perfect BBQ Baby Back Ribs Step by Step
Step 1: Remove the Membrane
Flip each rib rack bone-side up and locate the thin, silvery membrane covering the bones. Slide a butter knife under one corner of the membrane to loosen it, then grab it with a paper towel for better grip. Pull the entire membrane off in one piece — it should come away cleanly if you get a good grip.
This membrane acts like plastic wrap and prevents seasonings from penetrating the meat while making the ribs chewy. Removing it ensures your rub reaches the meat and creates tender, flavorful ribs that your guests can actually bite through.
Step 2: Apply Mustard Binder
Brush a thin layer of yellow mustard over both sides of each rib rack, covering every surface including between the bones. The mustard acts as a binder that helps the dry rub stick to the meat during the long cooking process. Don’t worry about the mustard flavor — it completely disappears during cooking.
Many pitmasters skip this step and wonder why their rub falls off during cooking. The mustard creates a tacky surface that grabs onto your seasonings and holds them in place through hours of smoking.
Step 3: Season with Dry Rub
Mix all dry rub ingredients in a bowl until evenly combined. Generously coat both sides of the ribs with the rub mixture, pressing it into the meat with your hands. Pay special attention to the meaty side, but don’t forget the bone side — every surface should be covered. Let the seasoned ribs sit at room temperature for 30 minutes before cooking.
The sugar in the rub will caramelize during cooking to create that beautiful bark everyone loves. The salt draws moisture to the surface, then dissolves and penetrates the meat, seasoning it from the inside out.
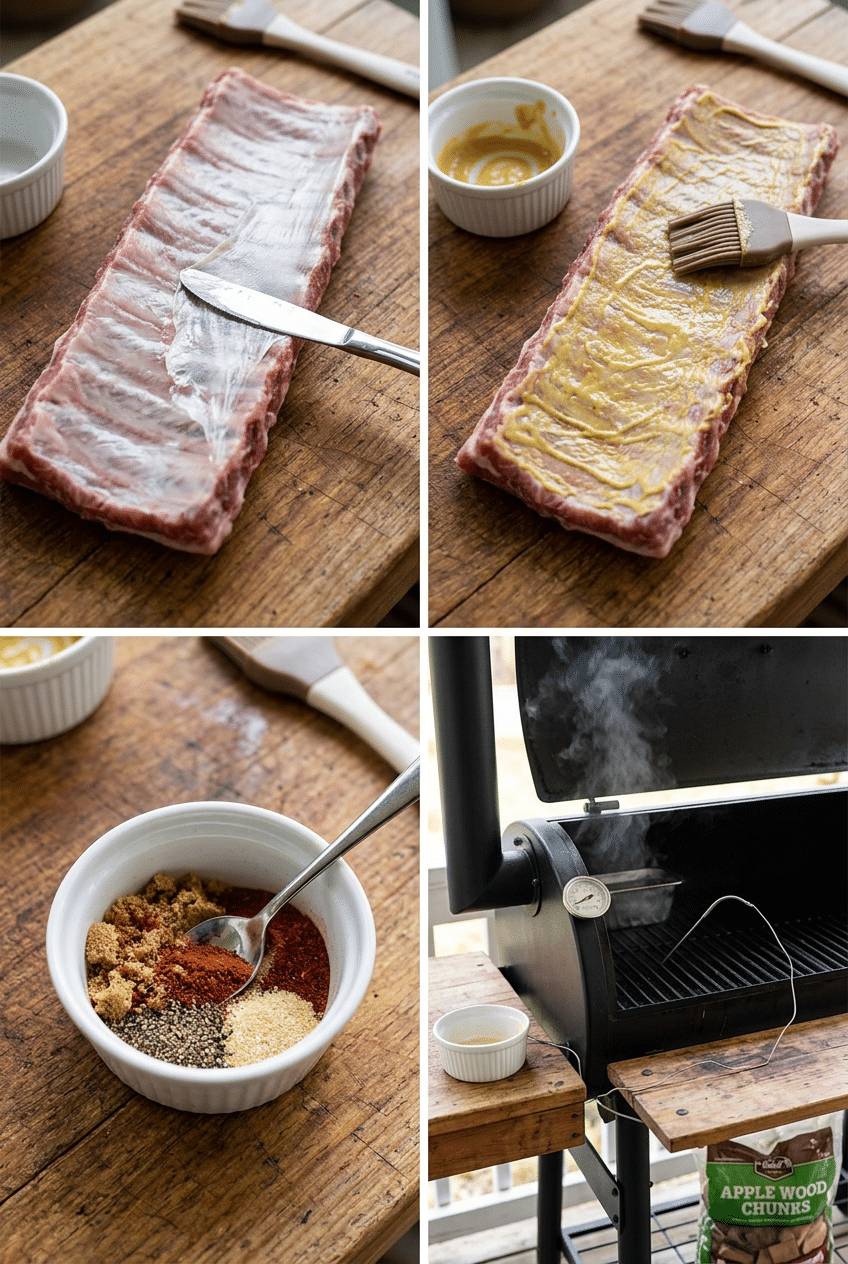
Step 4: Prepare Your Smoker
Set up your smoker for indirect cooking at 225°F. If using a charcoal smoker, arrange coals on one side and place a water pan on the other. For gas grills, heat only one side and place ribs on the cooler side. Add your choice of wood chips — apple and cherry provide mild sweetness, while hickory gives stronger smoke flavor.
Low and slow is the golden rule for ribs because tough connective tissues need time to break down into gelatin. Higher temperatures cook the outside too fast, leaving you with dry, tough meat that requires a saw to cut through.
Fighting with flimsy grill tongs that can’t grip a full rack of ribs? The Weber Original Stainless Steel Grilling Tongs have locking handles and wide gripping surfaces that securely hold heavy rib racks without dropping them in the coals.
Weber Original Stainless Steel Grilling Tongs — Essential for safely handling and turning heavy rib racks without dropping them.
Nutrition Information
- Per serving: 520 cal
- 35g fat
- 8g carbs
- 42g protein
Pro Tips
Bend Test for Doneness: Pick up the rack with tongs at one end — if it bends 90 degrees and the meat starts to crack on the surface, they’re perfectly done.
Spritz Every Hour: Keep ribs moist by spritzing with apple juice every hour after the first two hours of cooking to prevent drying out.
Texas Crutch Method: Wrap ribs in foil with butter and brown sugar at hour 3 to speed cooking and ensure tenderness, then unwrap for the last hour.
Rest Before Cutting: Let cooked ribs rest for 15 minutes before slicing to allow juices to redistribute throughout the meat.
Cut Between Every Bone: Use a sharp knife and cut straight down between each bone for clean, professional-looking individual ribs.
Delicious Variations
Kansas City Style
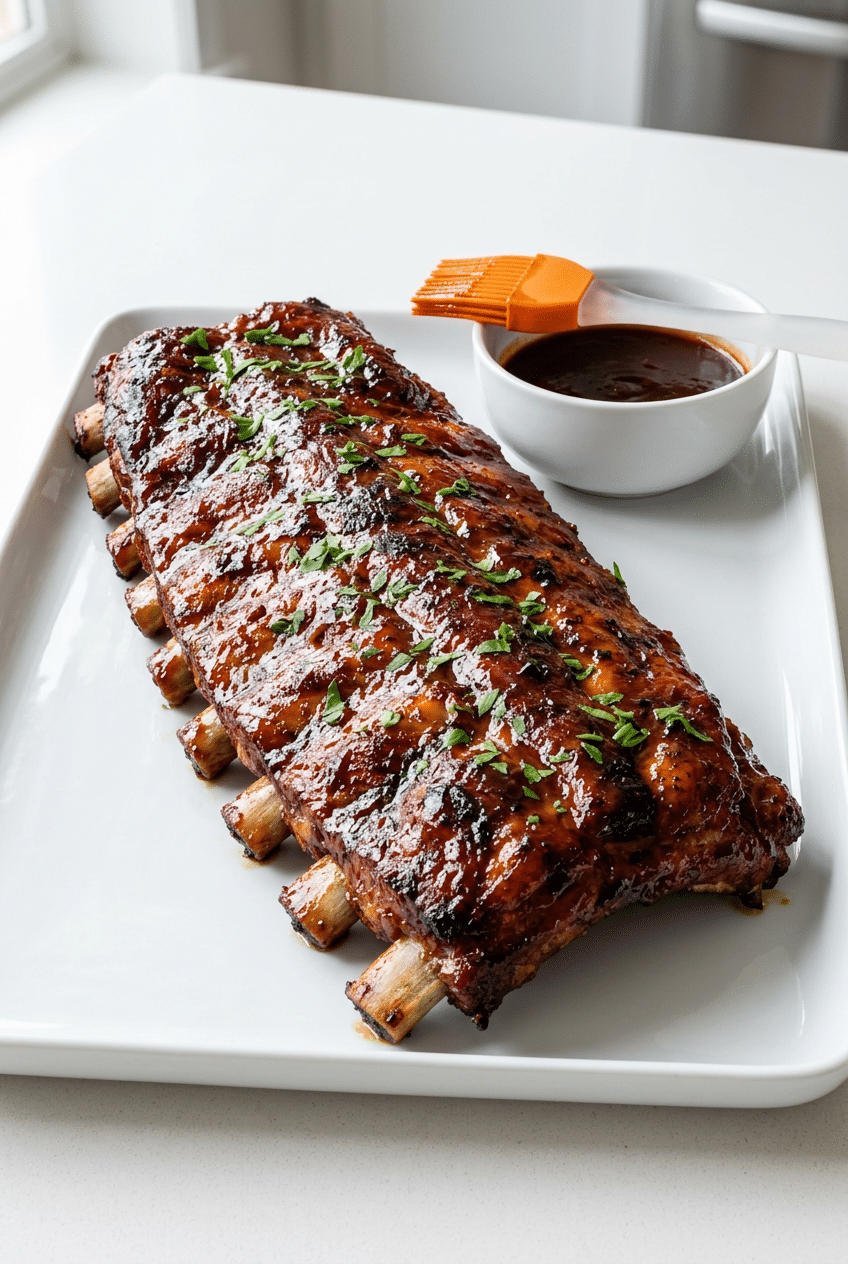
Brush ribs with a thick, molasses-based barbecue sauce during the last 30 minutes of cooking. This creates a sticky, caramelized glaze that’s sweet and tangy with a beautiful shine that makes your mouth water just looking at it.
Memphis Dry Rub
Skip the sauce entirely and increase the dry rub quantities by 50%. Focus on paprika, garlic powder, and brown sugar for a crusty bark that’s packed with flavor. Serve with sauce on the side for dipping if desired.
Korean BBQ Style
Replace the traditional rub with gochujang paste mixed with soy sauce, brown sugar, and sesame oil. The result is sweet, spicy ribs with an umami depth that’s completely different from traditional American barbecue.
Storage Instructions
Refrigerator
Store leftover ribs wrapped in foil or in airtight containers for up to 4 days in the refrigerator. Reheat gently in a 300°F oven wrapped in foil with a splash of apple juice to prevent drying out. The low temperature preserves the tender texture you worked so hard to achieve.
Freezer
Freeze cooked ribs for up to 3 months in freezer-safe bags with all air removed. Thaw overnight in the refrigerator before reheating. Frozen ribs maintain their flavor well but may lose some tenderness, so reheat slowly and add moisture as needed.
Make-Ahead
Season ribs with the dry rub up to 24 hours ahead and refrigerate covered. The longer contact time allows the salt to penetrate deeper into the meat for more flavorful results. Bring to room temperature 30 minutes before cooking for even heat distribution.
For food safety guidelines, visit USDA Safe Minimum Cooking Temperatures.
Frequently Asked Questions
How do I know when BBQ baby back ribs are done?
Use the bend test — lift one end of the rack with tongs and if it bends 90 degrees with the meat starting to crack on the surface, they’re done. Internal temperature should reach 195-203°F for fall-off-the-bone tenderness. The meat should pull back from the bone ends by about 1/4 inch when properly cooked.
Can I make BBQ baby back ribs without a smoker?
Absolutely! Use your oven at 275°F or set up your gas grill for indirect cooking. Place ribs on a foil-lined baking sheet with a wire rack, or on the cool side of your grill. Add liquid smoke to your rub for smoky flavor, or use smoked paprika as a substitute for traditional wood smoke.
Why are my BBQ baby back ribs tough?
Tough ribs usually result from cooking at too high temperature or not cooking long enough. Ribs need low heat (225-250°F) and time (4-6 hours) to break down tough connective tissues. Also check that you removed the membrane from the back of the ribs, which can make them chewy if left on.
Should I wrap BBQ baby back ribs in foil?
Wrapping in foil (the Texas Crutch method) speeds cooking and guarantees tenderness but can soften the bark. Wrap at hour 3 with butter and brown sugar, then unwrap for the final hour to re-crisp the exterior. Skip wrapping if you prefer a firmer bark and don’t mind longer cooking times.
More Recipes You Will Love
👉 Grilled Corn on the Cob Recipe (Smoky Sweet)
👉 Perfect Cold Pasta Salad Recipe (Easy Summer)
👉 Perfect No-Cook Summer Meals (5 Easy Recipes)
These BBQ baby back ribs prove that restaurant-quality results are totally achievable in your backyard. The combination of proper preparation, low-and-slow cooking, and patience creates ribs that’ll have your neighbors peeking over the fence. Fire up that smoker this weekend and prepare to become the rib legend of your neighborhood — your family will be requesting these for every gathering from now on!