
- Prep: 30 Minutes
- Cook: 12 Minutes
- Total: 42 Minutes
- Servings: 24 cookies
A Quick Note Before You Start
These patriotic cookies are softer when you slightly underbake them. The frosting sets best when cookies are completely cool, so be patient!
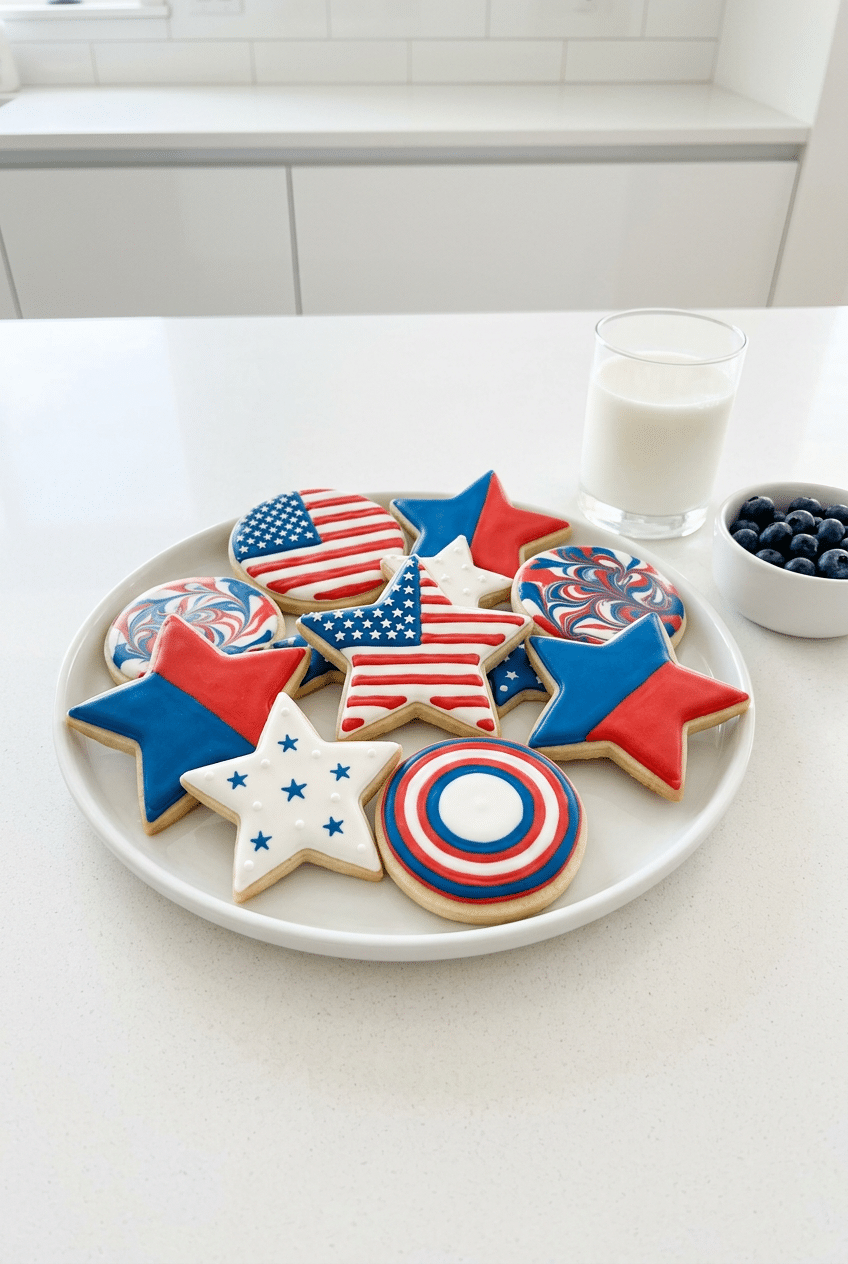
4th of July cookies bring festive fun to any Independence Day celebration with their bold red, white, and blue colors that scream American pride.
This foolproof sugar cookie recipe creates the perfect canvas for patriotic decorating, whether you’re making stars, stripes, or flag designs that’ll wow your guests.
Ingredients for Perfect 4th of July Cookies
For the Sugar Cookie Base
- 2¾ cups all-purpose flour — creates tender structure without toughness
- 1 cup unsalted butter, softened — provides rich flavor and perfect texture
- ¾ cup granulated sugar — sweetens and helps cookies hold their shape
- 1 large egg — binds ingredients and adds moisture
- 2 teaspoons vanilla extract — enhances overall flavor
- 1 teaspoon baking powder — creates slight lift without puffiness
- ½ teaspoon salt — balances sweetness and enhances flavors
For the Royal Icing Decoration
- 4 cups powdered sugar — creates smooth, hard-setting icing
- 3 large egg whites — provides structure and glossy finish
- 1 teaspoon vanilla extract — adds subtle flavor to icing
- Red food coloring — for vibrant patriotic red
- Blue food coloring — for deep American blue
- 2-3 tablespoons water — adjusts consistency as needed
Optional Add-Ins
- Silver pearl dust for shimmer
- Mini star sprinkles
- Red, white, and blue sanding sugar
- Edible glitter
How to Make 4th of July Cookies Step by Step
Step 1: Prepare Cookie Dough
Cream the softened butter and granulated sugar together in a large mixing bowl until light and fluffy, about 3-4 minutes with an electric mixer. The mixture should look pale and increased in volume, which means you’re incorporating enough air for tender cookies.
This creaming process is crucial because it creates the cookie’s texture. Properly creamed butter and sugar trap air bubbles that expand during baking, giving you cookies that are tender rather than dense.
Room temperature butter creams best, but if yours is too cold, trying to force it creates lumpy, uneven mixing that leads to tough cookies. The KitchenAid Artisan Stand Mixer makes this effortless with its powerful motor that creams butter perfectly in half the time of hand mixers.
KitchenAid Artisan Stand Mixer — Creams butter and sugar to perfect light, fluffy texture in half the time of hand mixing.
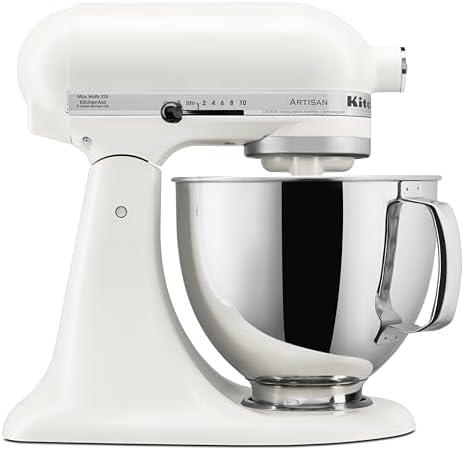
- Built to take it all on with the durable and built-to-last metal construction, and 59 touchpoints around the mixer bowl …
- 5 Quart Stainless Steel Bowl with comfortable handle for small or large batches, to mix up 9 dozen cookies* in a single …
- Easily add ingredients with the tilt-head design, because you’ll have better access to the bowl – lock the head in place…
Step 2: Add Wet Ingredients
Beat in the egg and vanilla extract until fully incorporated, scraping down the bowl sides as needed. The mixture might look slightly curdled at first, but keep mixing until it becomes smooth and cohesive.
Adding wet ingredients gradually prevents the mixture from breaking or becoming grainy. If your mixture does curdle, don’t panic—it will come together once you add the flour.
Step 3: Mix Dry Ingredients
Whisk together flour, baking powder, and salt in a separate bowl to ensure even distribution. This prevents pockets of baking powder that could cause uneven rising or salty spots in your finished cookies.
Gradually add the flour mixture to the butter mixture on low speed, mixing just until combined. Overmixing develops gluten, which makes cookies tough instead of tender.
Step 4: Chill and Roll Dough
Wrap the dough tightly in plastic wrap and refrigerate for at least 1 hour or up to 24 hours. Cold dough is much easier to roll and cut cleanly, plus it prevents cookies from spreading too much during baking.
Roll the chilled dough on a lightly floured surface to ¼-inch thickness, working quickly so it doesn’t warm up. If the dough becomes too soft, return it to the fridge for 15 minutes.
A proper rolling pin makes this step effortless, but many home bakers struggle with dough sticking or uneven thickness. The OXO Good Grips Rolling Pin has adjustable rings that guarantee perfect ¼-inch thickness every time, plus its non-stick surface prevents frustrating sticking.
OXO Good Grips Rolling Pin — Adjustable rings ensure perfect ¼-inch thickness every time, preventing thick or thin spots.

- Set includes: Small Spatula, Everyday Spatula and Spoon Spatula
- Small Spatula is ideal for use with saucepans and small mixing bowls
- Everyday Spatula is the perfect tool for stirring, mixing, scraping and more
Step 5: Cut Patriotic Shapes
Use star-shaped cookie cutters, circles, or flag-shaped cutters to create your patriotic cookies. Press firmly and lift straight up to ensure clean edges that will showcase your decorating beautifully.
Place cut cookies on parchment-lined baking sheets, spacing them about 2 inches apart. Clean cuts are essential for professional-looking decorated cookies, so dip your cutters in flour if the dough starts sticking.
Step 6: Bake to Perfection
Bake at 350°F for 10-12 minutes, until the edges are just set but centers still look slightly soft. The cookies will continue cooking on the hot pan after removal, so slight underbaking ensures they stay tender.
Cool completely on the baking sheets for 5 minutes, then transfer to wire racks. Completely cool cookies are essential for decorating—any residual heat will melt your icing and ruin your designs.
Step 7: Prepare Royal Icing
Beat egg whites in a clean bowl until foamy, then gradually add powdered sugar and vanilla, beating until the icing forms stiff peaks. The consistency should be thick enough to hold its shape but spreadable.
Divide icing into three bowls. Leave one white, tint one red, and one blue using food coloring. Add gel food coloring gradually—liquid coloring can thin the icing too much.
Getting the right icing consistency is tricky with a whisk, and lumpy icing ruins your decorating. The Cuisinart Hand Mixer with its powerful beaters creates perfectly smooth royal icing in minutes, with variable speeds that prevent splattering when adding powdered sugar.
Cuisinart Hand Mixer — Creates perfectly smooth royal icing without lumps that would ruin your decorating.

- 9-SPEED HAND MIXER: The Cuisinart Power Advantage PLUS 9-Speed Hand Mixer with 220-watt motor and automatic feedback fea…
- SMOOTHSTART FEATURE: The hand blender offers an automatic feedback SmoothStart feature with 3 low mixing speeds to elimi…
- EXTRA-LONG BEATERS: The extra-long dishwasher-safe self-cleaning beaters contain no center posts, so ingredients won’t c…
Step 8: Decorate with Patriotic Flair
Transfer each colored icing to piping bags fitted with round tips, or use squeeze bottles for easier control. Start with base colors and let each layer dry for 15-20 minutes before adding details.
Create American flag designs by piping alternating red and white stripes, then adding a blue square with white star dots. For simpler designs, flood cookies with one color and add contrasting dots or stripes while the base is still wet.
Nutrition Information
- Per cookie: 185 calories
- 6g fat
- 31g carbs
- 2g protein
Pro Tips
Chill Everything: Keep your dough, rolling pin, and work surface cool for the cleanest cuts and least spreading during baking.
Test Your Icing Consistency: Perfect royal icing should ribbon off the beater and disappear into itself within 10 seconds—adjust with powdered sugar or water.
Plan Your Design: Sketch your patriotic patterns on paper first, then pipe the lightest colors first since they’re easier to cover if you make mistakes.
Use Gel Food Coloring: Gel colors won’t thin your icing like liquid colors, giving you vibrant patriotic colors without compromising consistency.
Flood Technique: For smooth surfaces, outline your shape first, then flood the interior with thinned icing using a toothpick to spread evenly.
Delicious Variations
Chocolate Patriotic Cookies
Replace ½ cup flour with unsweetened cocoa powder for rich chocolate cookies that pair beautifully with white and red icing. The darker base makes red and white decorations pop even more dramatically.
Lemon Stars and Stripes
Add 2 tablespoons lemon zest to your dough and 1 teaspoon lemon extract for bright, citrusy cookies perfect for summer celebrations. The lemon flavor complements berry toppings beautifully.
Mini Flag Cookie Bites
Cut cookies into 1-inch squares and decorate as tiny American flags using mini piping tips. These bite-sized treats are perfect for large parties and easier for kids to handle.
Sparkle Celebration Cookies
Add edible pearl dust or luster dust to your white icing for shimmery stars and stripes that catch the light beautifully. Perfect for evening fireworks parties where a little extra sparkle matches the festivities.
Storage Instructions
Refrigerator
Store decorated 4th of July cookies in an airtight container at room temperature for up to one week. Layer between parchment paper to prevent icing from sticking together. The royal icing will stay firm and beautiful, and the cookies maintain their tender texture. Avoid refrigerating as this can make the icing weep and lose its crisp finish.
Freezer
Freeze undecorated baked cookies wrapped tightly in plastic wrap and stored in freezer bags for up to 3 months. Decorated cookies can also be frozen, but place them in rigid containers to protect the icing designs. Thaw completely at room temperature before serving—never microwave as this will melt the icing.
Make-Ahead
Bake cookies up to 2 weeks ahead and store in airtight containers, then decorate 1-2 days before serving for best appearance. Cookie dough can be made up to 3 days ahead and refrigerated, or frozen for up to 3 months. Royal icing keeps in the refrigerator for up to one week—rewhip before using if it separates.
For food safety guidelines, visit USDA Food Safety Guidelines.
Frequently Asked Questions
Why do my 4th of July cookies spread during baking?
Cookie spreading usually happens when the dough is too warm or contains too much butter. Always chill your dough for at least an hour before rolling, and make sure your butter was properly measured and not over-softened. Room temperature butter should give slightly to pressure but not be melty. Also, check that your baking powder is fresh—old leavening can cause unpredictable spreading.
How do I get vibrant red and blue colors in my icing?
Use gel or paste food coloring instead of liquid for the most vibrant patriotic colors without thinning your icing. Start with small amounts and build up gradually—red especially can turn pink quickly but takes patience to achieve deep red. Let colored icing rest for 30 minutes before judging the final color, as gel colors often deepen over time.
Can I make 4th of July cookies without royal icing?
Absolutely! You can use buttercream frosting, cream cheese frosting, or even simple powdered sugar glaze tinted with food coloring. While royal icing gives the crispest, most professional look, buttercream creates softer, more homestyle cookies that many people prefer. You can also roll the warm cookies in colored sanding sugar for a sparkly, no-icing option.
How far ahead can I decorate patriotic cookies?
Decorated 4th of July cookies with royal icing actually improve over time as the flavors meld and the icing fully sets. You can decorate them up to 5 days ahead and store them in airtight containers at room temperature. The icing will stay crisp and beautiful, making them perfect for party prep. Just avoid humid environments which can make icing sticky.
More Recipes You Will Love
👉 Perfect Frozen Lemonade Recipe (Slushy & Sweet)
👉 Perfect Homemade Popsicles Recipe (5 Amazing Flavors)
👉 No-Churn Ice Cream Recipe (2-Ingredient Easy)
👉 Perfect No-Cook Summer Meals (5 Easy Recipes)
These perfect 4th of July cookies bring patriotic pride to any Independence Day celebration with their beautiful red, white, and blue designs. The tender sugar cookie base provides the ideal canvas for your creative decorating, while the royal icing sets to a professional finish that’ll impress all your guests. Try this recipe for your next patriotic gathering and watch everyone reach for seconds!