
- Prep: 30 Minutes
- Cook: 25 Minutes
- Total: 55 Minutes
- Servings: 12 servings
A Quick Note Before You Start
This stunning red white blue dessert trifle looks fancy but comes together surprisingly easily. The secret is using store-bought pound cake to save time while still getting incredible homemade flavor.
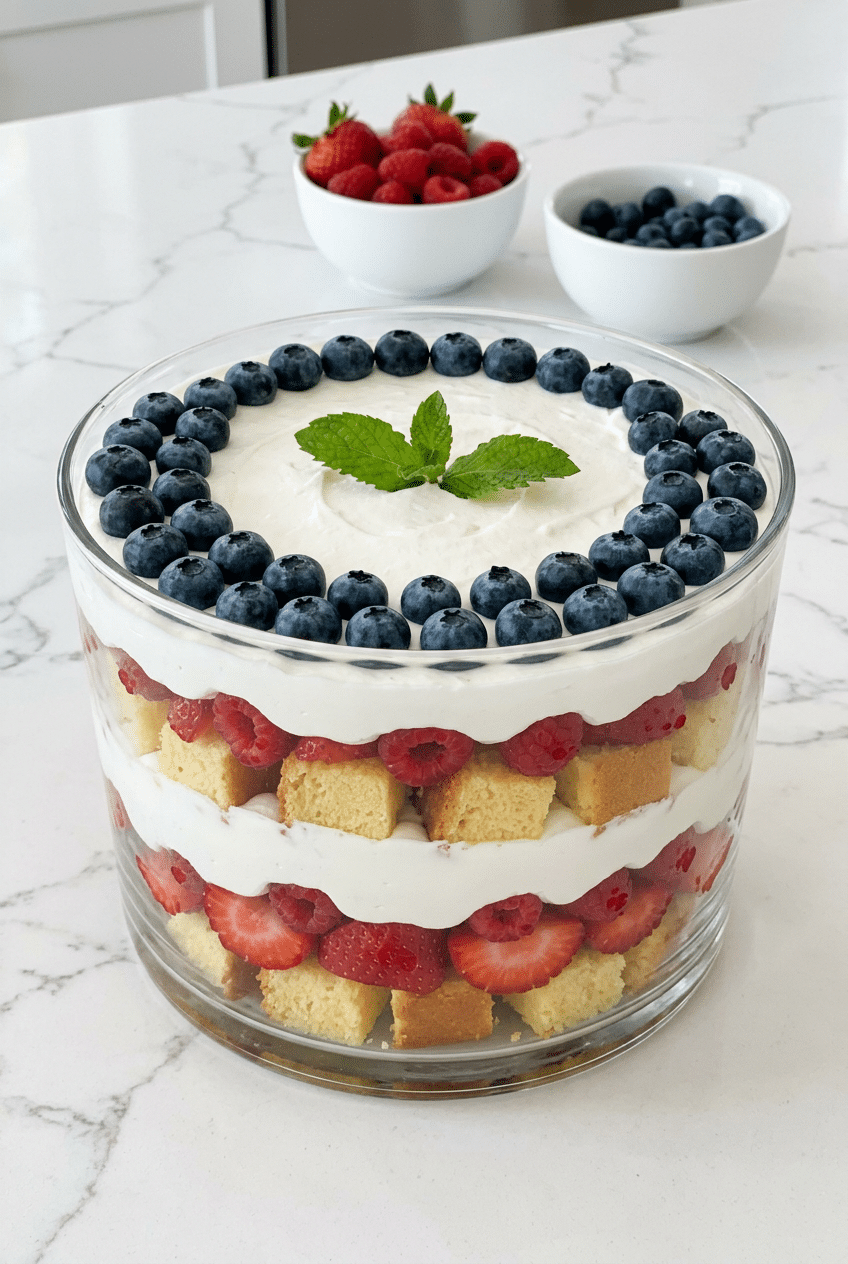
Red white blue dessert trifle transforms simple ingredients into a show-stopping patriotic centerpiece that’ll have everyone reaching for seconds. The layers of vanilla cake, sweet berries, and fluffy whipped cream create the perfect balance of flavors and textures.
This recipe breaks down each component so you can build confidence with every layer, plus I’ll share my tricks for getting those picture-perfect stripes that make this dessert absolutely irresistible.
Ingredients for Red White Blue Dessert Trifle
For the Cake Base
- 1 store-bought pound cake (16 oz) — provides sturdy foundation that won’t get soggy
- 1/4 cup strawberry or berry liqueur — optional, adds adult sophistication
- 2 tablespoons sugar — for macerating berries
For the Berry Layers
- 2 cups fresh strawberries, hulled and sliced — choose firm, bright red berries
- 1 cup fresh raspberries — adds tartness to balance sweetness
- 1 1/2 cups fresh blueberries — reserve 1/2 cup for garnish
- 3 tablespoons granulated sugar — helps berries release their natural juices
- 1 tablespoon fresh lemon juice — brightens berry flavors
For the Whipped Cream
- 2 cups heavy whipping cream — must be cold for proper whipping
- 1/3 cup powdered sugar — sweetens without grittiness
- 2 teaspoons pure vanilla extract — enhances the cream’s flavor
- 8 oz cream cheese, softened — adds stability and tangy richness
Optional Add-Ins
- 1/2 cup toasted sliced almonds for crunch
- 2 tablespoons honey instead of sugar for natural sweetness
- Fresh mint leaves for garnish
How to Make Red White Blue Dessert Trifle Step by Step
Step 1: Prepare the Berries
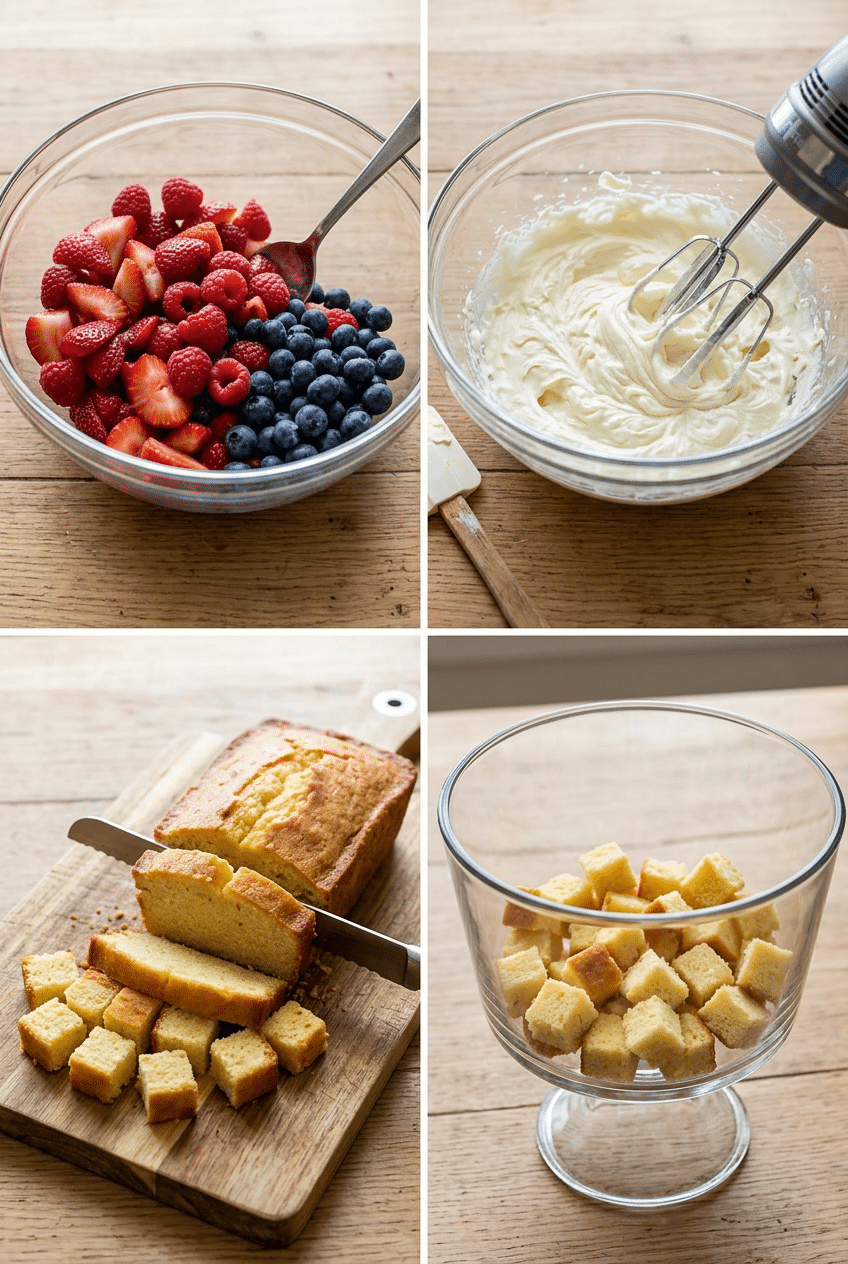
Start by combining your sliced strawberries, raspberries, and 1 cup of blueberries in a large mixing bowl. Sprinkle the 3 tablespoons of sugar and lemon juice over the berries, then gently toss with a wooden spoon to coat evenly.
Let the berries macerate for 15-20 minutes at room temperature. This process draws out their natural juices and creates a beautiful syrup that’ll flavor the cake layers. You’ll know they’re ready when you see pooled juice at the bottom of the bowl.
Macerating is crucial because it prevents the berries from being too tart and creates that glossy, jewel-like appearance that makes your trifle look professional. The sugar also helps the berries hold their shape instead of turning mushy.
Step 2: Make Stabilized Whipped Cream
In a large mixing bowl, beat the softened cream cheese with an electric mixer until completely smooth and fluffy, about 2 minutes. Gradually add the powdered sugar and vanilla, beating until well combined.
Pour in the cold heavy cream slowly while beating on medium speed. Once combined, increase to high speed and whip until stiff peaks form, about 3-4 minutes. Stop immediately when you reach stiff peaks to avoid over-whipping.
The cream cheese acts as a stabilizer, preventing your whipped cream from deflating or weeping over time. This is especially important for trifles that need to sit for hours before serving. Regular whipped cream would separate and make your beautiful layers look sad and watery.
Electric hand mixer — Whipping cream by hand takes forever and often leads to inconsistent results — an electric mixer gives you perfect peaks in minutes.

- NO MORE LOST BEATERS: The snap-on storage case that comes with the Hamilton Beach hand mixer neatly holds the 2 beaters …
- EASILY HANDLES A VARIETY OF RECIPES: With 6 different speed options plus a QuickBurst button for an extra burst of power…
- EVERYTHING YOU NEED TO START MIXING: This hand mixer comes with 2 traditional beaters and a whisk that are dishwasher sa…
Step 3: Cut and Prepare Cake
Using a sharp serrated knife, cut the pound cake into 1-inch cubes. Remove any crust if you prefer a more uniform look, though leaving it on adds nice texture contrast.
If using the berry liqueur, place the cake cubes in a bowl and drizzle with the liqueur, tossing gently to coat. Let them absorb the liquid for 5 minutes. This step is optional but adds sophisticated flavor depth.
The key is cutting uniform pieces so your layers look even and professional. Pound cake works perfectly because it’s dense enough to hold up under the weight of berries and cream without completely falling apart like regular cake would.
Step 4: Begin Layering the Trifle
Start with a third of your cake cubes in the bottom of a large glass trifle bowl or clear serving dish. Press them down gently to create an even layer, filling any gaps with smaller pieces.
Spoon half of your macerated berries over the cake, making sure to include some of that gorgeous syrup. The liquid will soak into the cake and add incredible flavor throughout.
Add a third of your whipped cream mixture, spreading it gently to the edges with an offset spatula. Try to keep the layers distinct by spreading right to the glass edges so you can see those beautiful stripes from the outside.
Large glass trifle bowl — A clear glass bowl shows off those gorgeous patriotic layers — plastic or ceramic just doesn’t have the same stunning visual impact.

- Glass Trifle Bowl with Airtight Lid: This trifile bowl comes with a matching Airtight Lid with a handle for daily use, t…
- High Borosilicate Glass Material: This trifle bowl is made of shock resistant high borosilicate heat – resistant glass, …
- Extra Large Capacity Salad Bowl: This 10 inch wide, 5.1 inch high, 197 oz 5820ml large salad bowl can store all kinds of…
Step 5: Complete the Layers
Repeat the layering process: another third of cake cubes, the remaining berries with their juices, and another third of the whipped cream. Press each layer gently as you go to prevent air gaps.
Finish with the final layer of cake cubes and top with the remaining whipped cream, spreading it smooth and even across the top surface.
For the final garnish, arrange your reserved 1/2 cup of fresh blueberries in a decorative pattern on top. I like to create a border around the edge, then fill the center with a few strategically placed berries and mint leaves if using.
Step 6: Chill and Set
Cover the trifle with plastic wrap, being careful not to let it touch the whipped cream surface. Refrigerate for at least 4 hours, though overnight is even better for fully developed flavors.
This chilling time allows all the flavors to meld together and the cake to absorb some moisture from the berries and cream. The result is a cohesive dessert where every bite has the perfect balance of all components.
When ready to serve, remove from refrigerator 10 minutes before serving to take the chill off. Use a large spoon to serve, making sure each portion includes all the beautiful layers you worked so hard to create.
Nutrition Information
- Per serving: 320 cal
- 22g fat
- 28g carbs
- 5g protein
Pro Tips
Layer visibility trick: Tilt your trifle bowl slightly when adding each layer, then spread ingredients against the glass first before filling the center. This creates clean, visible lines that look professionally made.
Perfect berry distribution: Reserve your most beautiful berries for the layers that touch the glass sides. Use slightly less perfect ones for the center where they won’t be seen.
Prevent soggy bottom: Add a thin layer of whipped cream to the very bottom before your first cake layer. This creates a moisture barrier that keeps the bottom cake from getting too soggy.
Make-ahead magic: This dessert actually tastes better the next day as flavors meld. Make it up to 2 days ahead for stress-free entertaining.
Serving size control: Use individual glasses or mason jars instead of one large trifle for perfect portion control and easier serving at parties.
Delicious Variations
Angel Food Cake Version
Substitute angel food cake for pound cake for a lighter, more airy texture. The cake will absorb flavors more quickly, so reduce chilling time to 2-3 hours for best results.
Chocolate Twist
Use chocolate pound cake and add a layer of chocolate pudding between the berries and cream. This creates a decadent patriotic dessert with deeper, richer flavors.
Shortcake Style
Replace pound cake with crumbled biscuits or shortbread cookies for a texture similar to strawberry shortcake but with the visual appeal of a layered trifle.
Boozy Adult Version
Add 2 tablespoons of vanilla rum or strawberry vodka to the whipped cream and use berry liqueur generously on the cake layers for a sophisticated adult dessert.
Storage Instructions
Refrigerator
Store covered in the refrigerator for up to 3 days. The dessert actually improves after the first day as flavors meld together. Cover tightly with plastic wrap, ensuring it doesn’t touch the surface to prevent condensation from ruining the presentation. The whipped cream stays stable thanks to the cream cheese, but quality is best within the first 48 hours.
Freezer
Not recommended for freezing as the whipped cream will separate and the berries will become mushy when thawed. The texture changes completely and loses that fresh, bright appeal that makes this dessert special.
Make-Ahead
Perfect make-ahead dessert! Assemble completely up to 2 days in advance and refrigerate covered. The flavors actually develop and improve overnight. Add the final berry garnish just before serving for the freshest appearance. If making individual portions, assemble in glasses up to 24 hours ahead for best results.
For food safety guidelines, visit USDA Berry Storage Guidelines.
Frequently Asked Questions
Can I use frozen berries in my red white blue dessert trifle?
Fresh berries work best because frozen berries release too much water when thawed, making your trifle watery and the layers less distinct. If you must use frozen, thaw them completely, drain thoroughly, and pat dry with paper towels before using. The texture won’t be quite as good, but the flavor will still be delicious.
How far ahead can I make this patriotic dessert?
You can make this trifle up to 2 days ahead, and it actually tastes better the next day as flavors meld together. The cream cheese in the whipped cream prevents it from deflating or weeping. Just add the final berry garnish right before serving to keep it looking fresh and vibrant.
What’s the best way to get clean layers in my trifle?
The secret is using a clear glass bowl and spreading each ingredient against the sides first before filling the center. Tilt the bowl slightly as you add ingredients, and use an offset spatula to spread whipped cream smoothly against the glass. This creates those Instagram-worthy distinct layers that make the dessert look professional.
Can I substitute the pound cake with something else?
Yes! Angel food cake, ladyfingers, or even crumbled shortbread cookies work well. Pound cake is ideal because it’s sturdy and won’t fall apart, but angel food cake creates a lighter version. Avoid regular layer cake as it’s too delicate and will become mushy under the weight of the other ingredients.
More Recipes You Will Love
👉 Perfect Homemade Popsicles Recipe (5 Amazing Flavors)
👉 No-Churn Ice Cream Recipe (2-Ingredient Easy)
👉 Perfect Frozen Lemonade Recipe (Slushy & Sweet)
👉 Perfect Watermelon Recipes (3 Fresh Summer Ideas)
This red white blue dessert trifle proves that patriotic desserts can be both stunning and delicious without being complicated. The combination of sweet berries, fluffy cream, and tender cake creates the perfect summer dessert that’ll have everyone asking for the recipe. Give it a try for your next celebration and let me know in the comments how it turned out!