
- Prep: 15 Minutes
- Cook: 0 Minutes
- Total: 15 Minutes
- Servings: 8-12 servings
A Quick Note Before You Start
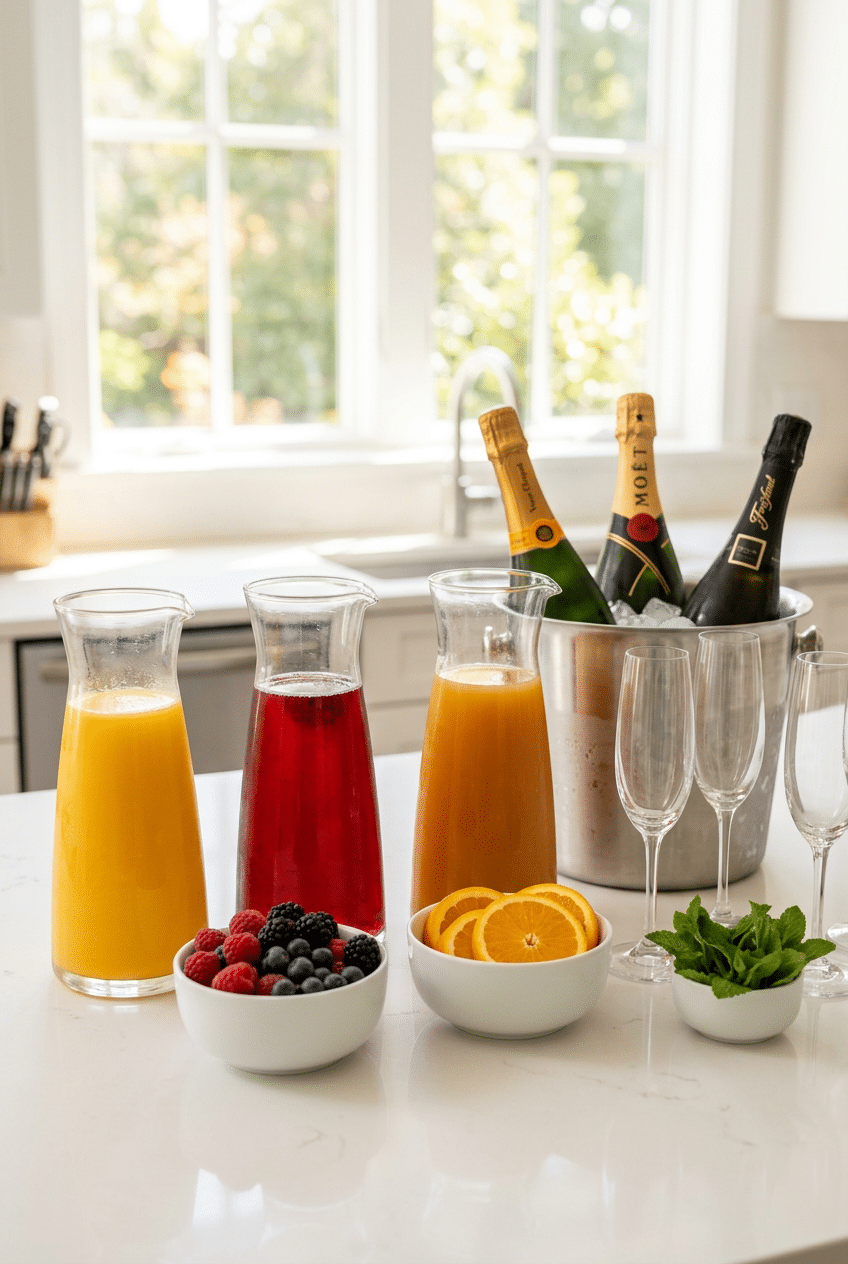
The secret to an amazing mimosa bar is having everything prepped and chilled before guests arrive. Set up your station with multiple juice options and creative garnishes for Instagram-worthy drinks.
Mimosa bar ideas transform any brunch into an elegant celebration where guests craft their perfect bubbly cocktail. This setup lets everyone customize their drink strength and flavor while creating a beautiful focal point for your party.
You’ll learn the ideal champagne-to-juice ratios, must-have garnish combinations, and presentation tricks that make your mimosa bar look professionally styled. These techniques work for intimate brunches or large celebrations.
Ingredients for Perfect Mimosa Bar
For the Base
- 3 bottles prosecco or champagne — provides the bubbly foundation
- 2 cups fresh orange juice — classic mimosa flavor
- 1 cup cranberry juice — adds beautiful color and tartness
- 1 cup peach nectar — creates elegant peach mimosas
- 1 cup pineapple juice — tropical twist option
For Garnishes
- 1 cup fresh strawberries, sliced — classic fruit garnish
- 1 cup fresh raspberries — adds color and flavor
- 1 cup fresh blueberries — patriotic touch
- 2 oranges, sliced into wheels — traditional mimosa garnish
- Fresh mint sprigs — aromatic finishing touch
Optional Add-Ins
- 1/2 cup pomegranate seeds
- Edible flowers for decoration
- Flavored simple syrups
- Fresh grapefruit juice
How to Set Up Perfect Mimosa Bar Ideas Step by Step
Step 1: Chill Everything First
Place all champagne bottles and fruit juices in the refrigerator at least 4 hours before your event. Cold ingredients are absolutely crucial because they prevent the champagne from going flat quickly and ensure every sip tastes crisp and refreshing.
Room temperature mixers will kill the bubbles in your champagne instantly. The carbon dioxide dissolves much faster in warm liquids, leaving you with flat, disappointing drinks that guests won’t enjoy.
If you’re short on fridge space, fill a large galvanized tub with ice and nestle the bottles inside. The Rubbermaid Commercial Ice Tub holds 12 bottles perfectly and keeps everything at the ideal serving temperature throughout your entire event.
Ice Bucket or Tub — Warm champagne loses carbonation within minutes of opening.

- HEAVY DUTY FOR EXTENDED LIFE: Rigorous testing for superior quality and happy customers, ensuring zero sweat and hand-cr…
- MADE TO LAST, NOT JUST PARTY CRASH: Beverage bucket crafted for years of gatherings—not single-use waste. Rigorously tes…
- NO LID NEEDED OR INCLUDED: This ice bucket is designed with extra-thick insulated stainless steel to keep ice cold for h…

- 6.5L Capacity: Compared to others’ 5L capacity, our ice bucket has a larger capacity of 6.5L, which can hold 4~5 bottles…
- Strong and Sturdy: Made from high-quality, thickened PET material, this champagne bucket is drop-resistant, shatterproof…
- Portable Design: The ice bucket for parties features comfortable handles on both sides, making it easy to carry and move…
Step 2: Arrange Your Station Layout
Set up your mimosa bar on a sturdy table or kitchen island with enough space for guests to move around comfortably. Position champagne bottles on one end, followed by juice pitchers, then glasses, and finally garnishes at the far end to create a natural flow.
This left-to-right setup prevents crowding because guests naturally move in one direction while building their drinks. Place napkins and small spoons near the garnishes for easy access.
A 6-foot table accommodates everything perfectly, but if you’re working with limited space, use a tiered serving stand. The Bambüsi 3-Tier Bamboo Stand maximizes vertical space while keeping everything organized and accessible.
Step 3: Prepare Juice Stations
Pour each juice into clear glass pitchers or carafes so guests can see the beautiful colors. Label each pitcher with small chalkboard signs or elegant tent cards showing the juice type and suggested garnish pairings.
Keep juices separate rather than pre-mixing because everyone has different preferences for sweetness and champagne strength. Some guests prefer a light splash of juice while others want a fruitier drink.
Glass pitchers with pour spouts prevent spills and look more elegant than plastic containers. The Hiware Glass Pitcher Set includes 4 matching pitchers with comfortable handles that make pouring effortless even when full.
Glass Pitchers with Pour Spouts — Pouring from bottles creates spills and looks messy at elegant events.

- Airtight and Leakproof Storage: Our Mason Jar Pitcher’s airtight silicone seal locks in freshness and prevents leaks—no …
- Versatile Usage: Perfect as a sun tea pitcher, cold brew pitcher, ice tea pitcher, and more. This 2-quart (64 oz) mason …
- Effortless Pouring Glass Pitcher with Lid: Experience smooth and controlled pouring with our thickened, full-grip handle…

- No More Lost Lids! Not only does the Hali Juice Carafe set come with BPA-free lids – not often seen on other carafe sets…
- Mix And Match To Your Party Decor: Some water decanter sets come with white lids but this one includes a black set, too….
- Fits in the Fridge AND Hold Large Cubes! At 11″ tall, this glass carafe with lids set is designed to fit in your refrige…
Step 4: Create Garnish Stations
Arrange fresh fruits in small glass bowls or on a wooden serving board, grouping similar colors together for visual impact. Pre-slice oranges into wheels and strawberries into attractive pieces that fit nicely on glass rims.
Provide small tongs or spoons for each garnish bowl to maintain hygiene and prevent cross-contamination between fruits. Guests appreciate not having to use their hands, especially in post-pandemic times.
Keep berries whole since they’re naturally bite-sized and look beautiful floating in champagne. Store prepared garnishes in the refrigerator until 30 minutes before serving to maintain freshness and prevent browning.
Step 5: Set Up Glassware Display
Arrange champagne flutes in neat rows on a separate tray or directly on the table, ensuring you have at least one glass per guest plus extras for second servings. Flutes preserve carbonation better than wide-mouthed glasses by reducing surface area.
If you don’t have enough champagne flutes, wine glasses work perfectly and actually hold more liquid for guests who prefer larger servings. The key is using glasses with stems to prevent warming the drink with hand heat.
For large parties, consider renting glassware rather than using disposable cups. The Schott Zwiesel Champagne Flute Set includes 6 professional-quality glasses that won’t break easily and make every drink feel special.
Champagne Flutes — Regular glasses let bubbles escape too quickly, leaving flat drinks.

- Perfect for your next birthday party, bridal shower, outdoor celebration and any occasion. Toast and clink to your heart…
- Ideal for serving champagne, rosé, mimosas, sparkling cocktails and more. The glass measures is 2.2” in diameter and 5.8…
- Smart patented features include a rounded rim for smooth drinking and Pop ’n Lock for easy stackability and storage.

- The Perfect Gift: Whether for your own use or as a gift, our champagne glasses will not disappoint you. It will impress …
Step 6: Add Final Touches
Create simple instruction cards showing the classic 3:1 champagne to juice ratio for perfect mimosas. Include suggestions for garnish pairings like strawberries with peach nectar or mint with pineapple juice.
Set out cocktail napkins in coordinating colors and provide small stirring spoons for guests who want to gently mix their drinks. These details show thoughtfulness and help guests feel comfortable.
Add ambient lighting with battery-operated string lights or candles around your mimosa bar area. Soft lighting makes everything look more elegant and creates perfect conditions for photos that guests will want to share.
Nutrition Information
- Per serving (1 mimosa): 95 calories
- 0g fat
- 8g carbs
- 0g protein
- 12g sugar
Pro Tips
Perfect Ratio Formula: Use 3 parts champagne to 1 part juice for classic mimosas. This ratio maintains the bubbly character while adding fruit flavor without overpowering the champagne’s delicate taste.
Keep Bubbles Alive: Open champagne bottles just before guests arrive and use champagne stoppers between pours. A flat mimosa is a sad mimosa that no one will enjoy drinking.
Color Coordination: Arrange juices from lightest to darkest colors for visual appeal. Start with orange juice, then peach, pineapple, and end with cranberry for a beautiful gradient effect.
Ice Strategy: Skip ice in the glasses since everything should already be chilled. Ice waters down the flavors and takes up valuable space in champagne flutes.
Make-Ahead Garnishes: Prep fruit garnishes the night before and store in airtight containers. Citrus wheels can be cut 24 hours ahead without losing freshness.
Leftover Solution: Combine remaining juices into a large pitcher for a delicious fruit punch that kids and non-drinkers can enjoy throughout the day.
Delicious Variations
Tropical Mimosa Bar
Replace traditional juices with mango nectar, passion fruit juice, and coconut water. Garnish with toasted coconut flakes, pineapple wedges, and lime wheels for a vacation vibe that transports guests to paradise.
Seasonal Berry Bar
Feature seasonal berry juices like blackberry, raspberry, or mixed berry blends. Add fresh berries, lemon twists, and rosemary sprigs for an elegant autumn or winter brunch setup.
Sophisticated Herb Bar
Elevate your setup with herb-infused simple syrups like lavender, basil, or thyme. Provide muddling tools and fresh herb garnishes for guests who want to create complex flavor profiles.
International Flavors
Offer unique juices like lychee, guava, or pomegranate for worldly guests. Include exotic garnishes like dragon fruit slices or star fruit wheels for Instagram-worthy presentations.
Storage Instructions
Refrigerator
Leftover mixed mimosas don’t store well since the carbonation disappears quickly. However, unused fruit juices keep in the refrigerator for 3-5 days and can be enjoyed as morning beverages or used in smoothies. Store opened champagne with a proper champagne stopper for up to 24 hours, though it’s best consumed immediately for optimal bubbles.
Freezer
Freeze leftover fruit juices in ice cube trays to create flavored ice cubes for future cocktails. These colorful cubes add flavor without dilution and look beautiful in clear drinks. Don’t freeze champagne as it will lose all carbonation and potentially explode bottles due to expansion.
Make-Ahead
Prepare all garnishes, chill beverages, and set up your station layout the night before your event. Create instruction cards and arrange serving pieces so you only need to add fresh garnishes and open champagne bottles when guests arrive. This advance preparation lets you enjoy your own party instead of playing bartender all morning.
For food safety guidelines, visit CDC Food Safety Guidelines.
Frequently Asked Questions
How much champagne do I need for a mimosa bar?
Plan for one 750ml bottle of champagne per 3-4 guests, assuming each person drinks 2-3 mimosas. This accounts for the 3:1 champagne to juice ratio and ensures you don’t run out during peak serving times. Buy one extra bottle as backup since running out of bubbly can end your party early.
Can I use prosecco instead of champagne for mimosa bar ideas?
Absolutely! Prosecco works wonderfully and costs significantly less than true champagne while providing the same delightful bubbles. Cava is another excellent budget-friendly option that tastes great in mimosas. Save expensive champagne for toasts and use affordable sparkling wine for mixed drinks.
What’s the best way to keep mimosa bar setup organized?
Create distinct stations flowing left to right: champagne, juices, glasses, and garnishes. Use clear labels for each juice type and include suggested garnish pairings. Provide separate serving utensils for each element to prevent cross-contamination and maintain hygiene standards throughout your event.
How far in advance can I set up my mimosa bar?
Set up everything except fresh garnishes 2-3 hours before guests arrive. Add fresh fruit garnishes 30 minutes before serving to maintain color and freshness. Open champagne bottles only when guests are ready to start drinking to preserve maximum carbonation and flavor.
More Recipes You Will Love
👉 Perfect Strawberry Cold Foam Recipe (Starbucks Style)
👉 Perfect Guacamole Recipe (Restaurant Quality)
👉 Mexican Street Corn Salad Recipe
Your mimosa bar ideas will create the perfect centerpiece for any brunch celebration, giving guests the freedom to customize their perfect bubbly cocktail. These setup techniques ensure smooth service and beautiful presentation that’ll have everyone asking for your party planning secrets. Try this approach for your next gathering and watch how a simple mimosa bar transforms into the highlight of your event!