
- Prep: 15 Minutes
- Cook: 25 Minutes
- Total: 40 Minutes
- Servings: 6 servings
A Quick Note Before You Start
Each style uses the same base chicken but different cooking methods. Start with whichever method matches your available time and equipment.
Chicken tacos are the ultimate weeknight dinner that never gets boring when you know these five game-changing cooking methods that transform ordinary chicken into extraordinary taco fillings.
Whether you have 20 minutes or all day, there’s a chicken taco style here that fits your schedule and delivers restaurant-quality flavor in your own kitchen.
Ingredients for Perfect Chicken Tacos (5 Styles)
For the Base Chicken (All Styles)
- 2 lbs boneless skinless chicken thighs — more flavor and moisture than breasts
- 2 tsp kosher salt — draws out moisture then reabsorbs for seasoning
- 1 tsp black pepper — adds heat and depth
- 2 tsp chili powder — smoky base flavor
- 1 tsp cumin — earthy warmth
- 1 tsp paprika — color and mild sweetness
- 1/2 tsp garlic powder — concentrated garlic flavor
- 1/2 tsp onion powder — subtle onion base
- 1/4 tsp cayenne pepper — adjustable heat
For Serving
- 12 corn tortillas — authentic flavor and texture
- 1 white onion, diced — classic taco topping
- 1/2 cup fresh cilantro, chopped — bright herbal finish
- 3 limes, cut into wedges — essential acid component
- 1 cup Mexican crema or sour cream — cooling richness
Style-Specific Additions
- 2 tbsp olive oil — for grilled and pan-seared styles
- 1 cup chicken broth — for slow-cooked style
- 1 chipotle pepper in adobo, minced — for smoky slow-cooked version
- 1 tsp oregano — for baked style
- 1 tbsp butter — for pan-seared finishing
Optional Add-Ins
- 1 cup shredded cheese (Mexican blend)
- 1 avocado, sliced
- 1/2 cup pickled jalapeños
- 1 cup salsa verde
How to Make Perfect Chicken Tacos Step by Step
Step 1: Season the Base Chicken
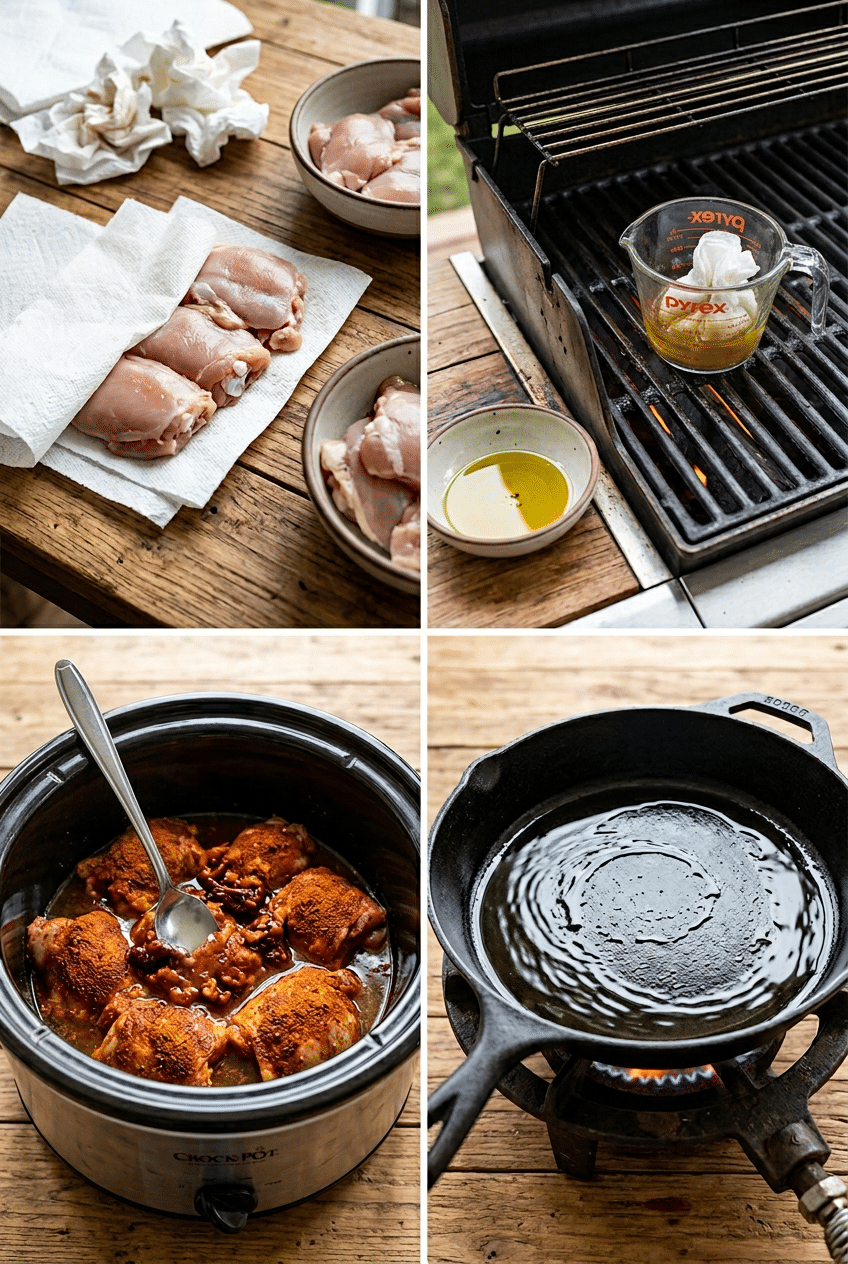
Pat 2 pounds of chicken thighs completely dry with paper towels, then trim any excess fat or skin. Combine all the spices in a small bowl and mix thoroughly until evenly distributed. Rub the spice mixture all over the chicken, making sure to get into every crevice and coating both sides completely.
The salt in this mixture will initially draw moisture from the chicken, then reabsorb back into the meat along with all the spices. This creates deeper flavor penetration than just surface seasoning. Let the seasoned chicken rest for at least 10 minutes, or up to 4 hours refrigerated for maximum flavor development.
Step 2: Style 1: Grilled Chicken Tacos
Preheat your grill to medium-high heat and oil the grates with a paper towel dipped in olive oil. Place the seasoned chicken thighs on the hottest part of the grill and cook for 6-7 minutes without moving them. You’ll hear the sizzle and see the edges starting to caramelize when it’s ready to flip.
Flip the chicken and move to a slightly cooler area of the grill to finish cooking for another 6-8 minutes until the internal temperature reaches 165°F. The char marks and smoky flavor from grilling create the most authentic street taco taste that’s impossible to replicate indoors.
Let the grilled chicken rest for 5 minutes, then chop into bite-sized pieces. The resting period allows the juices to redistribute throughout the meat, ensuring every bite stays moist and flavorful instead of drying out when you cut it.
Step 3: Style 2: Slow-Cooked Shredded Chicken
Place the seasoned chicken thighs in your slow cooker and add 1 cup of chicken broth plus the minced chipotle pepper in adobo sauce. The liquid should come about halfway up the chicken but not completely cover it. Cook on low for 6-8 hours or high for 3-4 hours until the chicken easily shreds with a fork.
Remove the chicken from the slow cooker and shred it using two forks, pulling the meat apart along the natural grain lines. Return the shredded chicken to the cooking liquid and stir to absorb all those concentrated flavors.
This method creates the most tender chicken tacos with deep, complex flavors that develop over the long cooking time. The chipotle adds a subtle smoky heat that penetrates every strand of meat, making each bite incredibly flavorful.
👉 Cast Iron Skillet — Essential for perfect searing and blackening techniques that develop complex flavors impossible with regular cookware.

- Versatile Cooking Skillet: The Lodge Cast Iron Skillet is a multipurpose, everyday cooking pan that excels at searing, s…
- Pre-Seasoned & PFAS-Free: This pre-seasoned skillet is made with 100% natural vegetable oil for a naturally nonstick fin…
- Superior Heat Distribution: The heavy-duty cast iron frying pan cooks evenly, making it ideal for precision recipes and …
Step 4: Style 3: Pan-Seared Chicken
Heat 2 tablespoons of olive oil in a large cast-iron skillet over medium-high heat until it shimmers but doesn’t smoke. Add the seasoned chicken thighs in a single layer, making sure not to overcrowd the pan. Cook for 5-6 minutes on the first side without moving them to develop a golden-brown crust.
Flip the chicken and add 1 tablespoon of butter to the pan, letting it melt around the chicken. Continue cooking for another 5-7 minutes, basting the chicken with the foamy butter using a spoon. This technique creates incredibly crispy edges while keeping the interior juicy.
Trying to flip chicken too early in a regular nonstick pan often results in sticking and tearing. A well-seasoned cast-iron skillet like the Lodge Cast Iron Skillet develops natural nonstick properties and retains heat better for perfect searing every time.
Step 5: Style 4: Oven-Baked Chicken
Preheat your oven to 425°F and line a baking sheet with parchment paper. Arrange the seasoned chicken thighs on the prepared baking sheet, making sure they’re not touching each other. Sprinkle with additional oregano and drizzle lightly with olive oil for extra browning.
Bake for 20-25 minutes until the internal temperature reaches 165°F and the tops are golden brown. The high heat creates a slightly crispy exterior while the enclosed oven environment keeps the interior incredibly moist.
This hands-off method is perfect when you’re making other taco components simultaneously. The even heat distribution ensures consistent cooking, and you can easily double or triple the recipe for meal prep or feeding a crowd.
Step 6: Style 5: Blackened Chicken
Heat a cast-iron skillet over high heat until it begins to smoke slightly. Press the seasoned chicken thighs firmly into the hot pan and cook for 4-5 minutes without moving them. The spices will create a dark, flavorful crust that might look burned but is actually perfectly caramelized.
Flip the chicken and continue cooking for another 4-6 minutes until the internal temperature reaches 165°F. The high heat creates intense caramelization of the spices, resulting in a complex, slightly bitter flavor that balances beautifully with cool toppings.
This technique requires confidence and a well-ventilated kitchen since it produces some smoke. The blackened crust provides an intense flavor contrast that makes these tacos stand out from typical preparations, delivering restaurant-quality Cajun-Mexican fusion in your home kitchen.
Step 7: Warm the Tortillas
Heat a dry skillet or comal over medium heat and warm each corn tortilla for 30-45 seconds per side until they’re pliable and have light brown spots. You can also char them directly over a gas flame using tongs for 15-20 seconds per side for authentic flavor.
Stack the warmed tortillas in a clean kitchen towel or tortilla warmer to keep them soft and warm while you assemble the tacos. Cold or stiff tortillas crack when folded and don’t provide the proper texture foundation for great tacos.
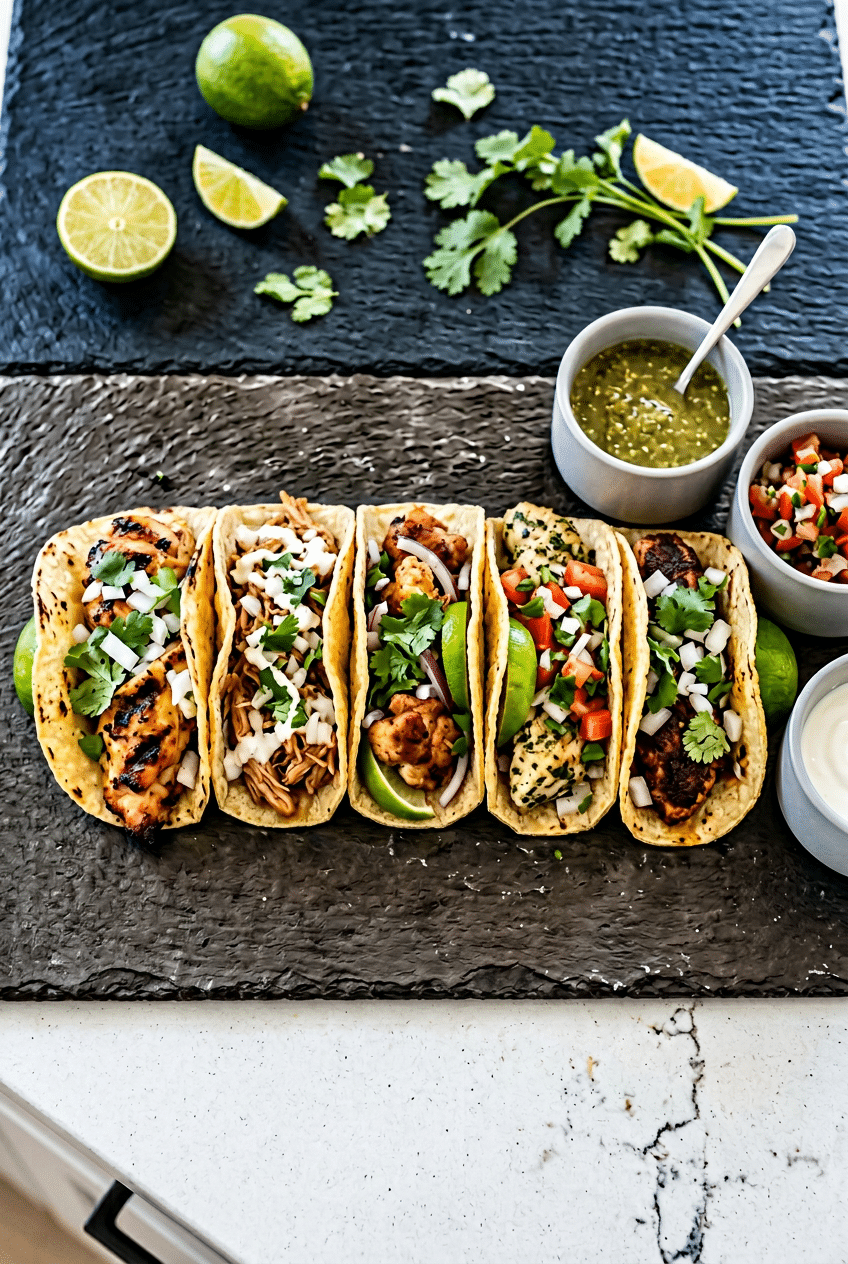
Step 8: Assemble and Serve
Place a generous portion of your chosen chicken style in each warm tortilla, then top with diced white onion and fresh cilantro. Serve immediately with lime wedges and Mexican crema on the side so each person can customize their tacos to taste.
The key to perfect taco assembly is restraint – don’t overfill them or they become impossible to eat. Each component should be distinct but work together, with the lime juice brightening all the flavors when squeezed over the top just before eating.
Nutrition Information
- Per serving (2 tacos): 320 calories
- 12g fat
- 24g carbs
- 28g protein
Pro Tips
Double the spice mixture: Make extra seasoning blend and store it in an airtight container for up to 6 months, giving you instant flavor for future chicken taco nights.
Use thighs, not breasts: Chicken thighs have more fat and connective tissue, making them nearly impossible to overcook and resulting in juicier, more flavorful tacos every single time.
Toast your spices first: Heat the spice mixture in a dry pan for 30 seconds before applying to chicken to intensify their flavors and create deeper, more complex taste profiles.
Rest the meat: Always let cooked chicken rest for 5 minutes before chopping or shredding to allow juices to redistribute, preventing dry, tough taco filling.
Char your onions: Quickly char diced onions in a dry pan for 1-2 minutes to add smoky sweetness that elevates any chicken taco style.
Delicious Variations
Chicken Tinga Style
Add fire-roasted tomatoes and chipotle peppers to the slow-cooked method, creating the classic Mexican tinga texture with deeper, smokier flavors that pair perfectly with pickled onions and avocado.
Cilantro Lime Chicken
Marinate chicken in lime juice, cilantro, and garlic for 2 hours before cooking with any method. The acid tenderizes the meat while infusing bright, fresh flavors throughout.
Buffalo Chicken Tacos
Toss any cooked chicken style with buffalo sauce and serve with blue cheese crema, celery leaves, and pickled jalapeños for a fun American-Mexican fusion twist.
Mole-Style Chicken
Add 2 tablespoons of mole paste to the slow-cooked version along with a square of dark chocolate for rich, complex flavors with subtle sweetness and heat.
Storage Instructions
Refrigerator
Store cooked chicken taco meat in airtight containers in the refrigerator for up to 4 days. Reheat gently in a skillet with a splash of broth to maintain moisture, or microwave in 30-second intervals, stirring between each interval. The flavors actually improve after a day as the spices continue to penetrate the meat.
Freezer
Freeze cooked chicken in portion-sized freezer bags for up to 3 months, pressing out all air before sealing. Thaw overnight in the refrigerator before reheating. The slow-cooked shredded version freezes best, while grilled and pan-seared styles may lose some texture but remain perfectly safe and flavorful.
Make-Ahead
Season chicken up to 24 hours ahead and refrigerate for deeper flavor penetration. Cooked chicken can be prepared 2-3 days in advance and reheated when ready to serve. Prepare all toppings except avocado up to 1 day ahead, storing each component separately in the refrigerator for maximum freshness.
For food safety guidelines, visit USDA Safe Minimum Cooking Temperatures.
Frequently Asked Questions
Can I use chicken breasts for chicken tacos instead of thighs?
Yes, but chicken breasts require more careful cooking to avoid drying out. Reduce cooking times by about 2-3 minutes per side and use a meat thermometer to ensure you don’t overcook them past 165°F. Thighs remain juicier and more forgiving, making them the preferred choice for consistently perfect chicken tacos.
How do I know when my chicken tacos are properly seasoned?
Properly seasoned chicken should have a visible spice coating that adheres to the surface. After cooking, taste a small piece – you should taste the spices immediately, followed by the chicken flavor. If the spices taste harsh or overpowering, add a squeeze of lime juice to balance the flavors before serving in tacos.
What’s the best way to reheat leftover chicken taco meat?
Reheat chicken taco meat gently in a skillet over medium-low heat with a splash of chicken broth or water to add moisture. Stir frequently to prevent sticking and heat evenly. Alternatively, microwave in 30-second intervals, stirring between each interval until heated through. Avoid high heat which can dry out the meat.
Can I make chicken tacos with frozen chicken?
Never cook chicken directly from frozen as it leads to uneven cooking and food safety concerns. Thaw chicken completely in the refrigerator overnight before seasoning and cooking. For quick thawing, submerge sealed chicken in cold water, changing the water every 30 minutes until fully thawed, which typically takes 1-2 hours depending on thickness.
More Recipes You Will Love
👉 Perfect Authentic Pico de Gallo Recipe
👉 Homemade Restaurant-Style Charred Salsa
👉 Perfect Rotisserie Chicken Casserole Recipe
Now you have five incredible chicken taco styles that transform ordinary weeknight dinners into restaurant-quality meals. Try the grilled version for summer cookouts, slow-cooked for busy weekdays, or blackened when you want to impress guests with bold flavors. Which style will you master first? Share your results in the comments below and let me know which technique becomes your new go-to favorite!