
Golden, Lacy, Crispy Edges That Will Ruin Regular Pancakes for You Forever
Prep Time: 10 Minutes | Cook Time: 15 Minutes | Total Time: 25 Minutes | Servings: 8–10 Pancakes
Why These Crispy Edge Pancakes Hit Different
There are fluffy pancakes, and then there are fluffy pancakes with buttery, golden, lacy crispy edges that shatter when you bite into them. These are the second kind. The center is soft, thick, and pillowy. The edges are thin, caramelized, and crispy from the butter meeting the hot pan. That contrast — soft middle, crunchy edge — is what makes these pancakes absolutely addictive. The batter is simple. Flour, sugar, eggs, milk, vanilla, melted butter, and just the right ratio of baking powder to baking soda that gives you tall, fluffy pancakes that rise beautifully on the griddle. The secret to the crispy edges is not a special ingredient — it is technique. A well-buttered hot pan, the right amount of batter, and the patience to let the edges set and crisp up before flipping. Once you nail it, you will never make pancakes any other way. Saturday mornings just got a serious upgrade.
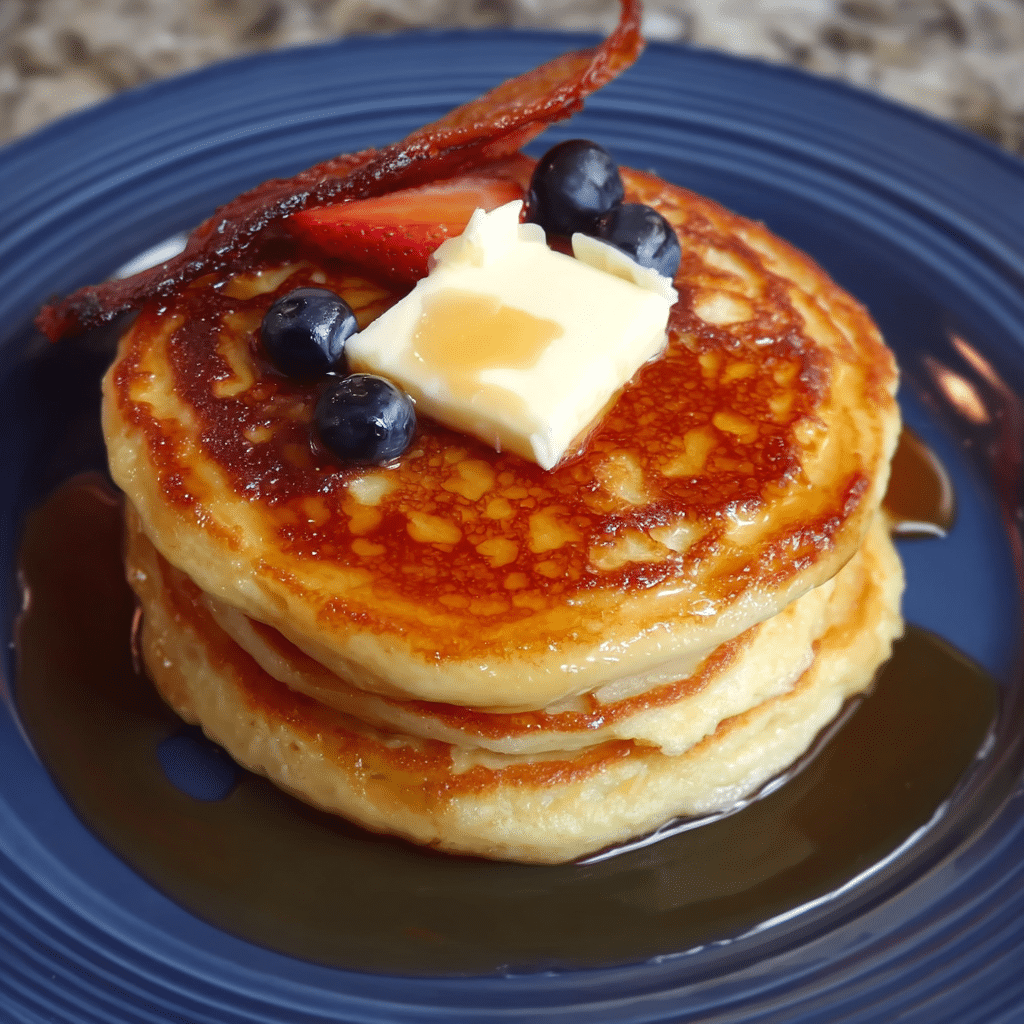
Table of Contents
Ingredients
For the Pancake Batter
- 2 cups (250g) all-purpose flour
- 2 tablespoons granulated white sugar
- 2 teaspoons baking powder
- 1½ teaspoons baking soda
- ½ teaspoon salt
- 2 eggs
- 1½ cups (360ml) milk
- 2 teaspoons pure vanilla extract
- 2 tablespoons unsalted butter, melted
For Cooking
- Extra unsalted butter for the pan (this is what creates the crispy edges)
Optional Toppings
- Maple syrup
- Fresh berries (strawberries, blueberries, raspberries)
- Whipped cream
- Sliced bananas
- Powdered sugar
- Nutella or chocolate hazelnut spread
- Peanut butter drizzle
- Honey butter
- Crispy bacon on the side
Crispy Edge Pancakes Step-by-Step Instructions
Step 1: Mix the Dry Ingredients
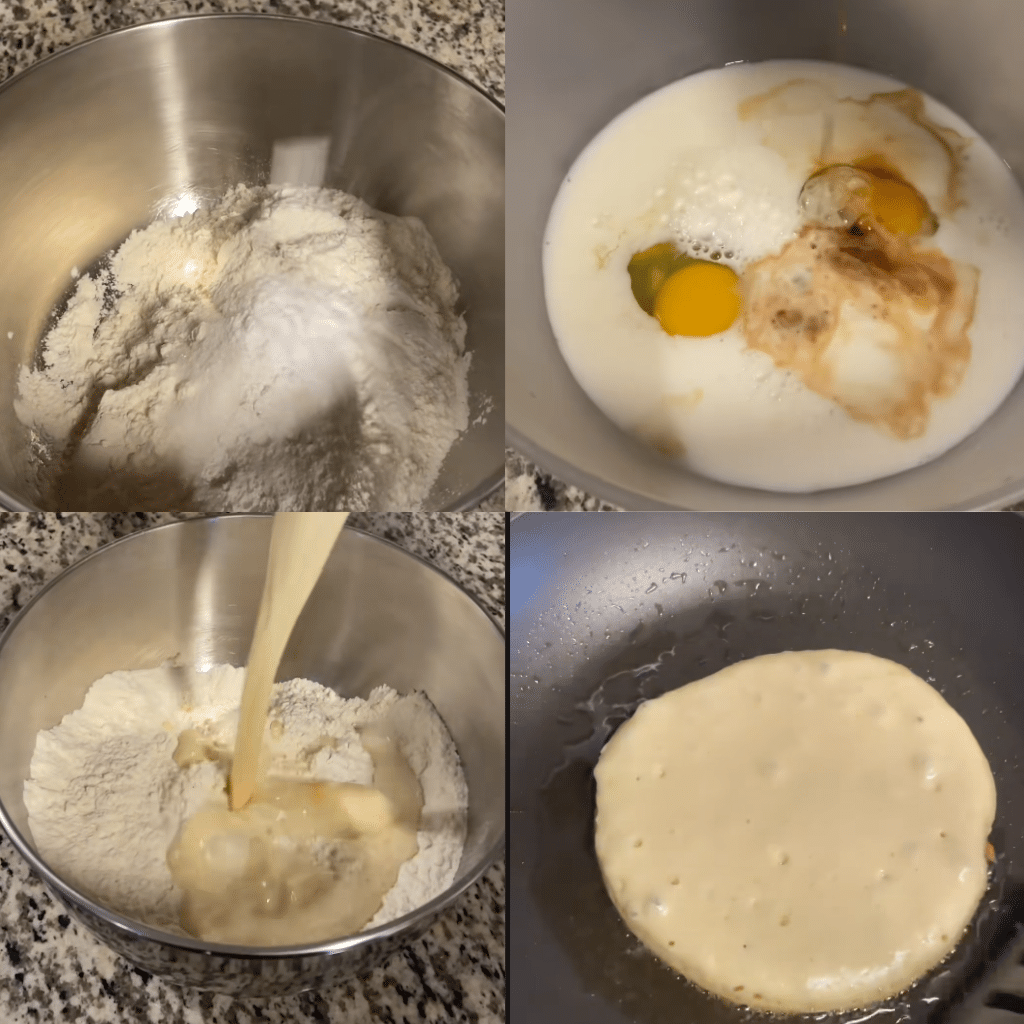
In a large mixing bowl, whisk together the 2 cups of flour, 2 tablespoons of sugar, 2 teaspoons of baking powder, 1½ teaspoons of baking soda, and ½ teaspoon of salt until everything is evenly combined. Whisking the dry ingredients together first ensures the leavening agents are distributed evenly throughout the flour, which means every pancake rises the same way.
You need separate bowls for dry and wet ingredients before combining — this is what gives you a lump-free, perfectly mixed batter. The Umite Chef Stainless Steel Mixing Bowl Set is perfect for this. The nesting sizes give you a large bowl for mixing the batter and smaller ones for prepping eggs and melted butter. The non-slip bases keep the bowls steady while whisking, and the airtight lids mean you can store leftover batter directly in the bowl.

- 3GRATER ATTACHMENTS: This bowl set comes with 3 different grater attachments (slicing/grating/shredding) just shred or s…
- NON SLIP SILICONE BOTTOMS: Most metal mixing bowls is that they will slide on the counter the more vigorously you store …
- AIRTIGHT BPA FREE LIDS & 5 SIZES BOWLS: The range of sizes from 5QT down to 1.5QT, makes this set incredibly versatile a…
Step 2: Mix the Wet Ingredients
In a separate bowl, whisk together the 2 eggs, 1½ cups of milk, 2 teaspoons of vanilla extract, and 2 tablespoons of melted butter (make sure the butter has cooled slightly so it does not scramble the eggs). Whisk until everything is smooth and combined.
Step 3: Combine Wet and Dry — But Do Not Overmix
Pour the wet ingredients into the dry ingredients and stir gently with a wooden spoon or spatula until just combined. The batter should still have small lumps — this is important. Overmixing activates the gluten in the flour and gives you dense, rubbery pancakes instead of fluffy, tender ones. A few lumps are your friend. Stop stirring the moment the flour is mostly incorporated. Let the batter rest for 5 minutes — this allows the baking powder and baking soda to activate and the gluten to relax, which makes fluffier pancakes.
Step 4: Heat the Pan and Add Butter
This is the most important step for getting those crispy edges. Heat a large nonstick griddle or flat pan over medium heat for at least 2 to 3 minutes so the entire surface is evenly hot. Add a generous pat of butter and let it melt, foam, and spread across the surface.
The pan you use makes or breaks the crispy edges. You need a wide, flat surface with even heat distribution so every pancake gets the same golden crust. A narrow skillet crowds the pancakes and steams them instead of crisping. The Sensarte Nonstick Griddle Pan is exactly what you want — it is wide and flat with enough room for 3 to 4 pancakes at once, heats evenly with no hot spots, and the nonstick surface means the buttery edges caramelize instead of sticking. The stay-cool handle is a bonus when you are flipping multiple batches on a Saturday morning.

- Swiss Non-Stick Coating – Swiss ILAG nonstick granite coating. Free of Intentionally Added PFOA. Smokeless, safe & healt…
- Suitable For All Stoves – High magnetic conductive stainless steel base allows the pancake pan to work on all cooktops, …
- Perfect Cookware – Large 10-inch diameter makes crepes to suit the biggest appetites; Lipping around the edge to make su…
Step 5: Pour the Batter and Cook
Once the butter is melted and foamy, pour about ¼ cup of batter per pancake onto the hot griddle. Leave at least 2 inches between each pancake so the edges have room to spread and crisp.
The trick to getting consistent, perfectly round pancakes every time is controlling how much batter you pour. Eyeballing it leads to uneven sizes that cook at different rates. The KPKitchen Pancake Batter Dispenser solves this completely — just fill it with batter, squeeze the handle, and it dispenses the exact same amount every time. Perfectly round, same-sized pancakes that cook evenly and look like they came from a breakfast restaurant. It also eliminates the drips and mess of pouring from a bowl or measuring cup.

- MESS-FREE PANCAKES! KPKitchen proudly presents our durable and reliable Pancake Dispenser & Cupcake Batter Dispenser! Ma…
- STRONGER DESIGN – REINFORCED FOR DURABILITY! Our redesigned pulley handle has been repositioned to ensure quality and du…
- PORTION CONTROLLED! Lopsided pancake stacks…. The breakfast struggle is real. Keeping a consistent size for your panca…
Cook the pancakes undisturbed for about 2 to 3 minutes. You will see small bubbles forming on the surface and the edges will start to look set and slightly dry. The underside should be deep golden brown. This is also when the edges start to get thin, lacy, and crispy from the butter.
Step 6: Flip and Finish
Using a wide spatula, flip each pancake in one confident motion. Cook for another 1 to 2 minutes on the second side until golden brown. The second side never gets as pretty as the first — that is totally normal. Before the next batch, add another pat of butter to the pan and let it melt and foam before adding more batter. Fresh butter for every batch is the secret to those crispy edges on every single pancake.
Step 7: Serve Immediately
Stack the pancakes on a plate, add a generous pat of butter on top, and drench in maple syrup. Add your favorite toppings — fresh berries, whipped cream, sliced bananas, powdered sugar, or whatever makes you happy. Serve immediately while the edges are still crispy and the centers are still warm and fluffy.
Estimated Nutrition Information (Per Serving)
Based on 10 pancakes (1 pancake per serving):
- Serving Size: 75 g
- Calories: 165 kcal
- Total Fat: 5 g
- Saturated Fat: 3 g
- Polyunsaturated Fat: 0 g
- Monounsaturated Fat: 1 g
- Trans Fat: 0 g
- Cholesterol: 50 mg
- Sodium: 380 mg
- Potassium: 120 mg
- Total Carbohydrates: 24 g
- Dietary Fiber: 1 g
- Sugar: 5 g
- Protein: 5 g
- Vitamin A: 150 IU
- Vitamin C: 0 mg
- Calcium: 100 mg
- Iron: 1 mg
Pro Tips for the Best Crispy Edge Pancakes
Butter is everything: The crispy edges come from butter melting in a hot pan and crisping the outer rim of the batter as it spreads. Do not use cooking spray — it will not give you the same result. Real butter, fresh pat for every batch.
Medium heat, not high: High heat burns the butter and the outside of the pancake before the inside cooks. Medium heat gives you a slow, even cook that lets the edges crisp up while the center stays fluffy and cooked through.
Do not press down on the pancakes: Pressing with the spatula squeezes out air and makes them dense. Let them cook undisturbed and they will puff up beautifully.
Do not overmix the batter: This is the most common pancake mistake. Mix until just combined with small lumps remaining. Overmixing develops gluten and turns fluffy pancakes into chewy, tough ones.
Let the batter rest: Five minutes of resting after mixing lets the baking powder and baking soda activate fully and the gluten relax. This gives you taller, fluffier pancakes.
Wait for the bubbles: Do not flip until you see bubbles forming on the surface and the edges look set. This means the bottom is golden and the pancake is stable enough to flip without falling apart.
Room temperature milk: Cold milk straight from the fridge can make the melted butter seize into little lumps in the batter. Letting the milk come to room temperature (or microwaving for 15 seconds) gives you a smoother batter.
Keep pancakes warm: If cooking multiple batches, place finished pancakes on a baking sheet in a 200°F (95°C) oven to keep them warm and crispy while you finish the rest.
Delicious Variations to Try
Blueberry Crispy Edge Pancakes
Gently fold ¾ cup of fresh blueberries into the finished batter. Or drop a few blueberries onto each pancake right after pouring the batter on the griddle. The berries burst and caramelize against the hot pan.
Chocolate Chip Pancakes
Sprinkle a tablespoon of chocolate chips onto each pancake immediately after pouring the batter. The chips melt into the pancake and create little pockets of gooey chocolate in every bite.
Banana Pancakes
Mash 1 ripe banana into the wet ingredients before combining with the dry. The banana adds natural sweetness and moisture. Top with sliced banana and a drizzle of honey.
Cinnamon Roll Pancakes
Add 1 teaspoon of cinnamon to the dry ingredients. Make a cinnamon swirl by mixing 2 tablespoons of softened butter, 2 tablespoons of brown sugar, and 1 teaspoon of cinnamon — drizzle it in a spiral on top of each pancake right after pouring. Top with a cream cheese glaze.
Buttermilk Crispy Edge Pancakes
Replace the regular milk with 1½ cups of buttermilk. Buttermilk adds tanginess and reacts with the baking soda for even fluffier pancakes with a more complex flavor.
Pumpkin Spice Pancakes
Add ½ cup pumpkin puree to the wet ingredients and 1 teaspoon of pumpkin pie spice to the dry. Top with whipped cream and a drizzle of maple syrup. Perfect for fall mornings.
Storage and Meal Prep Instructions
Refrigerator Storage
Store leftover pancakes in an airtight container in the refrigerator for up to 3 days. Place parchment paper between each pancake to prevent them from sticking together.
How to Reheat
For the best results, reheat in a toaster or toaster oven until warm and the edges are crispy again. You can also reheat on the griddle with a small pat of butter to re-crisp the edges. Microwaving works in a pinch but the edges will lose their crispiness.
Freezer Storage
Pancakes freeze beautifully for up to 2 months. Let them cool completely, stack with parchment paper between each one, and place in a freezer-safe bag. Reheat directly from frozen in a toaster or oven at 350°F (175°C) for 5 to 7 minutes.
Meal Prep Tips
Make a double or triple batch on Sunday morning and freeze the extras. On busy weekday mornings, pull out 2 to 3 pancakes, pop them in the toaster, and you have a homemade breakfast in minutes. Way better than anything from the freezer section of the grocery store.
Frequently Asked Questions
Why are my pancakes not fluffy? The most common reason is overmixing the batter. Mix until just combined with small lumps. Also make sure your baking powder and baking soda are fresh — they lose potency over time and will not give you the same rise.
How do I get the crispy edges? Butter, butter, butter. A generous pat of real butter on the hot pan before each batch is what creates those lacy, golden, crunchy edges. The butter melts, spreads under the batter edges, and caramelizes as the pancake cooks.
Can I use whole wheat flour? You can replace half the all-purpose flour with whole wheat flour for a nuttier, heartier pancake. Replacing all of it will make the pancakes denser and heavier.
Can I make the batter the night before? It is best to make the batter fresh because the baking powder and baking soda start working as soon as they get wet. Batter that sits overnight will not rise as well. You can mix the dry and wet ingredients separately the night before and combine them in the morning.
Why do my pancakes burn on the outside but are raw inside? Your heat is too high. Reduce to medium and let the pancakes cook slower. A lower, more even heat gives the inside time to cook through while the outside turns golden instead of burnt.
Can I make these dairy-free? Use any plant-based milk (oat milk works best for richness) and replace the butter with coconut oil or vegan butter. The edges will still crisp up beautifully.
How many pancakes does this recipe make? You should get about 8 to 10 pancakes depending on how much batter you use per pancake. About ¼ cup of batter per pancake is the standard size.
Can I add protein powder? Yes. Replace ¼ cup of the flour with your favorite vanilla protein powder. The pancakes may be slightly denser but still delicious and higher in protein.
You Might Also Love
If these crispy edge pancakes win your morning, try our Cinnamon Sugar French Toast Bites — bite-sized brioche dipped in vanilla custard, fried golden, rolled in cinnamon sugar, and dipped in warm Nutella. Another weekend breakfast game-changer.