
🛑 Stop! Don’t Have a Ninja Creami Yet?
This recipe strictly requires a Ninja Creami machine. Because of how the machine shaves ice, you cannot make this in a regular blender, food processor, or traditional ice cream maker.
If you are here because you keep seeing viral Creami recipes and are on the fence about buying one, read this first: Before you spend $200+, check out our Ninja Creami Review: 6-Month Test & Model Comparison. We break down exactly which model is actually worth the money, which one is the quietest, and how to score it for up to 40% off.
Already have your Creami on the counter? Let’s get to the recipe!
- Prep: 5 Minutes
- Cook: 24 Hours (Freezing)
- Total: 29 Minutes
- Servings: 4 servings
A Quick Note Before You Start
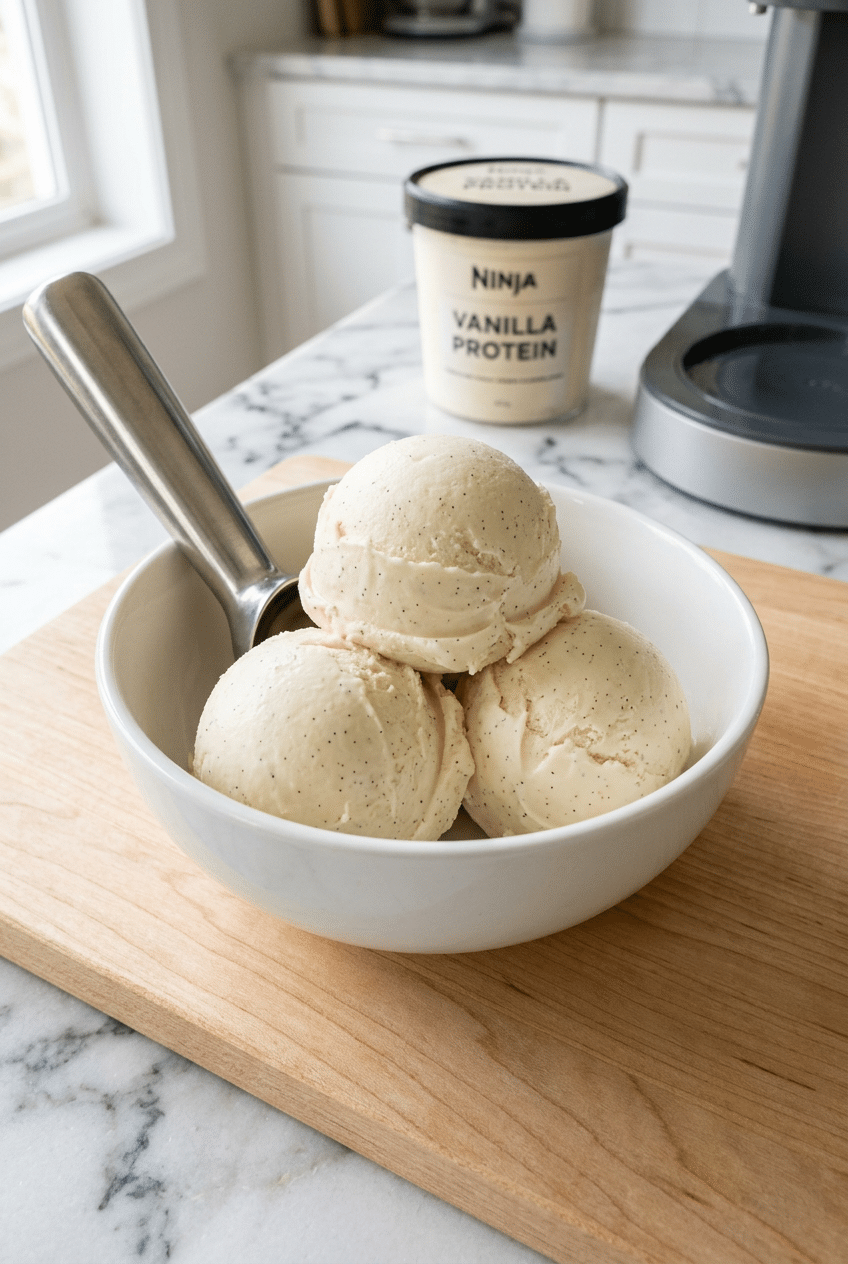
This protein ice cream tastes like premium gelato but packs 20g protein per serving. The secret is getting your base completely frozen solid before processing.
Ninja Creami protein ice cream transforms three simple ingredients into creamy, scoopable dessert magic that rivals any premium brand. This healthy recipe delivers restaurant-quality texture without eggs, cream, or complicated techniques.
The key lies in the perfect ratio of protein powder to liquid, creating a base that churns into impossibly smooth ice cream every single time.
Ingredients for Perfect Ninja Creami Protein Ice Cream
For the Base
- 2 cups unsweetened almond milk — creates the creamy foundation without extra calories
- 2 scoops (60g) vanilla protein powder — provides structure and 40g protein total
- 2-3 tablespoons honey or maple syrup — balances protein powder bitterness naturally
Optional Add-Ins
- 1 teaspoon vanilla extract
- 1/4 cup mini chocolate chips
- 2 tablespoons peanut butter powder
How to Make Ninja Creami Protein Ice Cream Step by Step
Step 1: Blend the Base Pour the almond milk into a blender and add your protein powder gradually while blending on low speed. This prevents the protein from clumping into chalky lumps that ruin the final texture. Blend for 30 seconds until completely smooth.
Chef’s Tip: The brand of protein you use matters massively for the texture. I highly recommend using a Whey/Casein blend like PEScience Select Vanilla or Quest Nutrition Vanilla Milkshake, as they freeze much thicker and creamier than pure whey.
To get that silky base, a high-speed blender is your best friend. I use my Vitamix 5200 to pulverize the powder in seconds, but for these small batches, a more affordable NutriBullet Pro 900 works absolutely perfectly.
Step 2: Sweeten and Mix Drizzle in your honey while the blender runs, starting with 2 tablespoons and tasting as you go. The sweetness should balance the protein powder’s slight bitterness without overpowering the vanilla notes. Blend for another 15 seconds until fully incorporated.
Macro-Friendly Tip: If you want to keep the carbs and sugar as close to zero as possible, swap the honey for a keto-friendly liquid sweetener. ChocZero Sugar-Free Maple Syrup or Lakanto Monkfruit Sweetened Syrup dissolve beautifully without adding icy crystals to your final spin.
Step 3: Pour and Freeze Pour the mixture directly into your Ninja Creami pint container, leaving about half an inch of space at the top for expansion during freezing. Tap the container gently on the counter to release any air bubbles that could create icy patches.
Place the filled container in your freezer for exactly 24 hours. The mixture must freeze completely solid throughout, not just on the surface, or your Creami won’t be able to process it properly.
Pro Tip: Waiting 24 hours is the hardest part! I highly recommend grabbing an extra 4-Pack of Official Ninja Creami Pints. I usually prep 4 or 5 different flavors on Sunday night so I always have a frozen base ready to spin throughout the week!
Step 4: Process in Creami Remove the frozen container from the freezer and install it in your Ninja NC301 CREAMi Ice Cream Maker. Select the ‘Ice Cream’ function and let the machine work its magic for the full cycle. Don’t peek during processing as this can disrupt the churning action.
The Ninja Creami’s unique Creamerizer paddle system shaves the frozen mixture into microscopic particles while incorporating air, creating that signature smooth and creamy texture. After the first cycle, your ice cream might look slightly crumbly on top, which is completely normal.
Step 5: Re-spin for Perfection If your ice cream looks dry or crumbly after the first spin, add 1-2 tablespoons of almond milk directly to the container. Use the ‘Re-spin’ function to process again, which will smooth out any remaining texture issues and create a perfect, scoopable consistency.
Most protein ice creams need this second spin to achieve premium texture. The extra liquid helps bind everything together without making it watery. (Optional: Once it’s perfect, slide your pint into a Neoprene Creami Pint Koozie Sleeve so your hands don’t freeze while you eat it on the couch!)
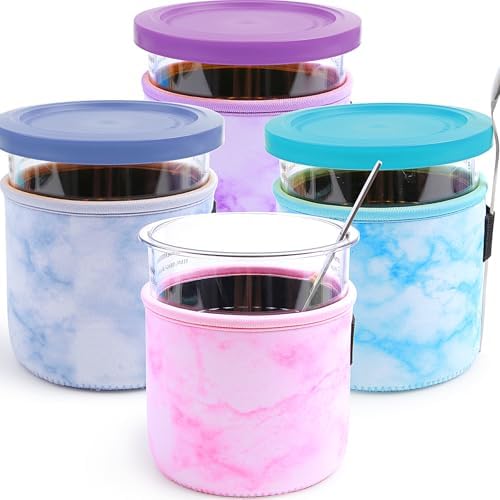
- What You Get: 4 Colorful ice cream neoprene sleeve creami(Smoke Blue, Purple, Blue, Pink) , which is attractive and look…
- Insulated Material :Are you frustrating about ice cream often melts quickly, and the containers sweat ? These ninja crea…
- Stop Condensation and Spill :You can directly put this ninja creami sleeve on the container after making the ice cream, …
Nutrition Information
- Per serving: 120 calories
- 2g fat
- 8g carbs
- 20g protein
Pro Tips
Protein Powder Matters: Whey protein creates the smoothest texture, while plant proteins can be grittier but work with extra blending time.
Temperature Test: Your base should be frozen solid enough that you can’t dent it with a spoon before processing in the Creami.
Storage Secret: Keep processed ice cream in the Creami container and re-spin for 30 seconds straight from the freezer for perfect scooping texture.
Flavor Boost: Add extracts or flavor drops during the blending stage rather than after processing for even distribution.
Consistency Fix: If your ice cream is too soft, freeze for another 2 hours and re-spin. If too hard, add 1 tablespoon liquid and re-spin.
Delicious Variations
Chocolate Protein Ice Cream
Replace vanilla protein with chocolate protein powder and add 1 tablespoon unsweetened cocoa powder. The result tastes like rich chocolate gelato with added nutrition benefits.
Peanut Butter Swirl
After the final spin, create wells in the ice cream and drizzle in 2 tablespoons warm peanut butter. Gently swirl with a knife for marbled perfection.
Berry Vanilla Protein
Add 1/2 cup frozen berries during the blending stage. The natural fruit sugars eliminate the need for additional sweetener while creating beautiful color.
Coffee Shop Style
Replace 1/4 cup almond milk with cold brew concentrate and add 1/2 teaspoon vanilla extract for a sophisticated coffee ice cream that beats any café version.
Storage Instructions
Refrigerator
This protein ice cream doesn’t store well in the refrigerator as it will become too soft and lose its scoopable texture. If accidentally thawed, refreeze for 4 hours and re-spin in the Creami to restore proper consistency.
Freezer
Store in the original Creami container for up to 1 month in the freezer. The ice cream will become very hard during storage, so let it sit at room temperature for 2-3 minutes before scooping, or better yet, run a quick 30-second re-spin cycle in your Creami for perfect texture every time.
Make-Ahead
You can prepare multiple bases at once and store them frozen for up to 3 months before processing. Make sure each container is labeled with the date and flavor. Process directly from frozen when ready to eat – no thawing required.
For food safety guidelines, visit USDA Food Safety Guidelines.
Frequently Asked Questions
Why is my Ninja Creami protein ice cream grainy?
Graininess usually comes from insufficient blending of the protein powder or using a protein powder that doesn’t dissolve well. Make sure to blend your base mixture for at least 45 seconds and consider switching to a higher-quality whey protein isolate. Some plant-based proteins naturally create more texture, so they may need an extra re-spin cycle with a tablespoon of liquid.
Can I use any type of milk for this recipe?
Yes, but results vary significantly. Whole milk creates the creamiest texture but adds calories. Oat milk works beautifully and adds natural sweetness. Skim milk works but may need extra sweetener. Coconut milk from a can creates incredibly rich ice cream but will have a strong coconut flavor. Avoid very thin milk alternatives as they create icy textures.
How long does the mixture need to freeze before processing?
The mixture must freeze for a minimum of 24 hours to become completely solid throughout. Partial freezing will result in a slushy mess that won’t process properly. Test by pressing firmly on the center – it should be rock-hard with no give. In warmer freezers or humid conditions, allow up to 30 hours for complete freezing.
What should I do if my ice cream is too hard to scoop?
Hard ice cream is normal straight from the freezer. Let it sit at room temperature for 2-3 minutes to soften slightly, or run a 30-second re-spin cycle in your Ninja Creami for immediate scooping consistency. Adding an extra tablespoon of liquid during the next re-spin will create a softer texture that’s easier to scoop.
More Recipes You Will Love
👉 Perfect Strawberry Shortcake Recipe (Fluffy Biscuits)
👉 Perfect Tiramisu Recipe (Classic Italian)
👉 Perfect Brunch Board Recipe (Ultimate Grazing Guide)
This three-ingredient Ninja Creami protein ice cream proves that healthy desserts don’t require sacrifice. With 20 grams of protein per serving and a texture that rivals premium gelato, it’s become my go-to treat for satisfying sweet cravings guilt-free. Try this base recipe first, then experiment with the variations to discover your perfect flavor combination. Share your favorite protein ice cream creations in the comments below!